The fourth violin position is a valuable tool when playing scales and orchestral repertoire. The third position may already feel so high up that you don’t want to think about anything that is even higher. Certainly the fourth position has some difficulty and it’s not for beginners, but by mastering it, you have another valuable tool in your arsenal. This article aims to help you understand this new position and provide exercises, as well as suggest some repertoire that will help make it easier. Before reading, be sure to check my earlier article about the third position.
Is There a fourth Position on the Violin?
Yes, there is a fourth position on the violin, and it is part of the violin canon studies! It starts where the first position ends – with the B note on the E string, E note on the A string, A note on the D string, and D note on the G string. The fourth position is located right above the third and not only is there a fourth position but also a fifth and above. Some would argue that there are 14 positions on the violin, though this is a theoretical number as it is rare to play that high for more than an instant. Violinists usually learn up to the sixth position and if higher notes are needed, we’re talking about fingering rather than playing in a given position.
Benefits of Learning the Fourth Position on the Violin
Wandering that high up will make you question if you really need to know these positions. Knowing the positions above the third gives you new avenues to apply smart fingering. Orchestral repertoire sometimes requires the fourth position, as does Paganini. If you’re only interested in playing folk music or just some easy violin songs and pieces, it might seem like you’re never going to use this position. While that might be true, it never hurts to expand your knowledge of the instrument so as to get a better understanding. Studying technique you’re never going to use might seem like a waste of time, but the reality is that it makes you even better at the things you already know. So to sum up, the benefits of learning the fourth position are:
- Higher notes on the E string
- You can apply smart fingering when it is needed
- More repertoire available
- Better understanding of the violin and its positions
- Easier transitions – this may come in handy when otherwise you would have to go to the fifth position or go to a lower note when you’re in the fifth position
What Are the Notes in the Fourth Position?
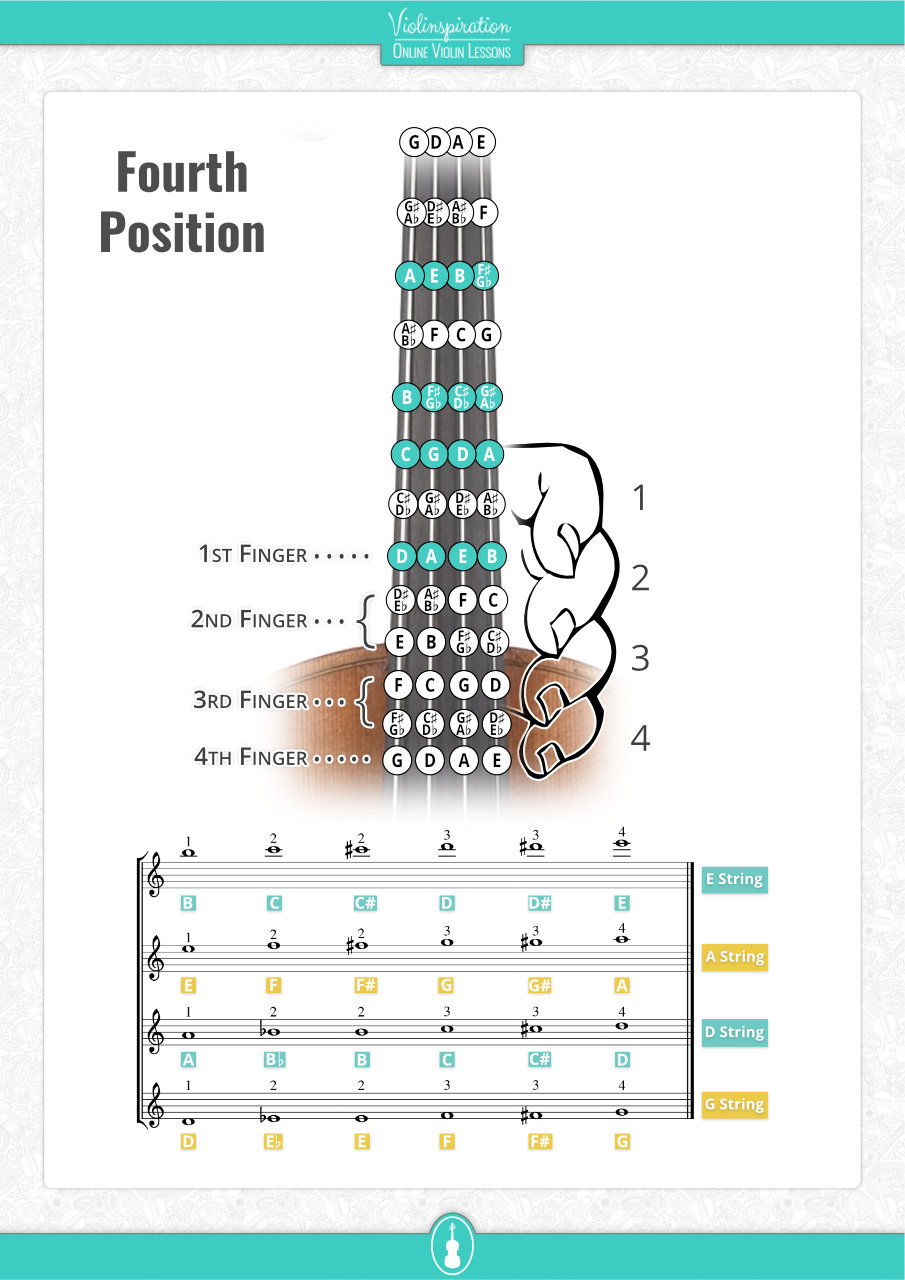
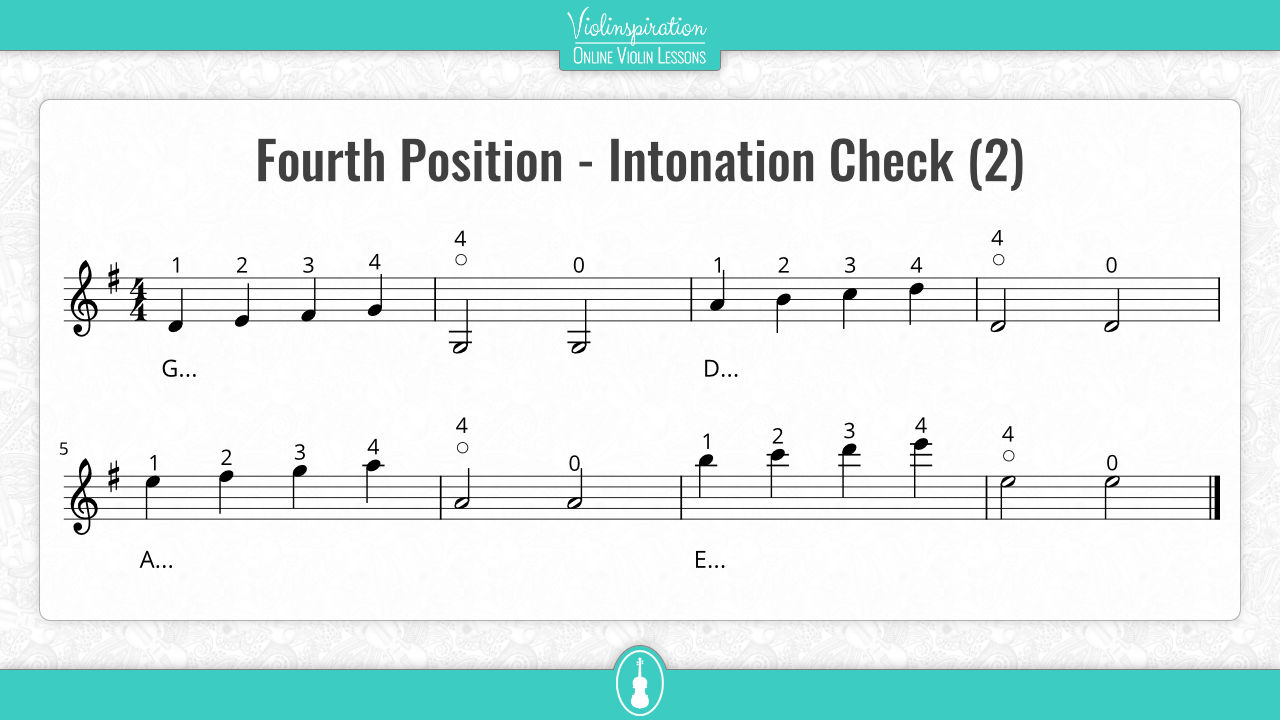
The violin’s fourth position starts where the first position ends: you put your first finger where your fourth finger was, when placed in the first position. This makes it easy to check the intonation as the first finger on the G, D and A string resonates with the next open string. The fourth finger in the position reaches the octave above the open string so you can also check it with the natural harmonic. Here are all the notes you can play in the fourth position on each string (without finger extensions):
- G string – D, D#/Eb, E, F, F#/Gb, G
- D string – A, A#/Bb, B, C, C#/Db, D
- A string – E, F, F#/Gb, G, G#/Ab, A
- E string – B, C, C#/Db, D, D#/Eb, E
When to Start Practicing the Fourth Position
Before starting to learn the fourth position, you will need good basics so, after mastering the first position the best to learn next is the third position, which is the next most commonly used position. After these basic positions, you can learn the second position, then the fourth and fifth. This way you’ll gain some experience before going to the harder parts of playing in positions higher than first. Another approach is to go straight to the second position, after the first, and continue in order. This is an unusual tactic but one which a few violin teachers prefer. Basically, if you have mastered the first three positions, you can go and try any other; the order is not important though it will help you remember them if you study the higher positions in order. In any case, if you have reached this level, it shouldn’t be that difficult to start working on a new position.
Posture in the Fourth Violin Position
If you have already studied the fifth position, the posture in the fourth position is not much different. Due to the intervals between notes becoming smaller and smaller as you go higher, the two positions are very close.
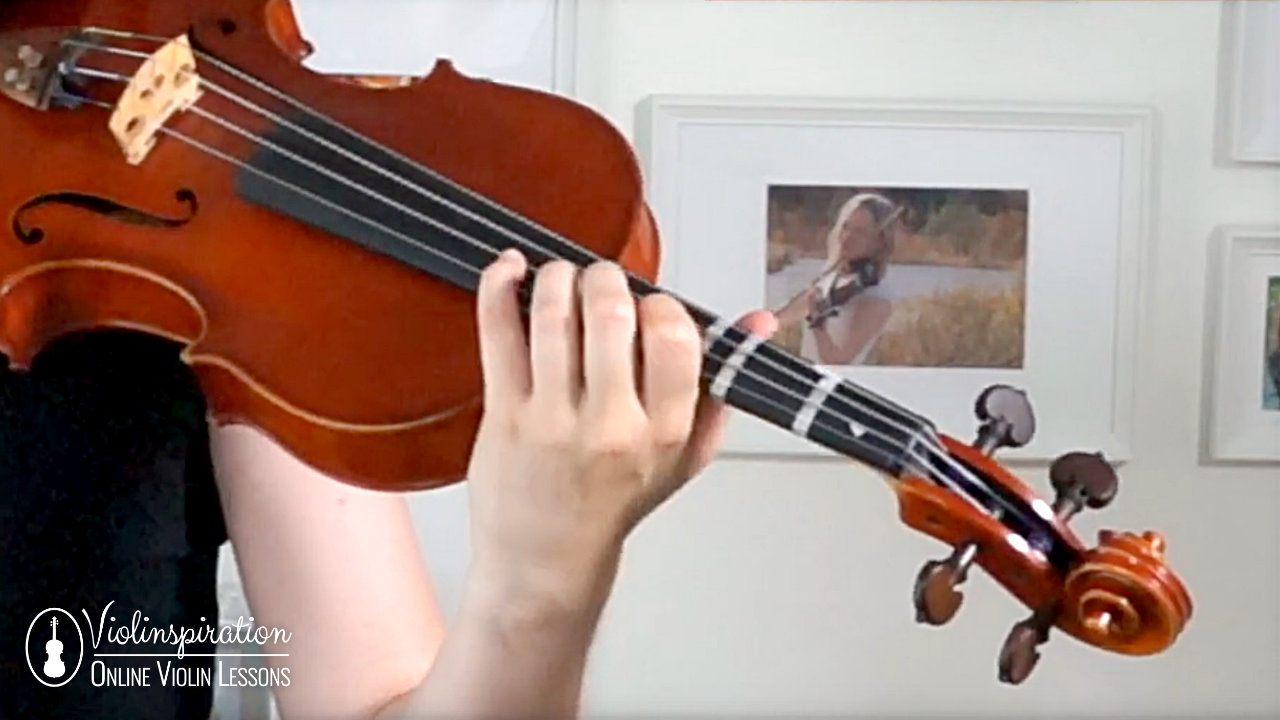
1. Touch the Body of the Violin with Your Left Hand
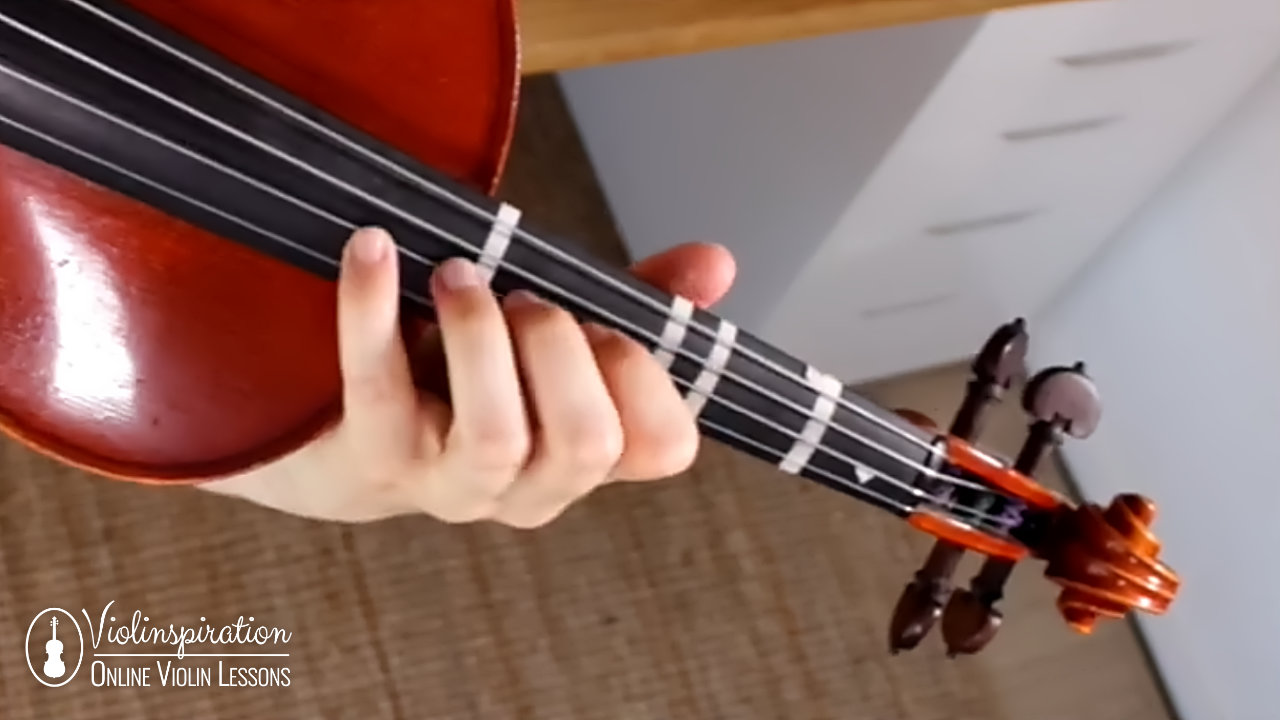
In the fourth position, your palm touches the body of the violin. Be sure to have your hand slightly higher, especially when you’re playing the low strings, so you can use each finger with ease.
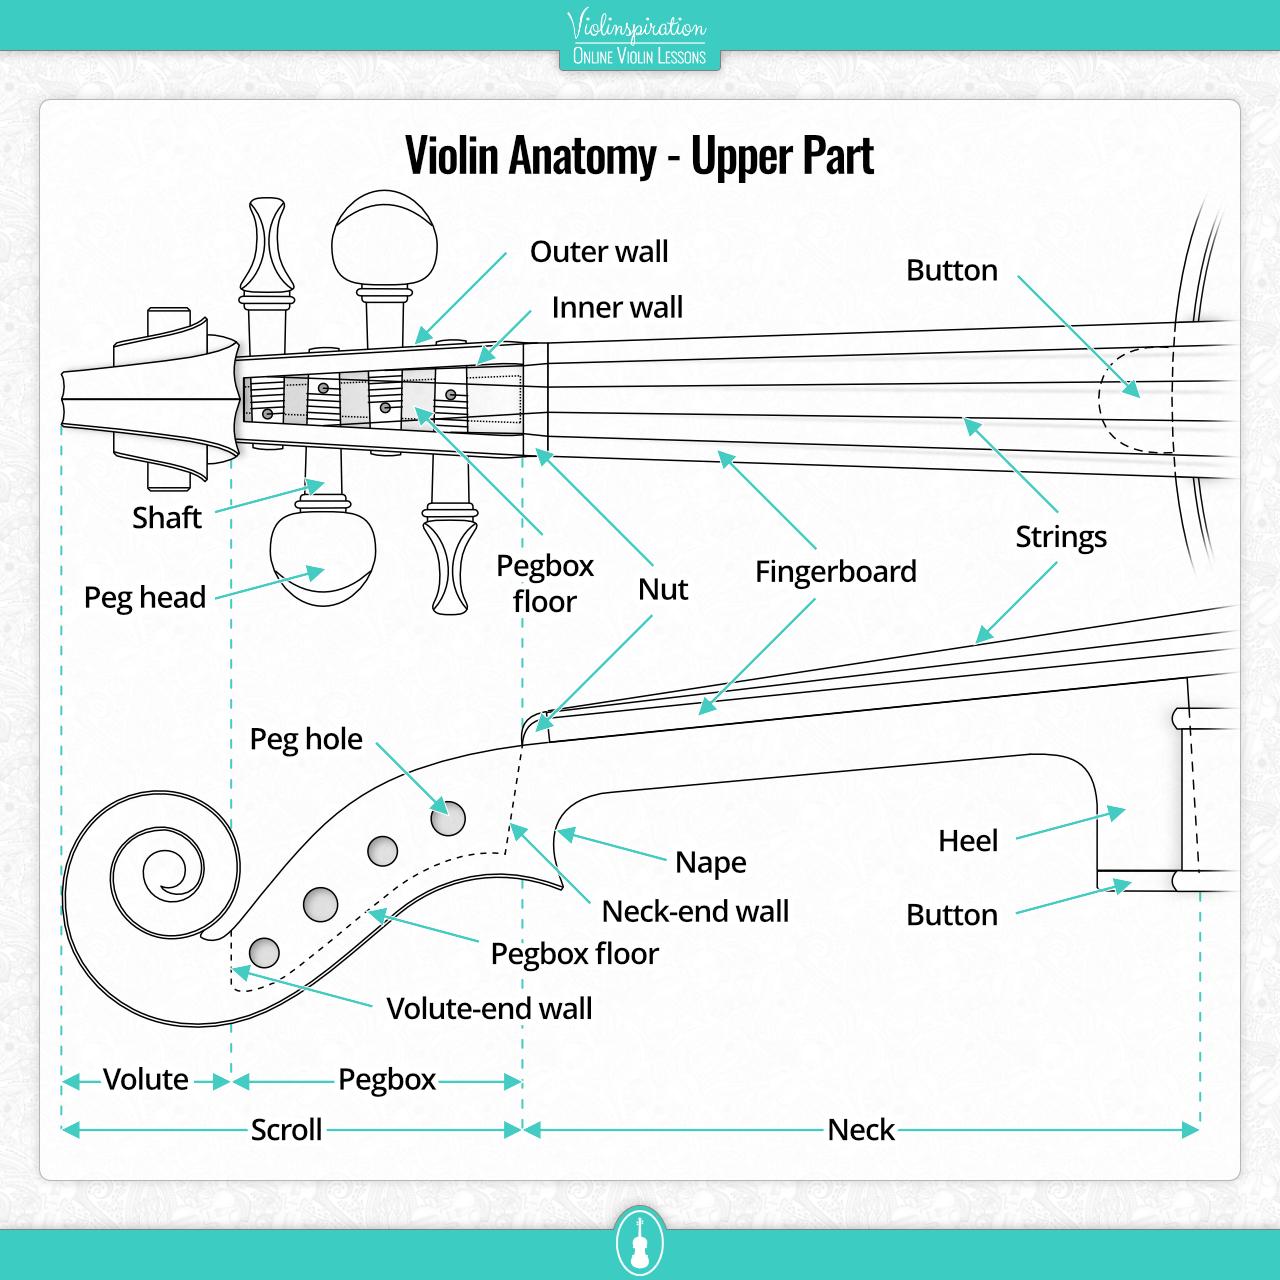
2. Hold the Neck at the Heel
Your thumb should be at the end of the neck – called the heel – and not on the violin’s back. It might feel natural to put your thumb there, but it will not help you, as your fingers won’t be able to reach the correct spot.
3. Straight Posture
Keep your back straight. Your elbow might touch your body but that’s ok – just don’t have it lean there. The correct posture will help you in applying the right amount of pressure on the bow and you’ll avoid back pain.
How Do you Play in Fourth Position on the Violin?
To find the fourth position, simply play with your first finger the note you would normally play with your fourth finger, while holding the left hand in the first position. You can try to play all the notes on a particular string and when you reach the fourth finger, shift to the fourth position. So for example, play on the G string G – A – B – C – D in the first position and then shift to the fourth position, so the first finger will be at the exact same spot your fourth finger was in. Try this on all strings.

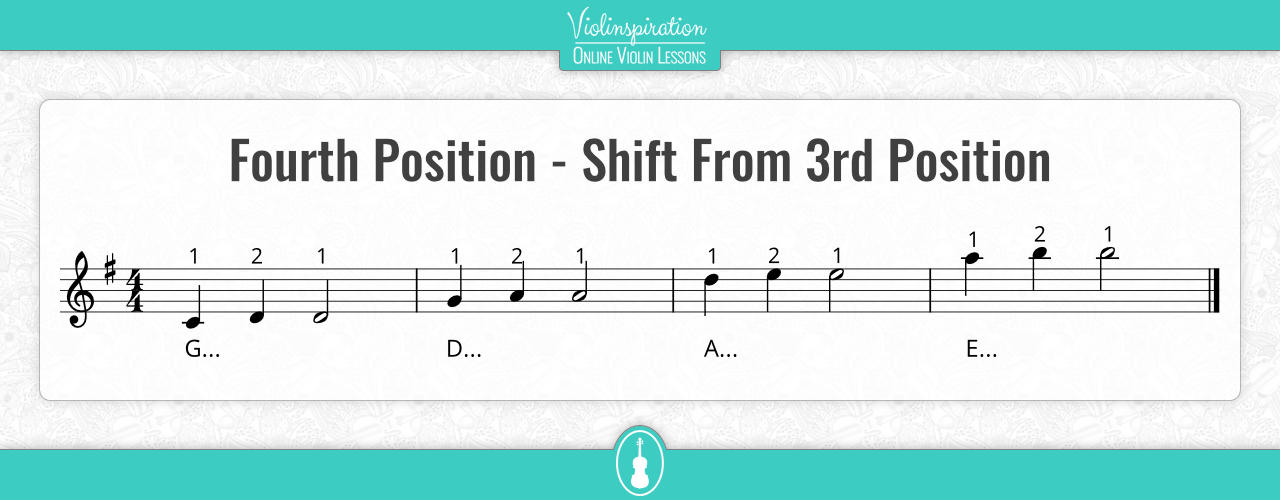
If you have mastered the third position, you can try shifting from third to fourth: play the notes with your first and second finger in the third position, then shift to the fourth position. On the G string, play C with your first finger in the third position and then D with your second finger. Then shift to the fourth position so that your first finger will be at the exact spot your second finger was on. Then repeat the exercise on other strings.
Are you playing in tune? Check by playing the first finger on any given string, then play the above open string: it should sound exactly the same! In this example, play D with your first finger, then play the open D string.
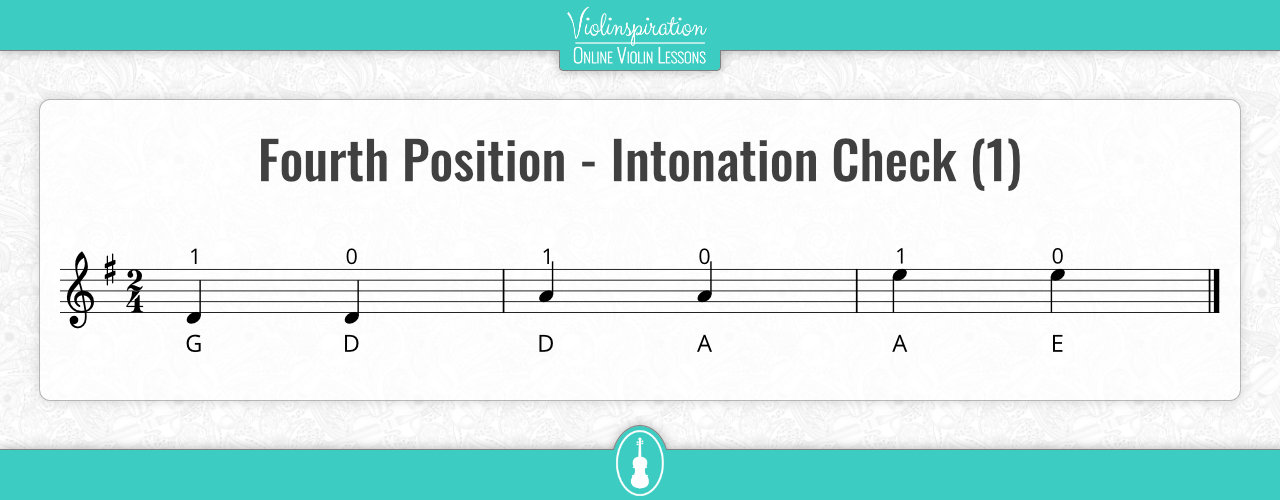
Of course, this does not apply to the E string since the violin does not have a B string. Another way of checking is with the natural harmonic. Play all the notes on a given string in the fourth position – in the example of the G string, your fourth finger should play G. Extend your finger a bit to find the natural G harmonic or play the open G string (the latter should sound an octave lower).
Shifting Exercises
After finding out where the new position is located and before doing exercises in the fourth position, you should do some shifting exercises. While it’s not that uncommon to play passages, normally you won’t stay in the fourth position for long: playing a small passage or a portion of it and then going back to the third or fifth position is very common. Of course, the above exercises will help with shifting but here are a couple more:
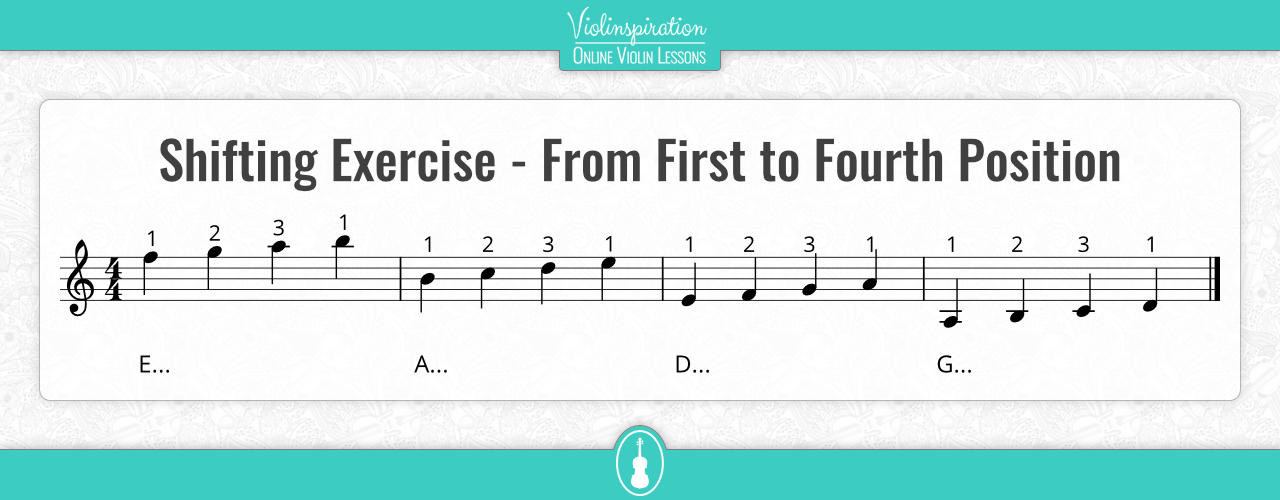
1. Shift from first to fourth position
Play the first three notes on any given string and then shift with your first finger to play the fourth note.
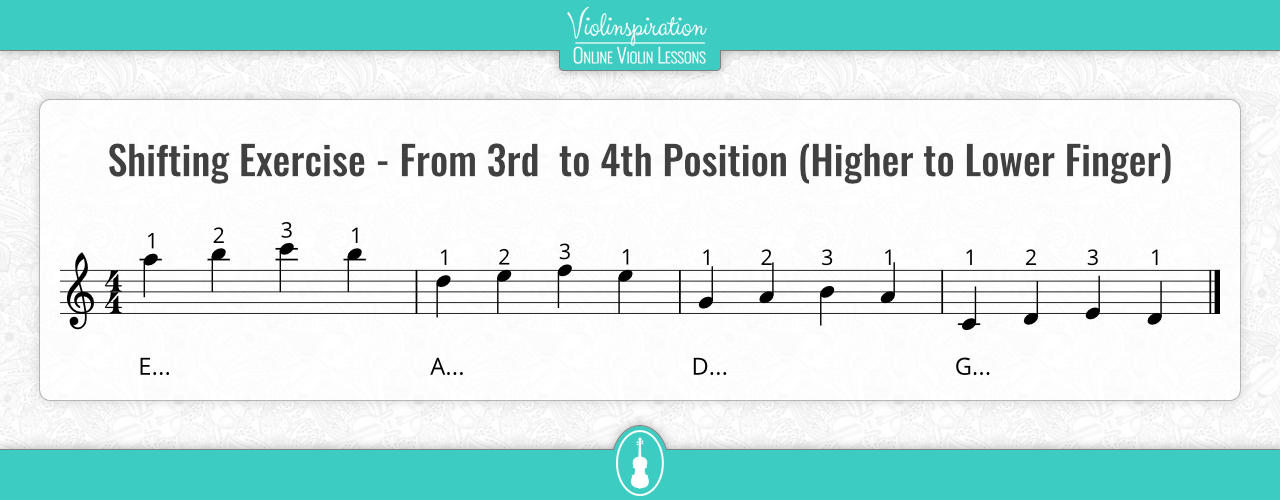
2. Shift from third to fourth position – from higher to lower finger
In the third position play the first three notes and then shift to the fourth position with your first finger.
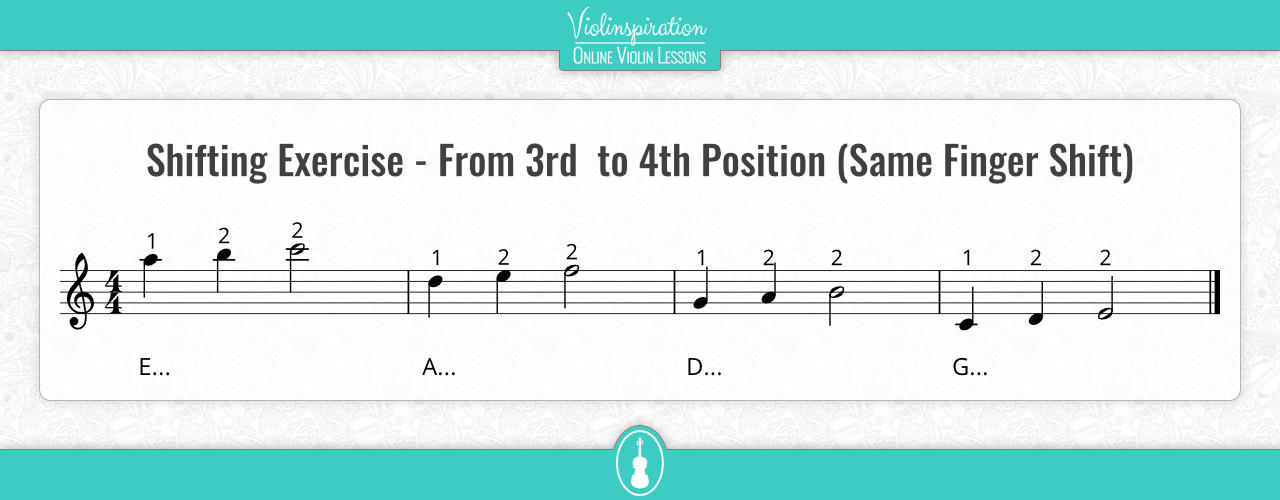
3. Shift from third to fourth position – same finger shift
Play the first two notes in the third position and then shift to the fourth position with your second finger.
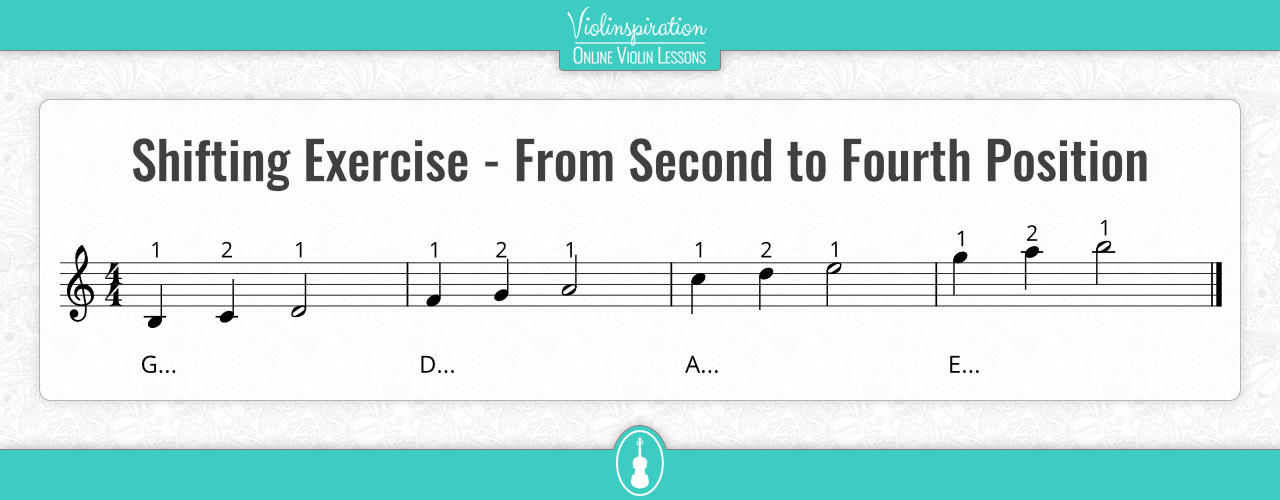
4. Shift from second to fourth position
Play in the second position the first two notes then shift to the fourth position.
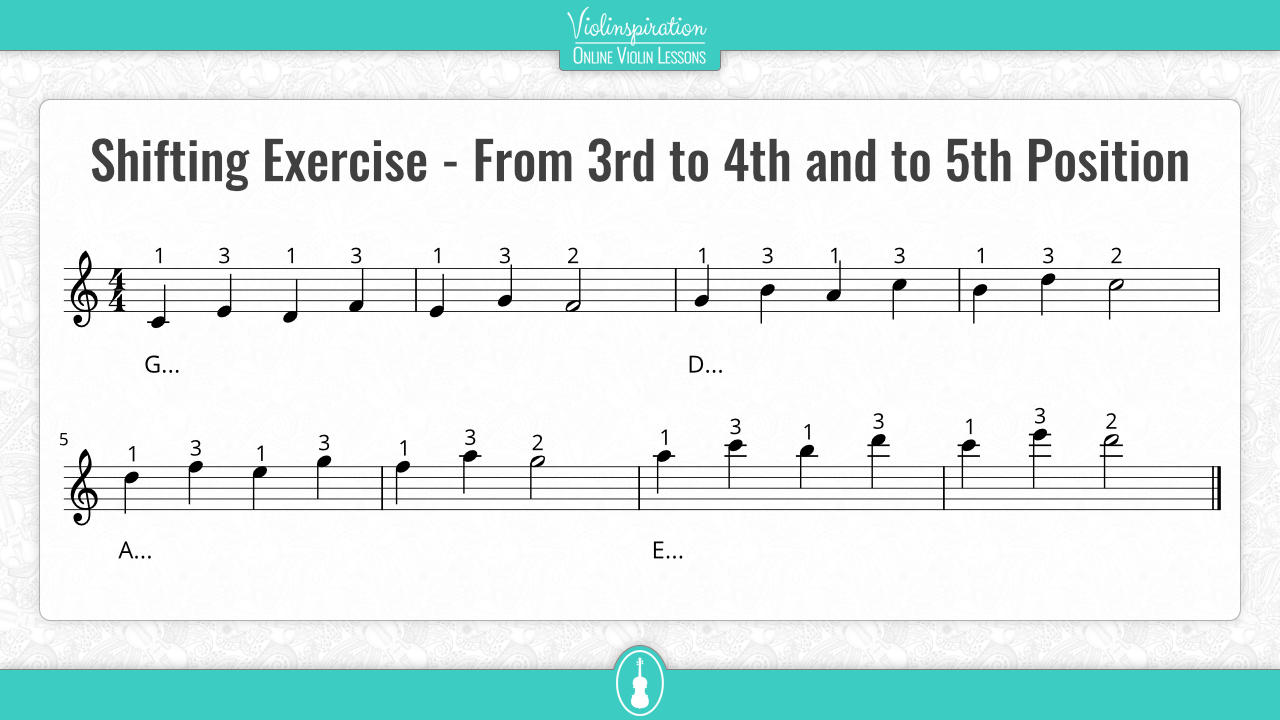
5. Challenge: shift from third to fourth and to fifth position
Skip a note as you go up: when you’re on the G string, play in the third position C and E, then in the fourth position with your first and third fingers D and F, then shift once again to reach the fifth position with your first finger and play E – G – F.
How Do you Practice the Fourth Position on the Violin?
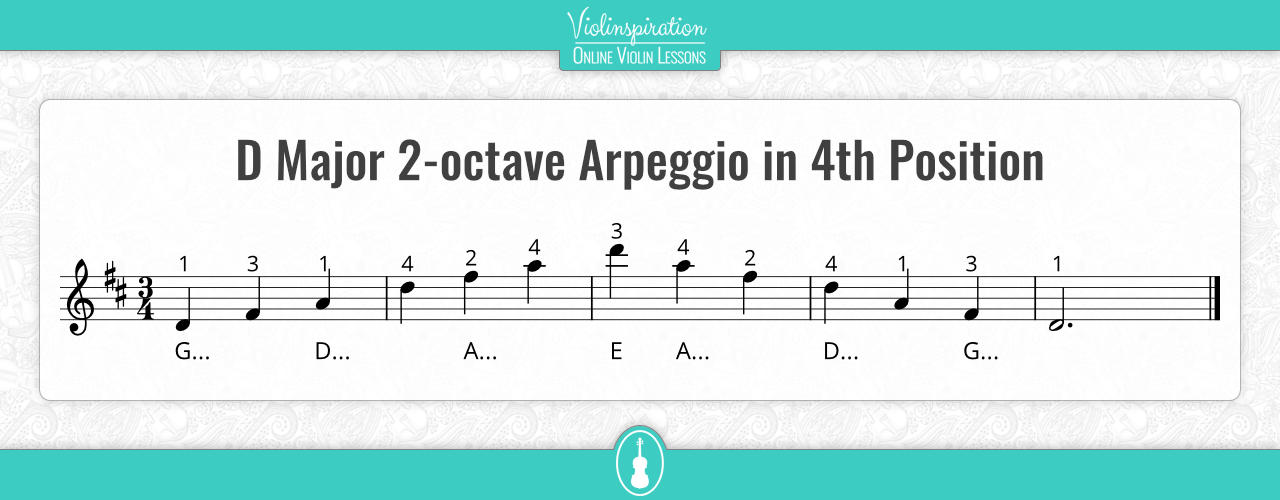
Now you know where the fourth position is located, and you have done the shifting exercises. It’s time to play something in the new position! Before any song or piece of music, you should practice scales and arpeggios. Scales will make you more comfortable with the notes in each position, and their position on the fingerboard in general. It will also help you with intonation as well as your finger dexterity. So pointing out that you have to study scales might seem repetitive, but their importance has to be underlined. First, you should try with the easy scales in the fourth position. That would be two octaves D, one octave A, one octave E. That’s both major and minor. These are all the scales that start with the first finger.

Then you can try the scales that are a bit more difficult. To play the C major or minor scale, start on the D string with your third finger and play one octave. Of course, since a major scale usually seems easier than a minor scale, you can try the latter when you feel comfortable. Of course, don’t skip arpeggios! They can provide an even better understanding of the terrain.
On the subject of skipping things, playing a scale by skipping a note and then going back to it is a very good exercise. This is called broken thirds. So to cover the whole position, play the D major (or minor) and back. That means it should go D – F# – E – G – F# – A – etc.
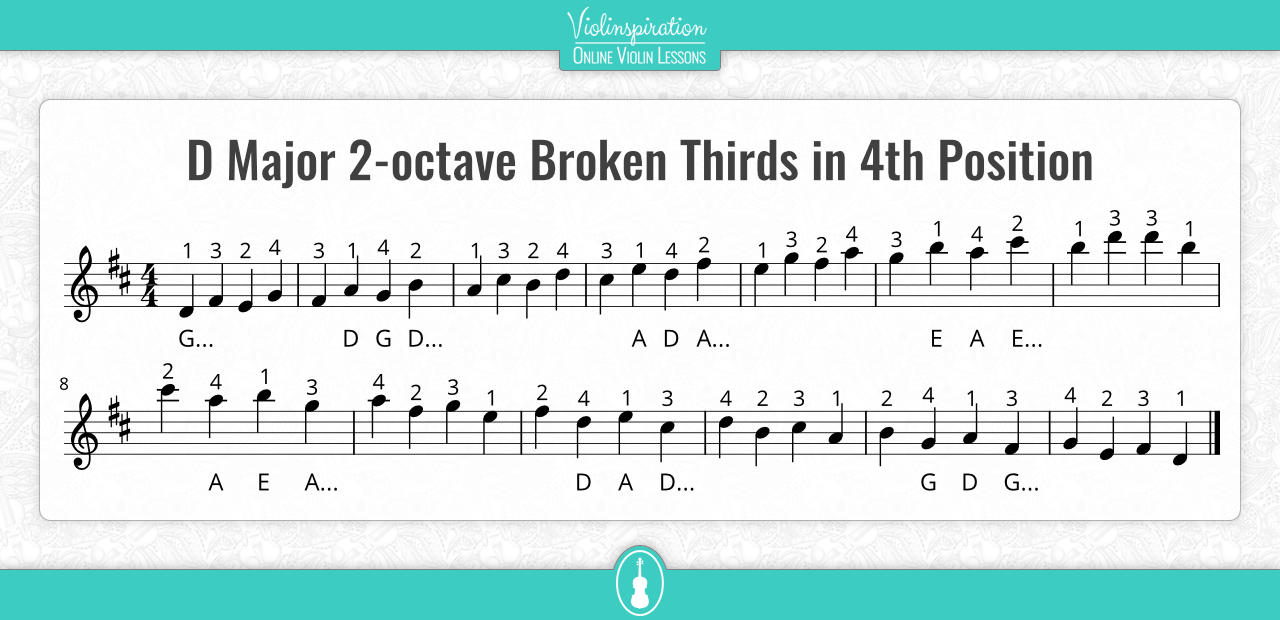
Download the booklet with all the listed scales and exercises here:
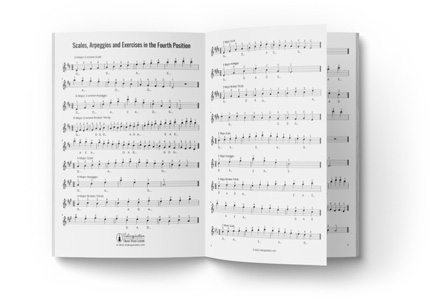
4th Position Scales, Arpegios and Broken Thirds Exercises
Free Violin Sheet Music
Five Tips for Mastering the Fourth Position on the Violin
Here are a few tips for mastering the position and to get ready for any other challenges like etudes or music pieces that include the fourth position:
1. Play scales
As a warm-up, practice scales and arpeggios. It always helps and you can never play enough of them.
2. Be aware of your posture
Always be aware of your posture. Be careful of your left hand; you should not apply pressure at all. Keep in mind that your thumb should not be on the violin’s back. Everything you’ve learned about the left-hand technique is still relevant.
3. Maintain correct bow hold and pressure
Don’t lose sight of your right hand. Playing in the high positions requires even more focus on the bow than usual! Make sure your sound is as clear as possible and remember to adjust the right hand and the way it moves whenever the sound suffers.
4. Pay attention to the intonation
Much like in the fifth and other positions, intervals are smaller than in the first position, so be careful about playing in tune.
5. Be persistent and patient
Practice everything, and keep practicing when things seem difficult. If something is not sounding right, be more persistent. Taking breaks or studying something else to clear your mind and then returning is always a clever tactic to not get fatigued. Be patient; there’s nothing you can’t play if you practice enough! With these tips as well as the exercises before them, you should be ready to start practicing some etudes, concertos, and other pieces of music. If you go step by step and practice with patience, everything else will seem much easier!
What to Practice in the Fourth Position on the Violin
Scales and Etudes
Here’s a list of scale studies and etudes that deal with the fourth position. While you can play scales without a specific book, these are highly recommended as they cover more ground than a regular scale.
Jan Hřímalý – Scale-Studies for Violin
A great book for intermediate students to get to know the scales, the various positions and different bowing techniques. Advanced students can find it very interesting to return to this one from time to time as it can be perfect for warm-up exercises.
Scale-Studies for Violin by Jan Hřímalý
Free Violin Sheet Music
Carl Flesch – Das Skalensystem
Probably the best scale system and one I’ve mentioned a lot! This is only for advanced students, as it dedicates several pages for each scale, examining thoroughly every possible scenario. You’ll get to play a scale on all strings and in all positions, double stops, broken thirds, arpeggios, and more. This book will help you in many ways, and not only with mastering the positions, so definitely give it a try if you’re ready for advanced exercises.

Carl Flesch – Das Skalensystem
Free Violin Sheet Music
Henry Schradieck – School of Violin Technics
Schradieck’s exercises will help you develop your technique; the first book has to do with the left hand. The book offers exercises in the fourth position in Chapters 12 and 13, and then the fourth position can be found in several exercises while passing to other positions. A very good book that can be either a companion or a preparation for Ševčík.

School of Violin Techniques by Henry Schradieck
Free Violin Sheet Music
Otakar Ševčík
Ševčík’s bibliography is a treasure. He even has what you could describe as “cheat sheets” for various concertos, where he deconstructs each passage and suggests exercises for it. His studies are really annoying but I can’t stress enough how helpful they can be, and you can always return to them for warm-up. The fourth position can be found in the books “School of Violin Technique Part 2,” “Violin Method for Beginners Part 6,” “Studies Preparatory to the Shake Part 2,” and “Op 8: Changes of Position and Preparatory Scale.”

School of Violin Technique Op. 1, part 2 by Otakar Ševčík
Free Violin Sheet Music
Heinrich Ernst Kayser – 36 Violin Studies, Op.20
Almost everyone will play at least a couple of Kayser etudes as a student. They are great for developing your technique, even though they lack musicality compared to others. The fourth position can be found in passing in several etudes, such as No. 18 and 21.

36 Violin Studies, Op. 20 by Heinrich Ernst Kayser
Free Violin Sheet Music
Jacques Féréol Mazas – Etudes, Op.36
Both Mazas’ and Kayser’s etudes are equally important. The Mazas etudes are rich in musicality while incorporating several different techniques in a clever manner that fools the brain into believing that you’re playing a musical piece and not an exercise. The fourth position is present from the first etude, though for the most part for only a few notes. But it’s not common to encounter lengthy fourth position passages, so you can say the ones in the etudes are in their “natural environment.”

Etudes, Op. 36 (book 1 & 2) by Jacques Féréol Mazas
Free Violin Sheet Music
Rodolphe Kreutzer – Études ou caprices
Many violinists consider this book to be “the bible” for violinists. It is one of the most important etude books and all violinists have studied it. The fourth position is there from the beginning, at first in small doses such as in etudes like No 2, 7, and 8.

Rodolphe Kreutzer – 40 Études ou caprices
Free Violin Sheet Music
Federigo Fiorillo – 36 Caprices for Violin, Op.3
In any other list that mentions violin etudes, Fiorillo would have a place. However, for some reason, this book is not heavy on the fourth position, appearing only slightly in some of the etudes. However, these are all challengingly interesting etudes that you should check regardless.
36 Études or Caprices by Fiorillo
Free Violin Sheet Music
Concertos, Orchestral Repertoire, etc
Here are a few examples of music that use the fourth position. Of course, almost all the examples can be played in other positions too. If you are advanced enough, you can decide for yourself which way is easier for you, but I think the fourth position will help you a lot in these examples.
Pyotr Tchaikovsky – Italian Capriccio, Op.45
The first movement, Vln1, measures 128–137 are a great example of a passage in the fourth position that you can change maybe for a couple of notes to the third position and back again.
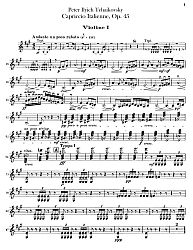
Italian Capriccio, Op.45 by Pyotr Tchaikovsky
Free Violin Sheet Music
Wolfgang Amadeus Mozart – Clarinet Quintet in A major, K.581
It is not uncommon that a lot of passages look like they were written for the first position, though in the fourth position, despite your possible initial hesitation to avoid higher positions, you will find they sound smoother and are more comfortable to play. An example will be this quintet, second page, second row, vln1. Similarly, on the final row of the page, by avoiding the first position, you’re avoiding open strings.
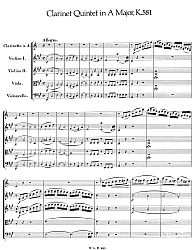
Mozart – Clarinet Quintet in A major, K.581
Free Violin Sheet Music
Jacques Offenbach – La belle Hélène
Here’s a passage (intro) that can be benefitted from playing in the fourth position. It could be played in the third position, but you’ll have to extend your little finger to reach the high E. Similarly, it could be played starting in the second position so as to not change strings, but you’ll have to change positions regularly. For better results, change to the third position for that final D – E.
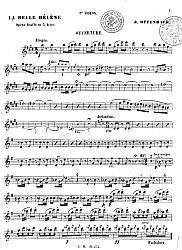
Jacques Offenbach – La belle Hélène
Free Violin Sheet Music
Niccolò Paganini – 24 Caprices for Solo Violin, Op.1
Let’s talk for a moment about the “holy grail” of the violin repertoire. Every violinist will have wanted to play at least a couple if not all of the caprices – probably a lot of violinists started playing the instrument because of one of these. They are some amazing pieces of music that are extremely virtuosic at the same time. It would not be an exaggeration to say that in almost all of them, there is the use of the fourth position, some extensively and others in passing only. In any case, since the caprices make use of all the known violin techniques of the time, it goes without saying that you need to have everything mastered before tackling them – including the fourth position. Certainly, you can play some without it, but it will prove very useful.
24 Caprices by Paganini
Free Violin Sheet Music
Final Note
Mastering all or most of the violin positions can be a very useful tool in your musical arsenal. You will be able to choose the best way to interpret a passage and not be troubled by changing strings or uncomfortable fingering positions. The fourth position in particular is great when moving between the third and fifth position, and there are several instances where you can play passages comfortably in it.
