Changing violin strings consists of two parts. Removing the old strings – one string at a time – and replacing them with new ones. NEVER remove all the strings at once. After you changed one string, you can repeat the process for the other ones.
The reason for this is that the bridge is only held in place by the strings. If you remove all the strings at once, there will be nothing holding the bridge and so it will collapse. And unless you know what you are doing, you won’t be able to put it back. On rare occasions, even the soundpost can become loose, which is definitely something you cannot fix yourself.
If you are not in a hurry to have all the strings replaced, you might consider changing one string only and waiting for a day or two until the string stops settling and going out of tune. Unless you break them in, new strings keep stretching over the days after fitting, and if you’ve replaced all 4 then the bridge can slip as the strings stretch. So if you do change them all, make sure the feet of the bridge lie flat against the wood of the violin.
9 Steps on How to Change Violin Strings
I wanted to break this down enough for a complete beginner to be able to follow it. This means it looks like a lot of steps, but don’t worry, it isn’t as hard as it seems.
When you start this process, you should already have a new set of strings. If you need advice on buying them, check out my blog post “6 Things to Consider When Choosing Violin Strings.”
Step 1. Remove the Old String
If you’re replacing all four of them, slightly loosen each string before completely removing one string only. Slowly turn the peg to release the tension, while holding the string with the other hand. Be careful it doesn’t snap back at you.
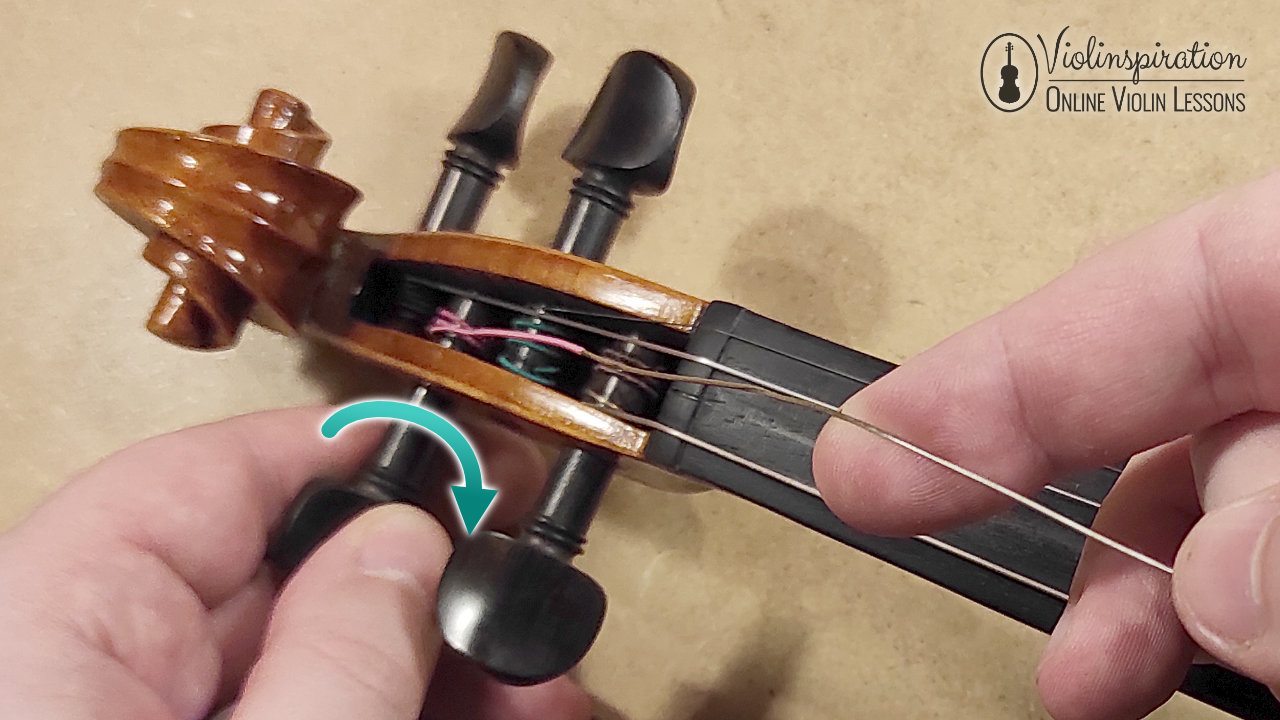
Once the peg is loose, pull the string out of it and then remove the other end – ball or loop. Save the old string in an envelope, coiled up, with a date of when you removed it. It can come in handy as a replacement if you break a string and don’t have a new one yet.

Step 2. Lubricate Tuning Peg With Peg Paste
Check whether the peg is clean, wipe it off if necessary. Then rub some peg paste onto it. This can sometimes be called by other names, such as peg soap, peg wax, or peg compound. Peg paste comes in a small tube just like lipstick. Rub it all around the peg before inserting it into the hole. This will help you turn the peg when tuning the violin.
Here is one I often use: W. E. Hill & Sons Original Hill Pegsoap.
Step 3. Lubricate the Bridge and the Nut (optional)
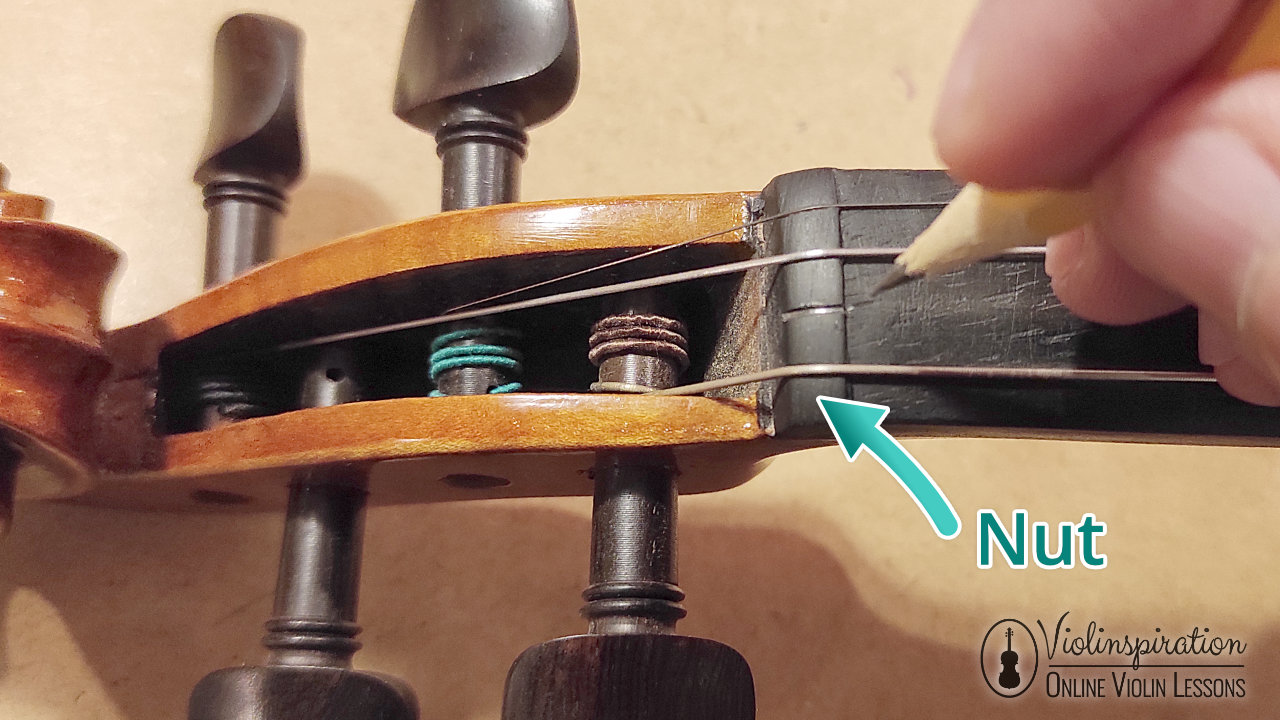
There is no special product for this and it isn’t always necessary, but you can rub the lead of a pencil into the groove on the bridge and into the groove on the violin nut. The nut is the slightly raised edge between the fingerboard and the pegbox, it has grooves in it to hold each string in place.

Sometimes the E-string comes with a bridge protector – a small plastic tube that’s already on the string. If it is present, you can skip this step, as the tube will protect and also allow for motion at the bridge. You can still lubricate the nut.
Step 4. Find the Right Replacement String
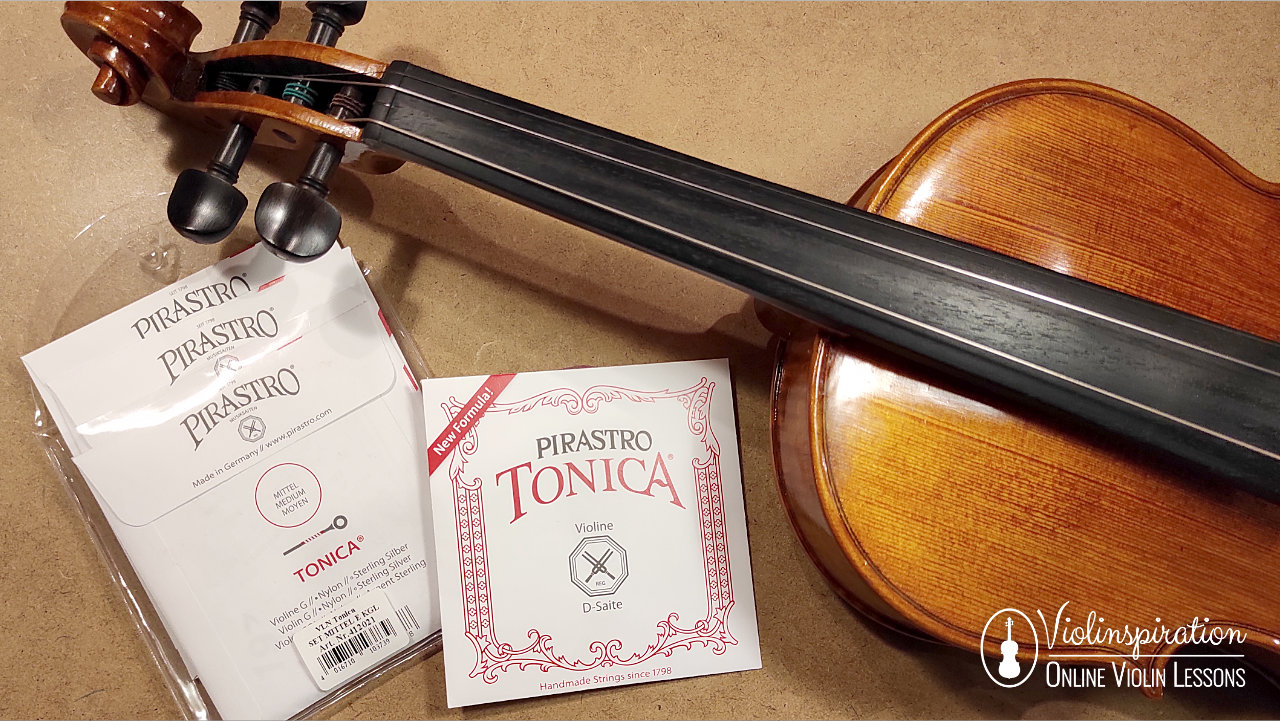
Ensure that you have the correct string, the same pitch as the one you just removed, e.g. an A for an A, etc. This may seem obvious, but it is all too easy to lose track of things when trying to do something new. Also make sure you’re using brand new strings, as strings go off even if they have never been used and were kept in their packaging. They usually have a shelf life of three months or so.
Step 5. Thread String Through Peg
Insert the peg into the hole from the outside, until the small hole in the peg is visible on the inside of the pegbox.

Poke the end of the string through the small hole in the peg. Allow a small amount to stick out on the other side, maybe just under an inch (2cm) or a bit more. The length of the string coming through will determine the angle of the peg once the string is tuned. If later on you want to adjust this angle, you can unwind the string and change how much of it sticks out. For now, what matters is that there is enough for the string to not slip out of the peg.
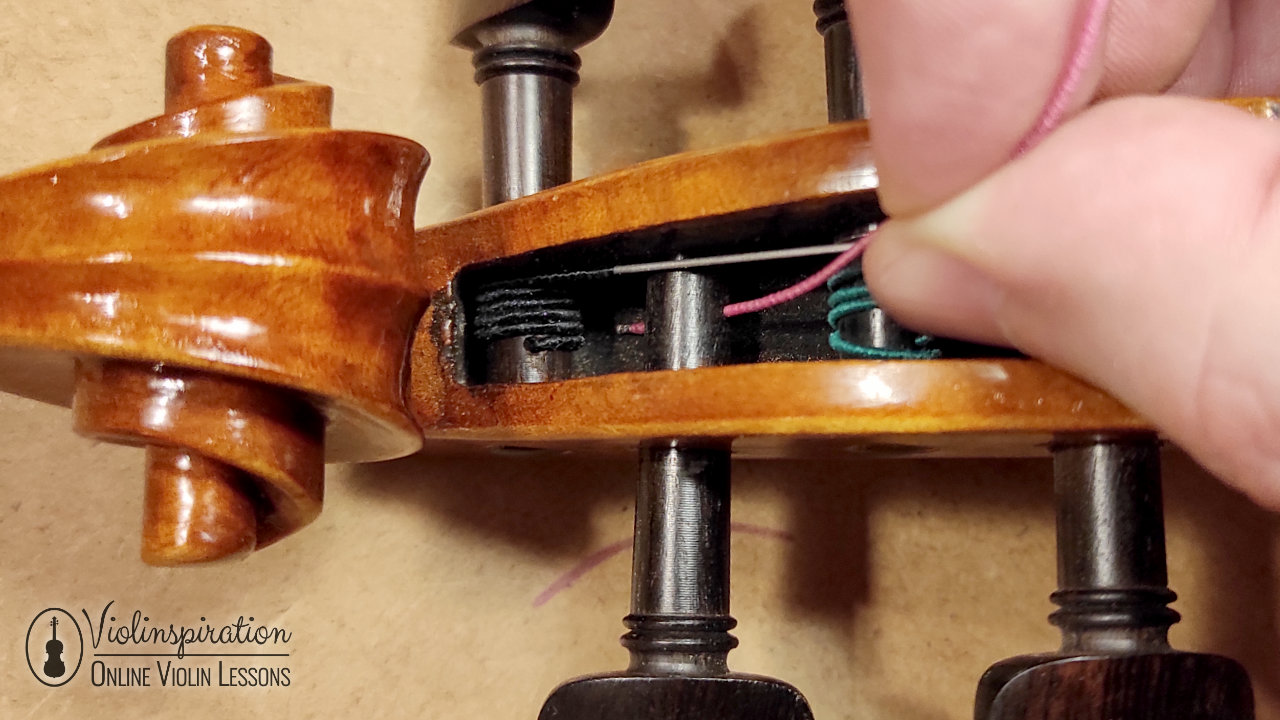
Turn the peg in the direction of the back of the violin.

As you do this, let the newly wound string go over the bit you left sticking out, so it holds it down. Continue to wind the string in such a way that the later bits go between the first loop and the wood of the pegbox. This will create tension that will keep the peg from unwinding and pulling out of the pegbox.

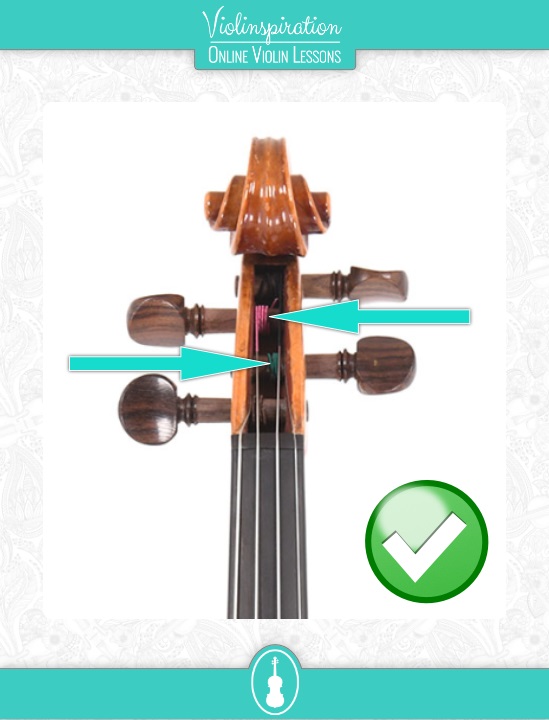
Step 6. Insert the Ball End Into the Tailpiece
Once you have wound enough of the string around the peg so it is secure, but not too much, insert the ball end of the string into the tailpiece.
Strings can also come with a hook end, which has its own adjuster, but for most users, it’s easier and cheaper to use strings with a ball end.
If you are using fine tuners, the ball hooks in between the two prongs of the fine tuner. Otherwise, it slides into the hole in the tailpiece. You may need to use something like the tip of a pencil to push the end of the string into the hole.
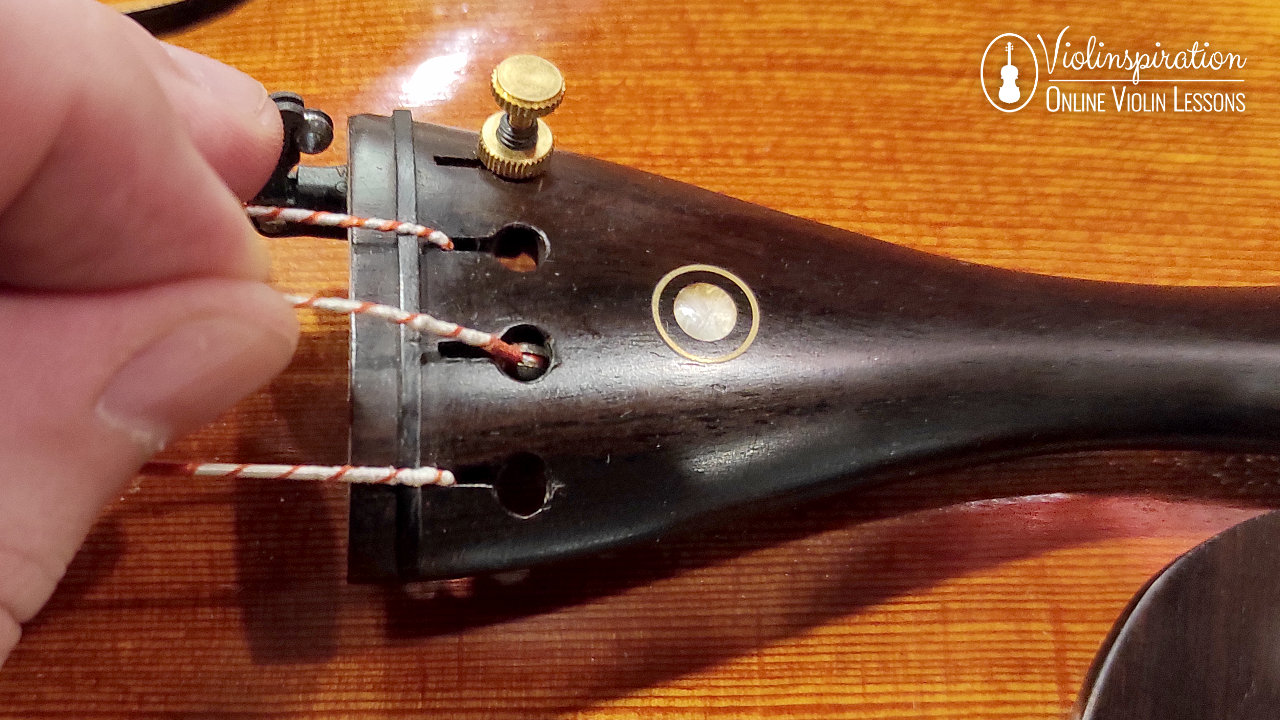
Step 7. Reduce the Slack
At this point, you should have a string that is attached at both ends but still hangs relatively loose on the body of the violin.
Holding the loose string with one finger, so it’s tight, which will ensure the ball end stays in its place, as you gently wind the string further to take off the slack. Do this slowly, so you can guide the string into the relevant groove on each end.

If this is the E-string and your string has a bridge protector, now you need to make sure this tube lands on the groove in the bridge. Tighten the string further, just until the slack is removed, and the string is secure.

Tune the string to roughly the right pitch. You can either check this using a tuner app, online tuner, electric tuner, or by playing the right note on a piano or tuner fork.
If you need help in tuning, read my two posts about this topic:
- How to Tune a Violin as a Beginner
- How to Tune A Violin with The Pegs: A Simple Guide – if you don’t have fine tuners
Whatever you do, perform this step slowly, so as not to break a string from over-tightening it.
Step 8. Check if the Bridge is Straight
When the string is more or less in tune, we need to check if the bridge is still straight. No matter how carefully we fit the new strings, the bridge can still go out of alignment. Make sure it is sitting firmly and flatly on the wood, and it goes across the body between the f-hole notches, not diagonally.
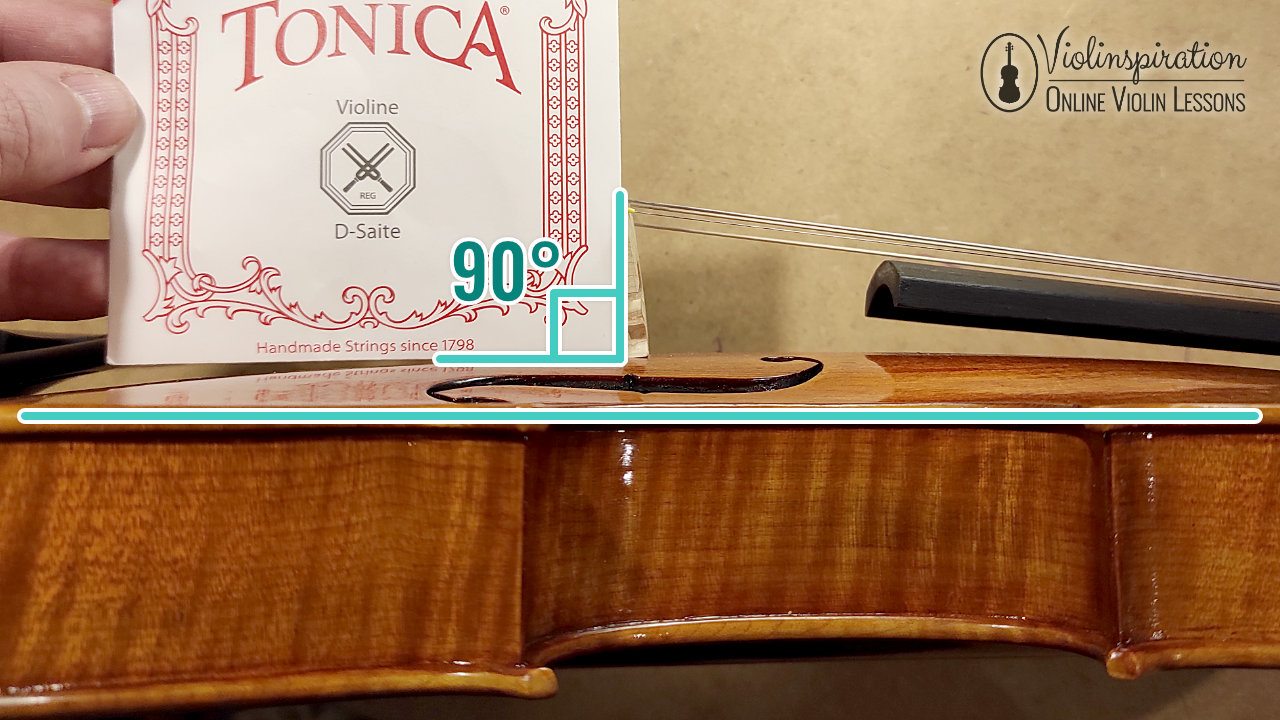
Step 9. Final Tuning
Now you can tune the string to its proper pitch, finishing with the fine tuners if you have them. Strings will take anything from 3 to 7 days to settle fully. During this time they will sound strange and go out of tune quite often. Readjust the tuning when needed.
Troubleshooting
Sometimes things go wrong. In this section, I address some of the most frequently encountered issues and questions I get asked.
My New Strings Sound Horrible
This is normal in the beginning. The best solution is the simplest: play the strings, re-tune when needed and after a few days they will sound wonderful.
The Ball End Doesn’t Want to Slide Into the Hole in the Tailpiece
Use the tip of a pencil to gently push it into the narrow gap above the hole. If the string is too thick for the narrow slot, then the gap needs to be enlarged or the tailpiece changed to one that can accommodate this type of string. This can happen if you have changed to a different type of string, for example synthetic.
When Reducing the Slack, the String Keeps Coming Out of the Tailpiece
Place the end of the string into the tailpiece, and place your finger under the string, gently holding it up to take the slack out as you slowly turn the peg. Let your finger go down as the string gets tighter.
The Peg Keeps Slipping
Make sure you have used enough peg paste. Push the peg further into the hole as you’re turning it. If none of this works, check whether the surface of the peg feels really smooth, which can happen with extensive use. You might need to make it a bit rougher using fine sandpaper.
The String Doesn’t Stay in the Peg
Did you leave enough length sticking out behind the hole? Did you cross the string over this? If the answer is yes to both, and the string still keeps coming out, maybe the hole in the peg is too big, and you need a luthier to change the pegs. (This shouldn’t be the case if your previous strings were fine.)
I Broke a String While Fitting it
This is usually the result of over-tightening. If you follow the instructions and don’t tighten it further than the pitch it is supposed to be, this shouldn’t happen. If it does, you will have to get a new string and start again. However painful this is, and no matter how expensive they are, it’s not possible to reuse broken strings.
Fine Tuners are Too Stiff
The screws need to be removed, cleaned, and lubricated. If there is visible dirt on them, you can remove it with a dry toothbrush. Once cleaned, there are various things you can use. Light lubricating oil, vaseline, pencil lead, dry soap, and WD40 lubricate are often suggested.
The standard WD40 is not really a lubricating oil, the WD stands for Water Displacement, and in practice, while it has anti-corrosion properties, it attracts dust and dirt, so I wouldn’t use it. There is WD40 lubricate, which is more suitable.
Do not spray the lubricant on the fine tuners while still in place as you could damage the violin. Remove the screws and brush them with a small amount only. Make sure to wipe the excess of it off before reinserting the screws.
Violin Makes a Rattling Sound After Changing Strings
Depending on where the sound is coming from, it could be a loose string protector (the small plastic tube), loose fine tuners, or the strings lying too close to the fingerboard. This last one happens when the tension in the strings is low enough to leave the string touching the fingerboard. Strings come in different tension varieties, so it could be because of that. It is also possible that the nut has worn too low, which would need the attention of a luthier.
FAQ
Is it hard to change violin strings?
Once you’ve changed the strings a few times, it is not hard at all. It may feel like that at the beginning. For this reason, it may be helpful to see it done by someone else first. If you feel uncomfortable doing it alone, ask your teacher, staff at the music shop, or a fellow string player to show you how to do it.
Can you change violin strings yourself?
Yes, you can change violin strings on your own. You just have to be careful and follow the instructions step by step. If it’s your first time, it can also be a good idea to ask for help from someone like your teacher. A professional can help guide you through the steps while you’re doing them.
Don’t get discouraged if it takes a lot of time and effort. Once you’ve done it a few times, it will become second nature.
In what order do you change the strings on a violin?
Usually, people change the strings on a violin starting with the G string and move across to finish with the E string. However, you can change them in any order. You may also find that the E string needs replacing much more often than the other strings. They are also more likely to break.
Should I change all violin strings at once?
You may change all violin strings at once but you should NEVER remove all the strings at the same time. You can also wait a day or two between changing each string, so the bridge doesn’t move as the strings settle. However, it is common practice to replace all four strings in one go, as long as you take off one string at a time.
How much does it cost to restring a violin?
In addition to the cost of the strings, most shops will change the strings for you for a small price, around $5 per string, or a total of $10-15 for the lot. The exact cost depends on the shop.
In Europe and the UK, the prices are similar, £8-10 or €10-15 but may vary, especially if you live in a small town. As it is not a hard job and doesn’t take a long time, it shouldn’t be very expensive.
How often should I change violin strings?
The general rule of thumb is to get new strings after about 300 hours of playing. This could be three months if you practice and play for 4 hours a day. Generally, 9-12 months should be fine, but for very light use, it could be even longer. If they start sounding less clear, however, do change the strings.
Some people take note of the time they last changed them, while others just go by how the strings sound, and replace them when they start hearing deterioration in quality.
Final Note
While changing violin strings regularly is important, it is equally important to clean and maintain them well. After every use, wipe the strings with a dry cloth to remove any sweat, dust, or rosin that would damage the strings. Here is a guide to how to clean your violin.
While changing violin strings is not difficult, if you have never done it before or feel uncomfortable trying, it is better to ask for professional help. Once you learn how to do it, it will become just something you do.


