 https://violinspiration.com/wp-content/uploads/2019/11/how-to-hold-a-violin-bow-adult-beginners.gif
 You want to start playing the violin, great! Now, all that’s left to do is grab your bow and play! But, wait. How do you properly hold a violin bow?
As a beginner violinist, you may have noticed that keeping control of the bow on the strings is not as easy as it looks. Or that your bow hand hurts a lot after practice. Or that you just can’t seem to get the right sound out.
If you want to become better at playing the violin, you need to start with perfecting the basics. The correct bow hold will instantly improve your playing, and prevent your hand, wrist and fingers from feeling stiff and painful after practice.
Read on to take the next step in your violin journey and find out how to hold a violin bow the right way!
How to Hold a Violin Bow
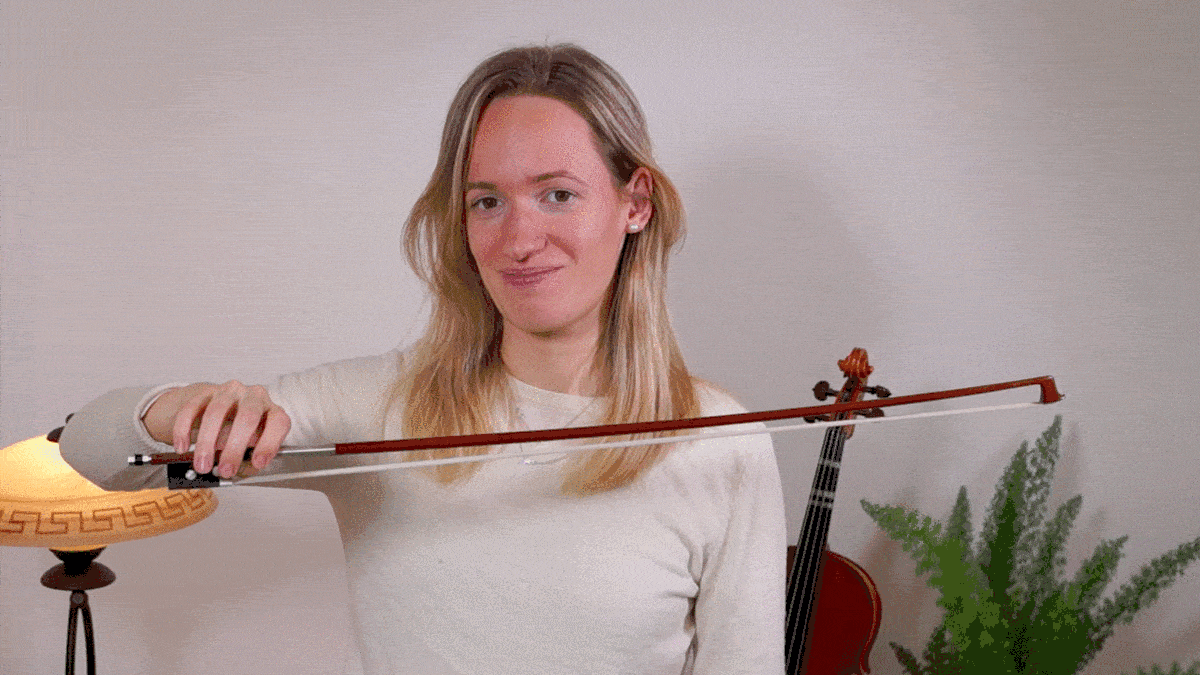
Violin Bow Hold Pictures From All Angles
Let’s first have a look at some pictures together. In that way, you can see what a correct violin bow hold looks like.

This first picture shows the front view of the correct violin bow hold. Note how the pinky finger is slightly rounded and the fingers are evenly spaced. The middle finger is hiding the thumb.

If you look a the bow hold from a sideview, you can see that the thumb is slightly rounded. Also you can see how the pinky finger is bending. The hand and the arm are forming a line together.

If you look at the bow hold from below, you can see that the thumb is not only slightly bent, but that the knuckle points slightly towards the tip.

Notice how the knuckles of the hand are low and in line with each other. You could imagine the knuckles to be parallel to the bow and only slightly above the wood of the bow. Also, here you can see again that the hand forms an extension of the arm. There is no bending in the wrist.

This is what the bow hold looks like from the violinist’s point of view. The knuckles are more or less parallel to the bow. You can see how the fingers are evenly spaced.
The 6 Steps to the Perfect Violin Bow Hold
So, how do you get into this perfect bow hold? Here are the steps to follow.
Congrats! You have now mastered the basic bow hold. Now let’s get the bunny to eat a carrot! Or in this case, a violin bow.
All your fingers should now be in place. Your hand should feel relaxed and soft, and slightly tilted towards the tip of the bow.
Well done! Now, all that’s left to do is PRACTICE. While watching TV, eating dinner, at work or school: repeat the positioning of your fingers with or without bow. Before you know it, it will become natural!
Common Mistakes with a Beginner Violin Bow Hold
Followed these steps, but still struggling to get it right? Maybe you’re making one of these common mistakes when holding your bow.
Relaxing the Palm and Wrist
Have you mastered your grip but is your hand still painful after practice? Mind your palm and wrist: they should not feel stiff or forced while you play. Keep them soft and relaxed, just like your fingers!
Maintaining the Correct Violin Bow Hold
Struggling to maintain your bow hold while playing? Don’t stress! It’s okay for your hand to adapt naturally to the way you use your bow. Generally, during downstrokes, your fingers will be nice and curved, while during upstrokes they will be slightly elongated.
Scratchy Noises
Is your bow moving around on the strings, causing scratchy noises? The key to eliminating scratchy noises is to keep the bow perfectly straight on the string. Make sure that the bow is in contact with the string on the contact point exactly between the bridge and the fingerboard.

FREE Contact Point Guide
Improve Your Contact Points Technique
Once you have a very good bow hold and can understand the important elements to produce a good tone, you can begin to learn different bowing techniques.
Don’t Bend the Wrist
Because the muscles in your hands are not used to the bow hold yet, your wrist may want to bend to compensate. Keep your wrist in a neutral position, relaxed and flexible.
How to Hold a Violin Bow: Strengthening Your Bow Hand
As a beginner violinist, it may take some time before your hand and fingers become used to the bow hold. There’s nothing left to do but practice, practice, practice!
Here are some easy exercises you can do to strengthen the muscles in your hands and fingers.
You will hear violin teachers say it again and again: “relax your hand!”. But how? Have your violin and bow ready and join this little exercise to release the tension in your hand.
Place your hand on the bow in the correct bow hold. Check your fingers. Is your pinky curved? Your hand slightly tilted? Your hand relaxed? Now crawl your hand towards the tip of the bow and back down again without losing your bow hold. This one is a challenge!
Place your hand on the bow in the correct bow hold. Now slowly press down with your pinky and feel the bow move up to a 90-degree angle. Then slowly bring the bow down again by releasing the tension of your pinky. Can you feel the tension in your thumb as the bow moves back down? Repeat this exercise a couple of times. Remember to keep your wrist still! Let the fingers do the work.
Don’t Give Up!
Don’t worry if the bow hold continues to feel unnatural for a while. As an adult beginner violinist, your hands and fingers need just a bit more practice to get it right.
Before you know it, your bow hand will turn to the correct bow hold automatically and you won’t remember how you ever held the bow any other way!
Still struggling with motivation? Be sure to become a member of Violinspiration (it’s free!) and receive my practice motivation emails, a copy of my books, and much, much more!
Or become a student of mine and learn with my step-by-step learning system in Julia’s Violin Academy. As soon as you join the Academy, make sure to upload your video and get feedback on your bow hold or any other violin playing aspect that you’re struggling with!


