Wondering how to play notes in the higher positions? Here is a complete guide to learning how to play the violin positions.
Currently I am taking violin lessons with a teacher that got taught by the Russian school after David Oistrakh. In our classes, one of the things that has been stressed is to have beautiful and seamless position changes.
That is one of the things that distinguishes the “good player” from the “great player”. You can’t just randomly move up your finger and hope that it lands on the correct spot. Well, not if you want to become a professional violin player.
What will you learn in this post?
In this post I’ll share the whole process of learning how to play each position on the violin. The most important thing is to remember to take your time to learn positions. The way I teach positions in Julia’s Violin Academy is step-by-step. You start by learning to play the first position perfectly in tune, then you move on to the third position. You take it one position at the time.
To get you started, I’ve compiled a complete guide to learn to play positions – from the very basics, such as “what are violin positions”, to an explanation where to find the highest violin positions on the fingerboard. I also added a PDF booklet with the finger positions in each position, that you can use as a jumping-off point to start playing in different positions in violin pieces. You can download it here:
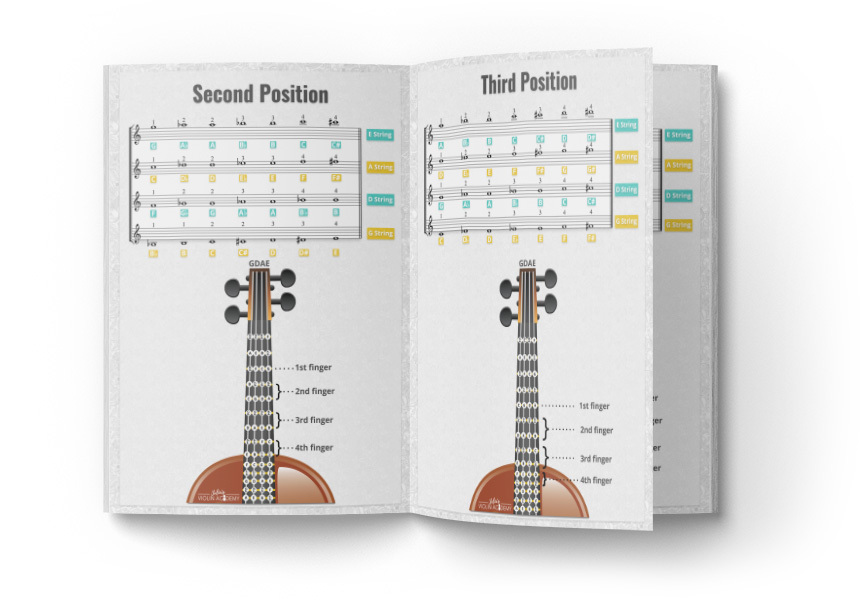
Get your free violin charts
for all the positions!
What Are Violin Positions?
The first question you might be asking yourself is: what are positions?
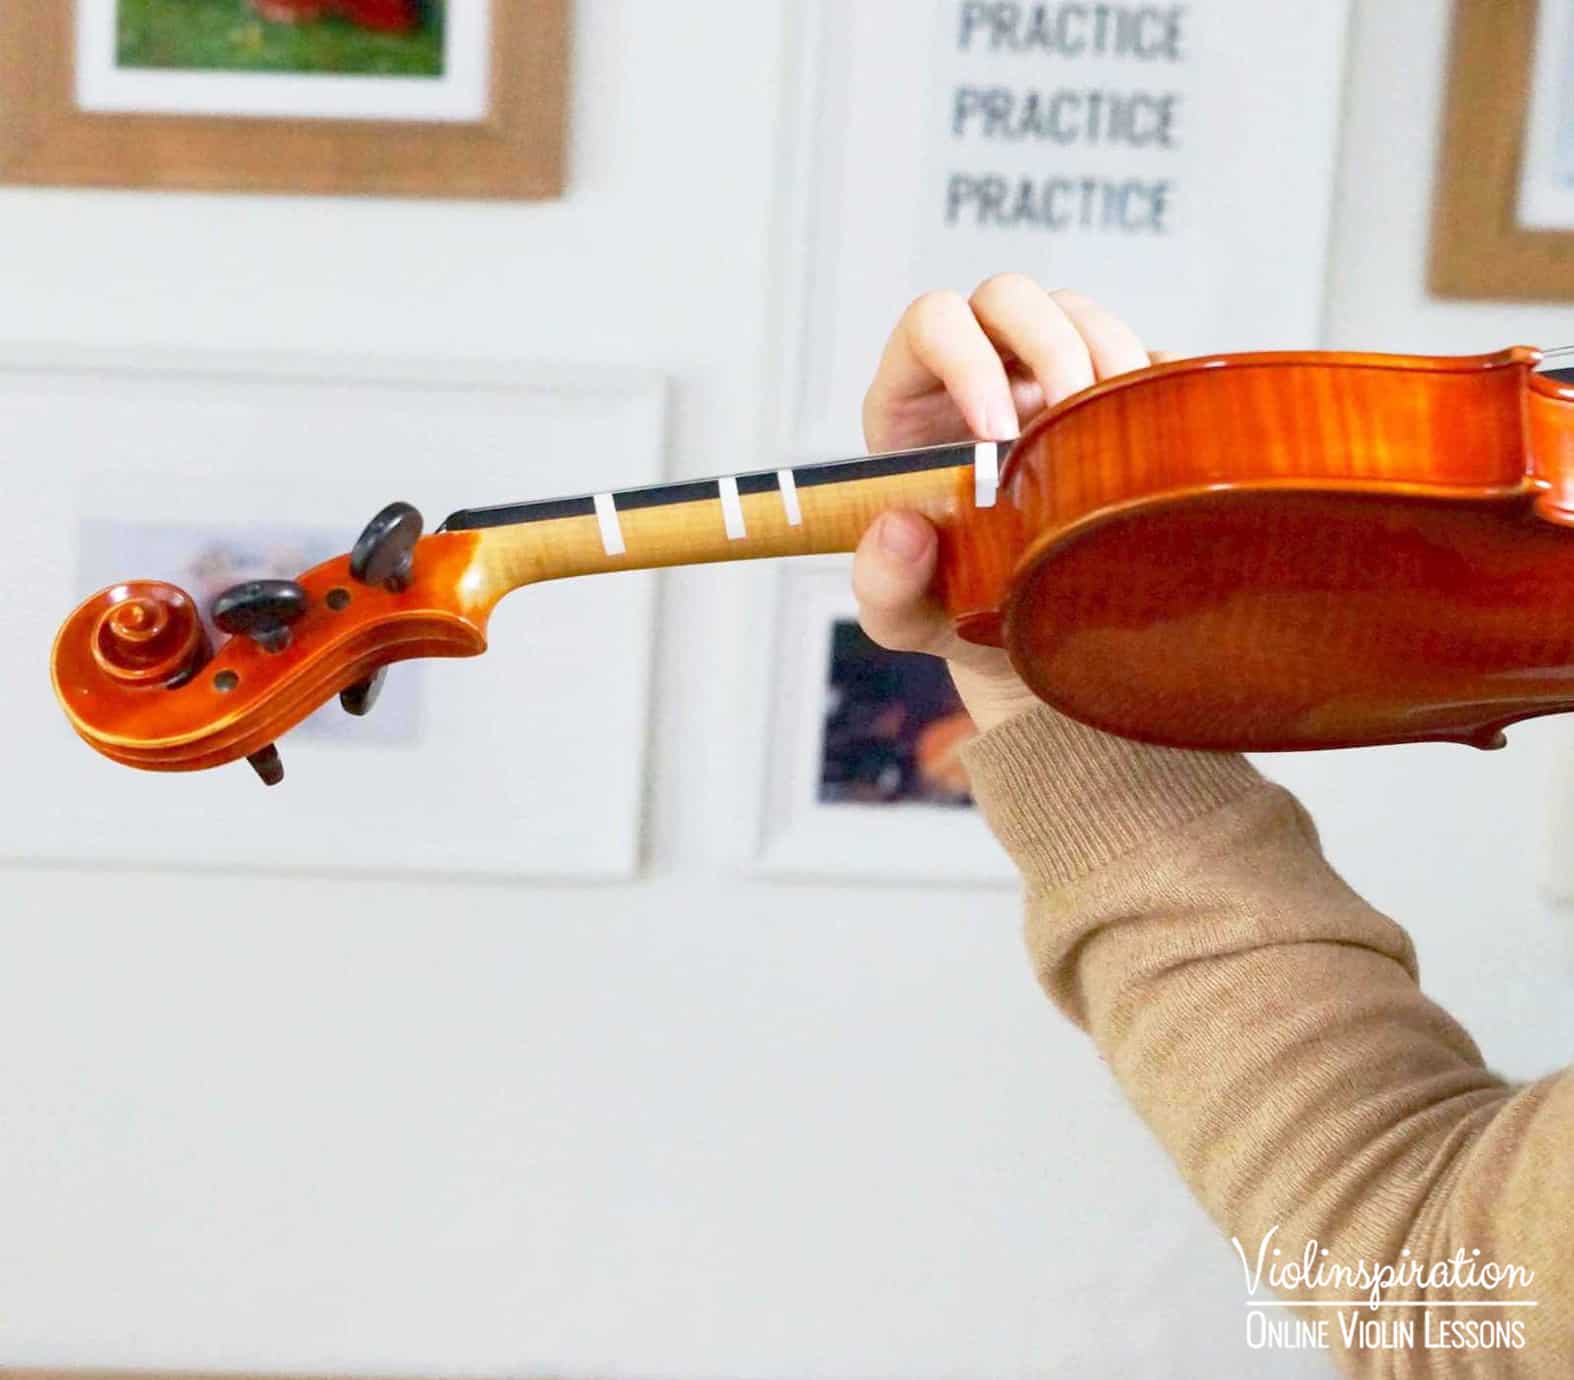
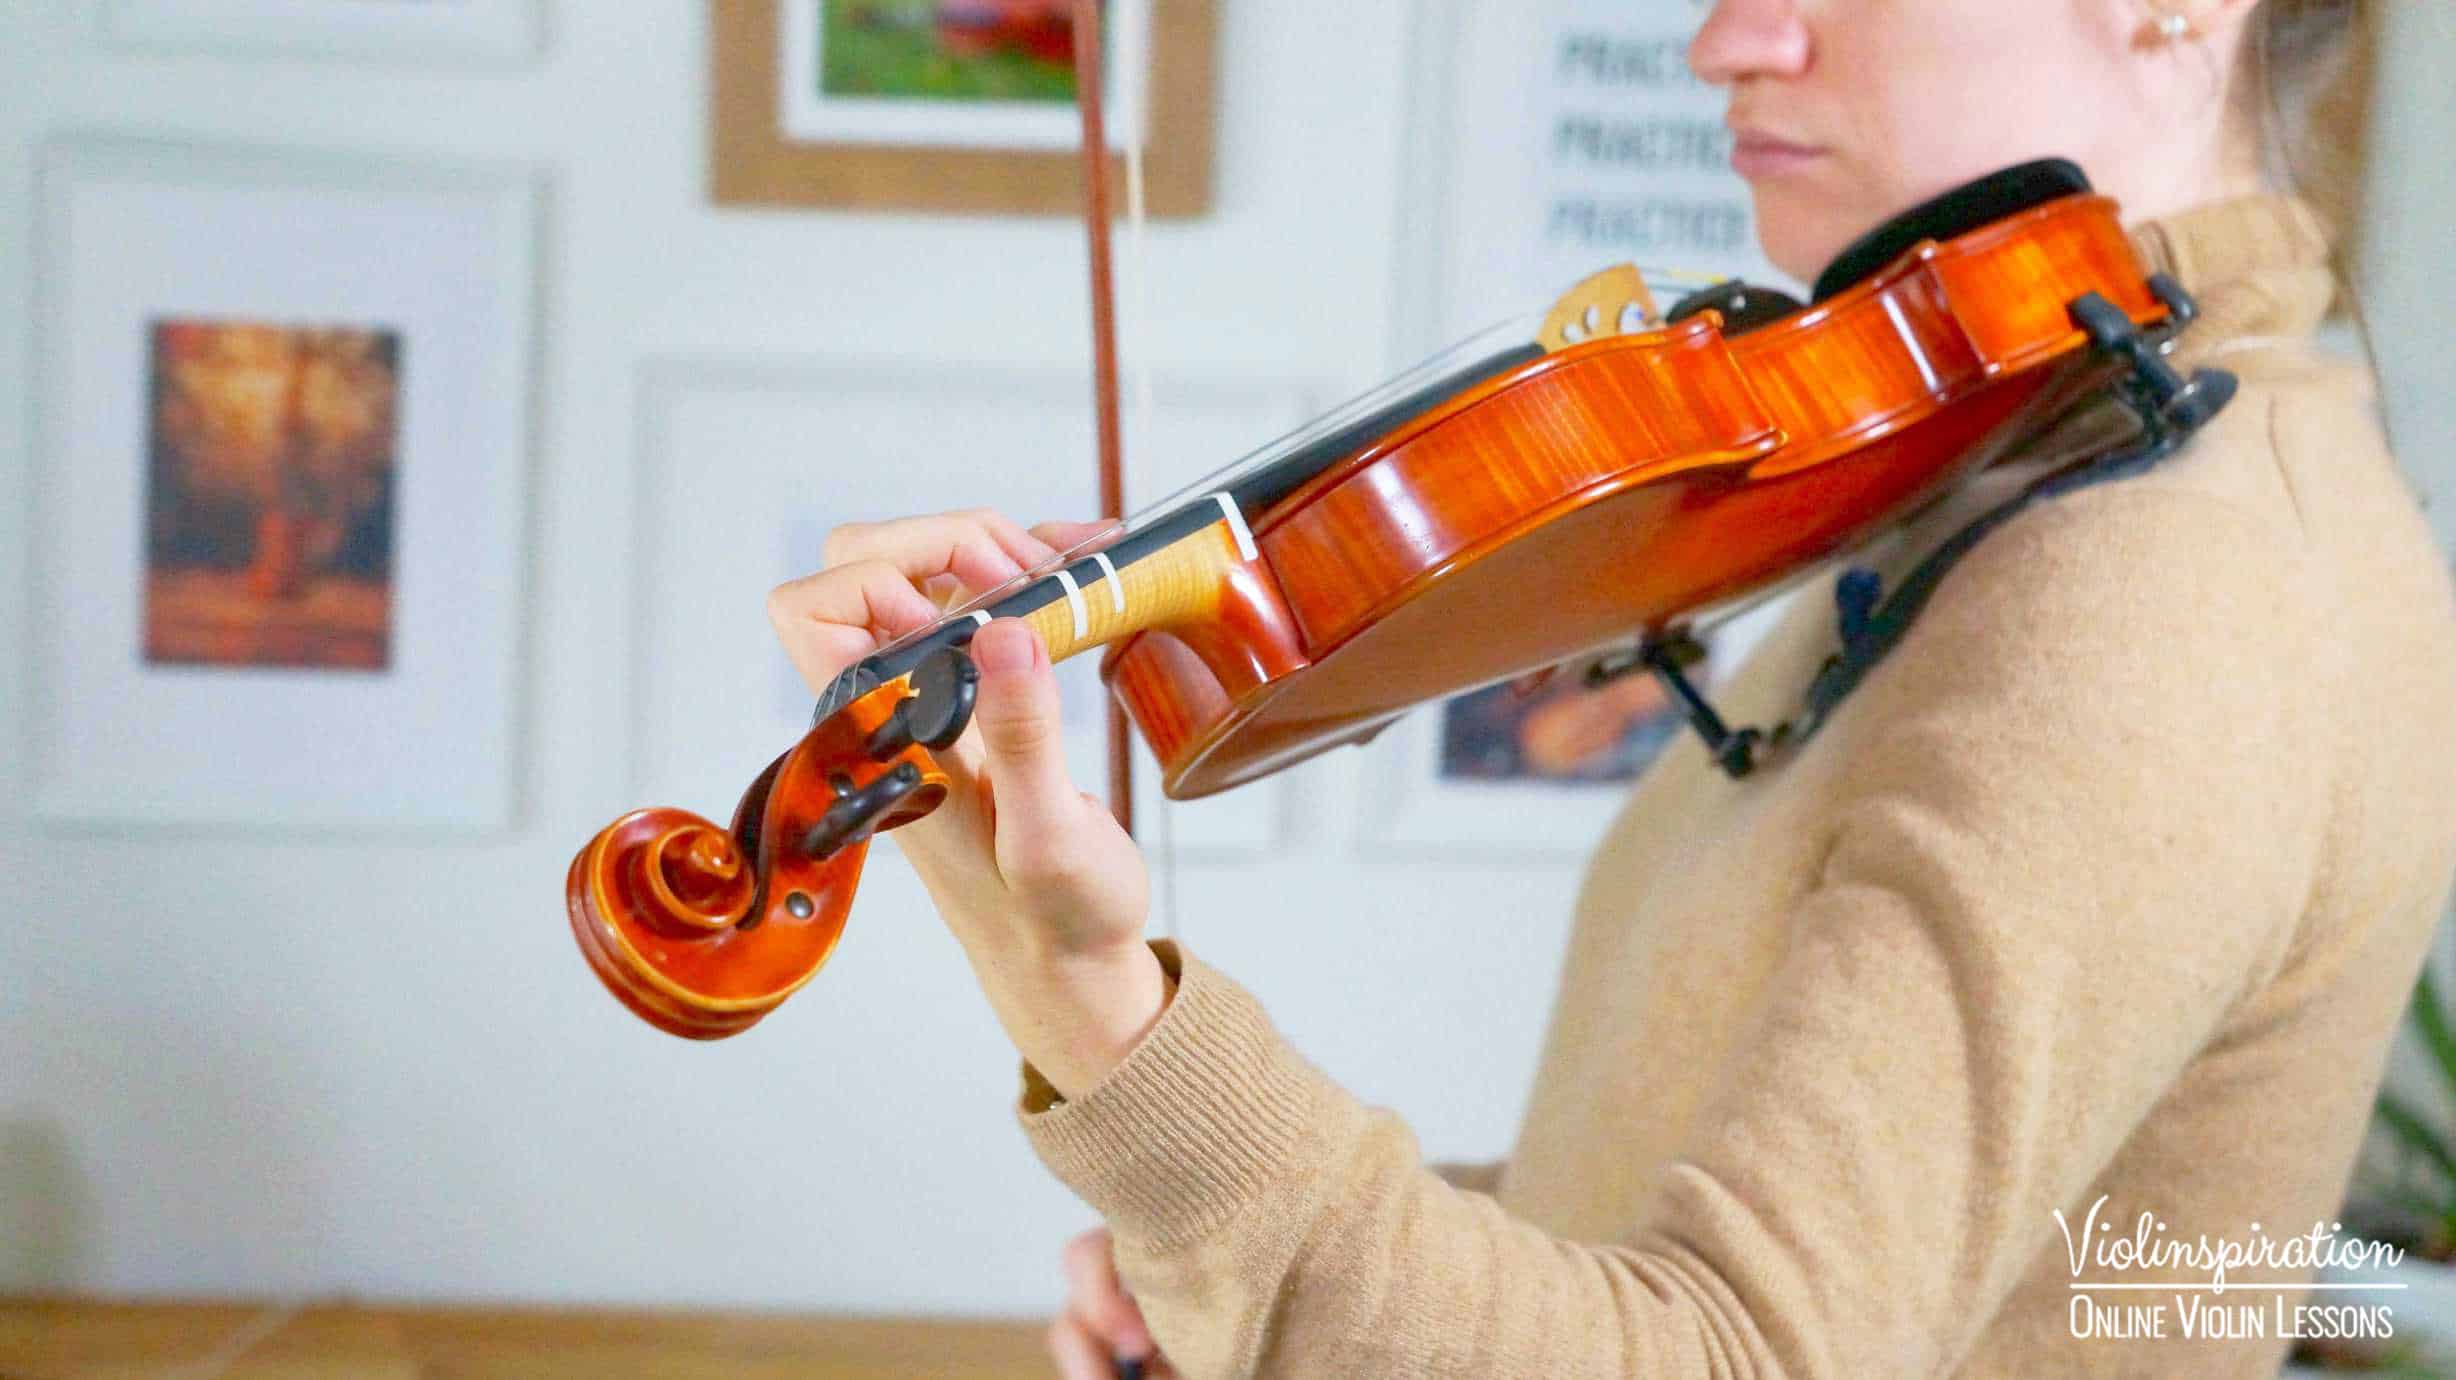
Where you place your left hand, fingers and thumb on the fingerboard is the violin position. The higher the number of the position, the further away the position is from the scroll.
Please watch my video below to see how the hand position changes depending on in which position you play:
There are eight often used violin positions. Every violinist uses the first position as a starting point – this is the “fundamental violin position”. Advancing beginners and intermediate players can usually play in the first and third positions. You will find that advanced violinists can play in fourth through eighth positions. There are also pieces of music played in positions higher than eighth position – these pieces are for the master players.
Can I play the violin without learning the other playing positions?
You might be wondering if you can play the violin without learning to play in each position. The answer is: YES!
The only position you truly need to learn in order to play the violin is the first position.
You can play a wide variety of beginner pieces, fiddle tunes and many folk songs after learning this fundamental position. Have a look at my free online violin lessons page and sort by “first position”. You will notice how many pieces can be played only in first position.
There are many fiddle players that will never learn to play in higher position. That’s because almost all traditional folk music can be played using only the first position.
Why then would I want to learn how to play in other positions?
You might be wondering: “But, Julia – why would I even learn to play in other positions”? I’m glad you asked!
First of all, some pieces can not be played in only first position. Think of classical pieces like Adagio of Albinoni (often played on funerals), but also popular and film music like Song from the Secret Garden. The notes used in the pieces are simply too high, which means they can not be played in first position.
Secondly, playing in a different position can change the sound color or timbre of a note. If the sound color changes, the actual tone or pitch stays the same. The only difference is the way it sounds. For instance, the sound of the note played on the lower string but in the higher position, will be more mellow and can add a richness in color to your piece. The same note played in the lower position but on the higher string will sound a lot different. For instance, playing an E, or F on the G string in third position, will sound deeper and richer than playing the E or F on the D string.
Moreover, some passages might be very difficult to play smoothly in a lower position, so shifting to another (higher) position makes it much easier to play.
Also, it looks really cool when you shift between the different positions, especially to someone who does not know how to play the violin. 🙂
Is it hard to play the violin in the higher positions?
Playing in higher positions is not easy, but as soon as you get started learning, you will notice it is not as daunting as it first seems! Anyone can learn to play in the higher positions if stays dedicated and doesn’t lose focus. Here’s a complete guide on what the violin positions are & how to go about learning them.

The First Position on the Violin
Firstly, please have a look at the proper left hand placement in the first position:
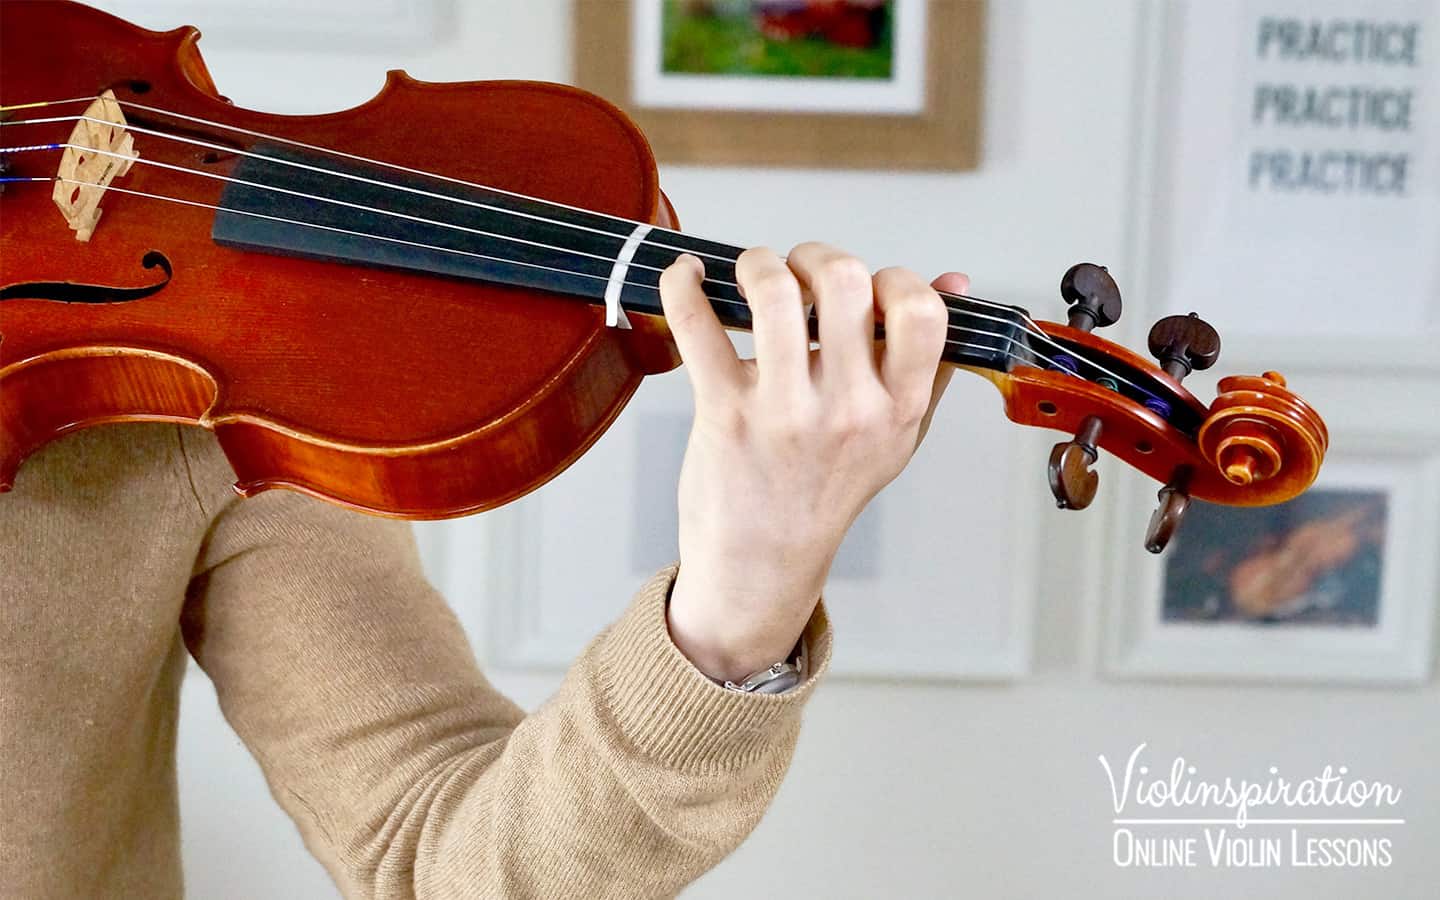

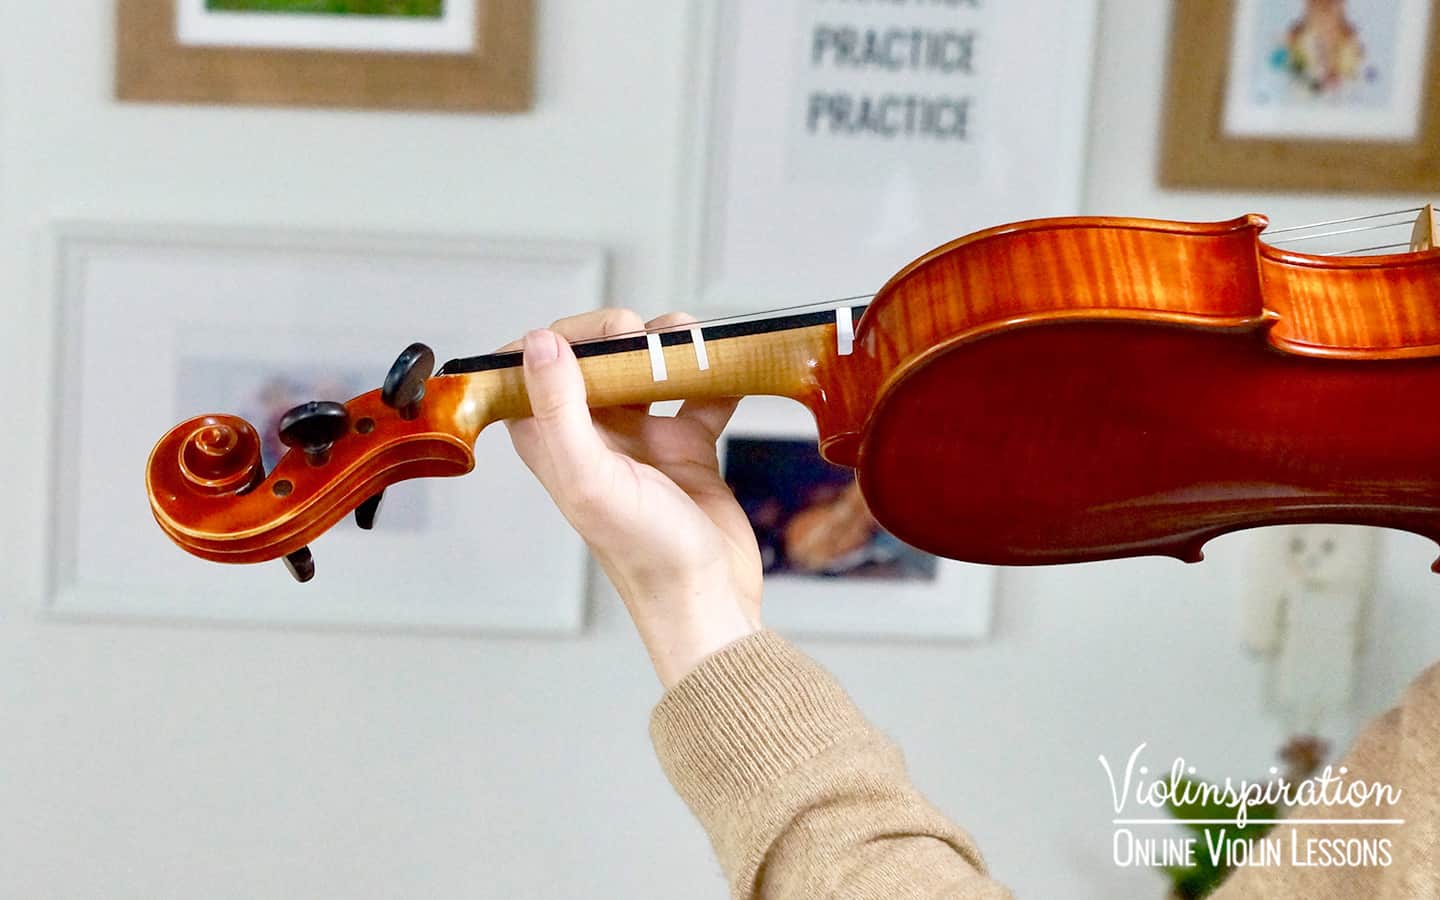
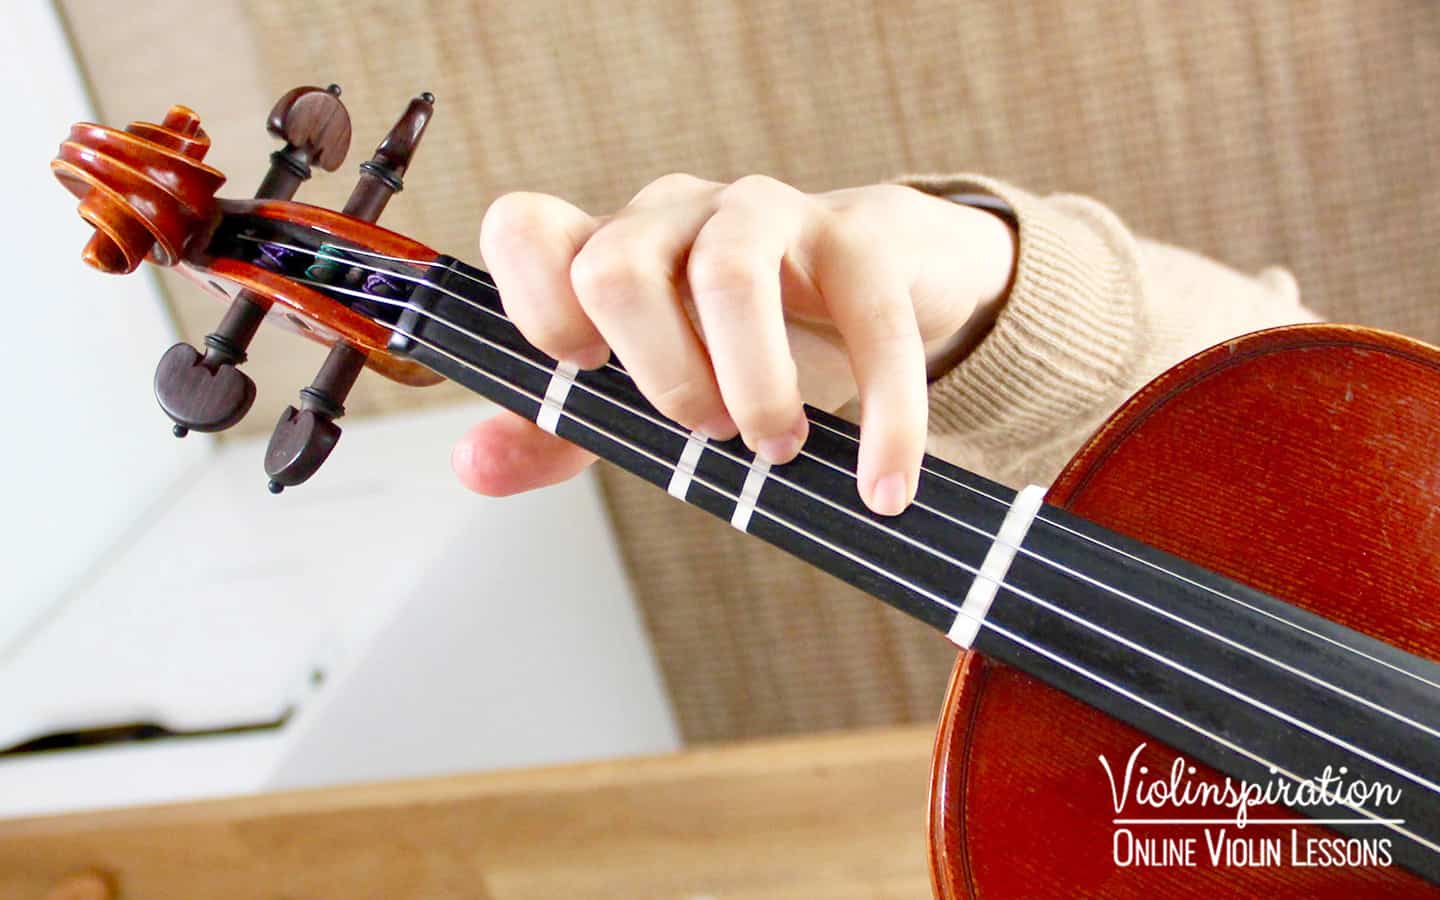
First position is the fundamental left hand position of violin playing. It is the position first taught when learning to play the violin.
Your left hand position is your first finger, or index finger, in the place where it can stop the open string. You stop the string one whole step up from the open string.
On the A string in the first position, depending on the key, your:
- index finger will be right above the pitch of B
- second finger will be above C or C♯
- third finger will be above D or D♯
- and fourth finger above E.
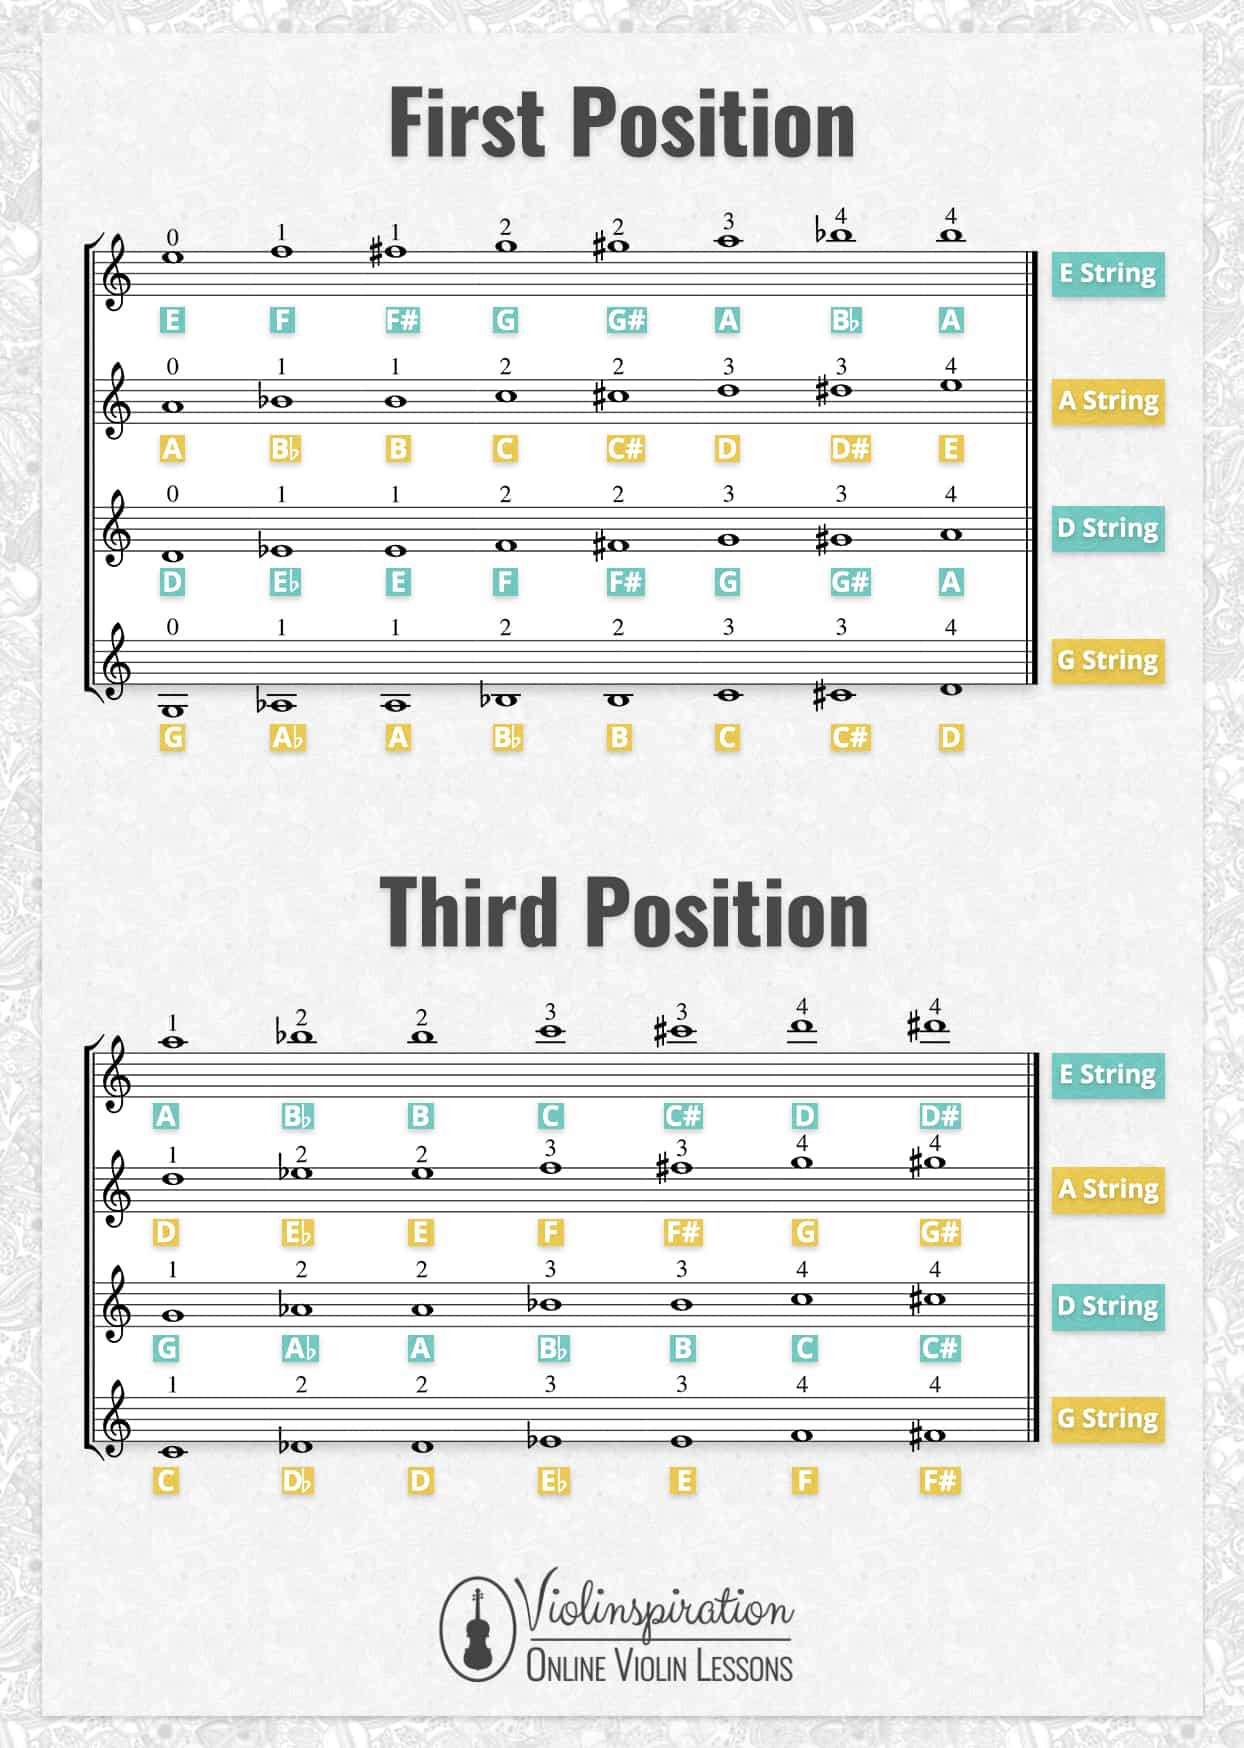
The following chart shows where on the violin the notes are played in the first position:
You can download all the charts at the end of the post.
Half Position
Each time you place your first finger a half step above the open string, i. e. you play:
- A♭ (G♯) on the G string
- E♭ (D♯) on the D string
- B♭ (A♯) on the A string
- F (E♯) on the E string
you have to slightly change the position of your left hand. The hand moves backward – towards the scroll. After that move you’ve reached the half position.
After playing the note(s) with the so called low first finger, you can go back to the first position or you can stay in the half position. In that case you should put your second finger in the place where the first finger in the first position would be and shift the other fingers accordingly.
Pieces in the key of e. g. F Major/D Minor, B♭ Major/G Minor or E♭ Major/C use the half position. If you already play any piece in one of these keys, you might already have “accidentally” played in half position!
The Second Position on the Violin
Don’t let the name “Second Position” fool you. A lot of starting violinists assume that after the first position, you will learn the second position. In reality, most violin teachers recommend to learn the third position after the first position. The second position usually comes after the fifth position. You can check out the complete order in which I recommend to learn the violin positions in the bottom of this post.
Why don’t we learn the second position after we learn the first?
There are two reasons for that:
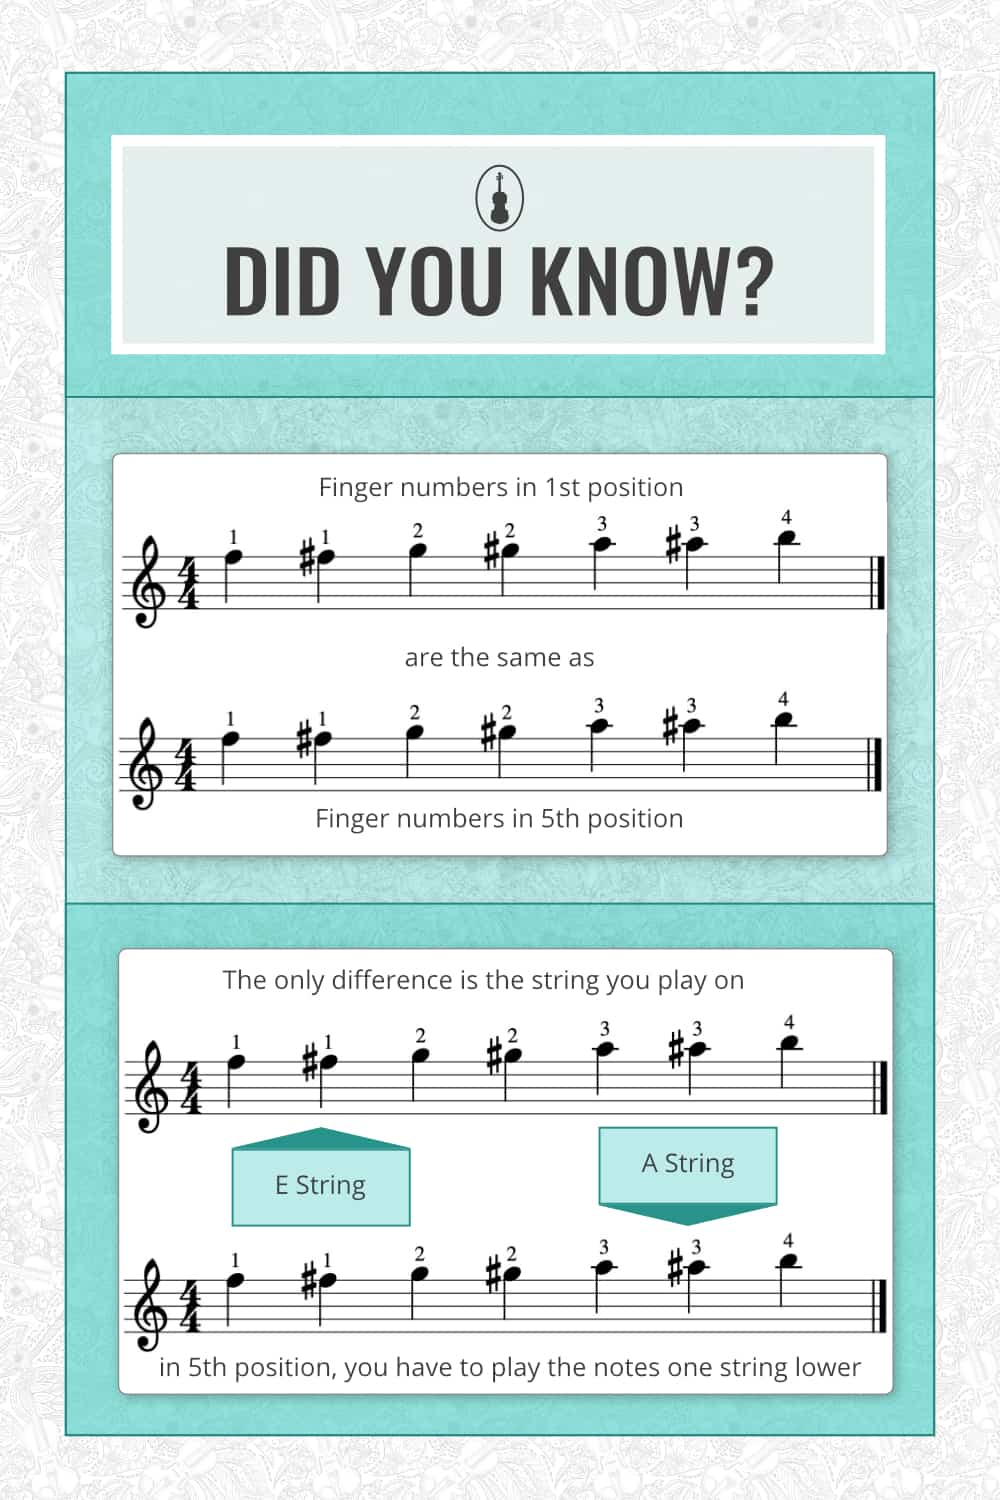
- The third position is easier to learn, as the finger positions resemble the finger positions in first position.
- The second position is not as vital as the third and fifth position. You can still play most pieces, even if you did not master second position. If you did not learn third or fifth position, you simply can not play many pieces, as they require third or fifth position.
An Example of Second Position Play
You can see an example of a violin player playing in second position in the following video where Daniel Lozakovich plays Bach: Partita in D Minor – L’allemande. Notice how the violin player in the video slightly moves the first finger upwards at 0:37 – here he is moving into second position.
The second position is regularly used in the remainder of the piece.
In order to observe the shift more easily, I recommend to click the “settings” icon on the video and set the video to a slower speed.
How to find the second position
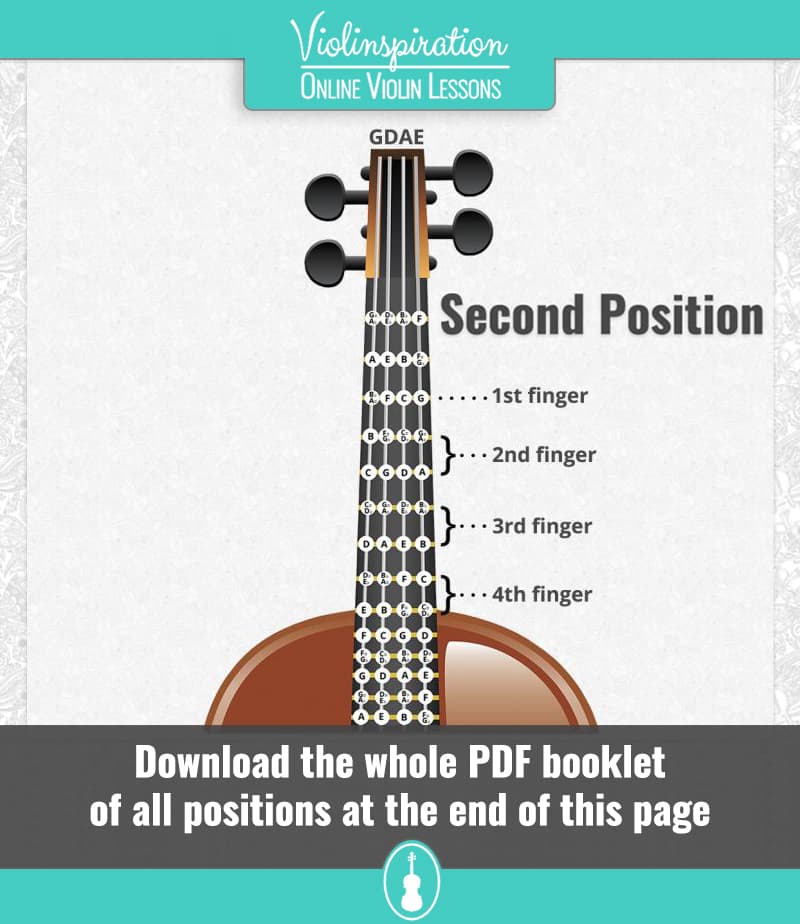
It’s easy to find the second position on the fingerboard. Shift your hand position so that your first, or index, finger is above where your second finger was. You only need to move your first finger one semitone (half step) higher than in first position.
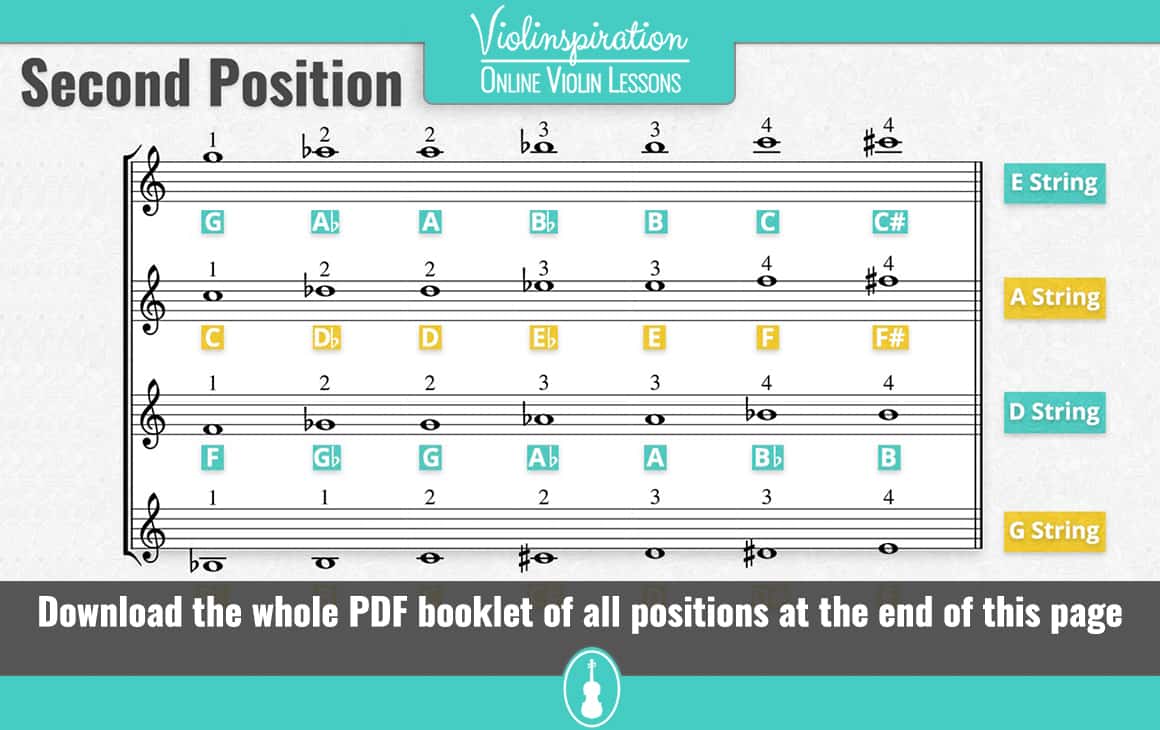
To play in second position, you place your first finger on the following locations:
- B♭ (A♯) on the G string
- F on the D string
- C on the A string
- G on the E string
For many violin players, second position is a difficult position to play! The reason for that, is that it is often ignored in their practice routine. If you are already able to play third and fifth position, the second position won’t be hard to master.
My Recommended Second Position Exercise
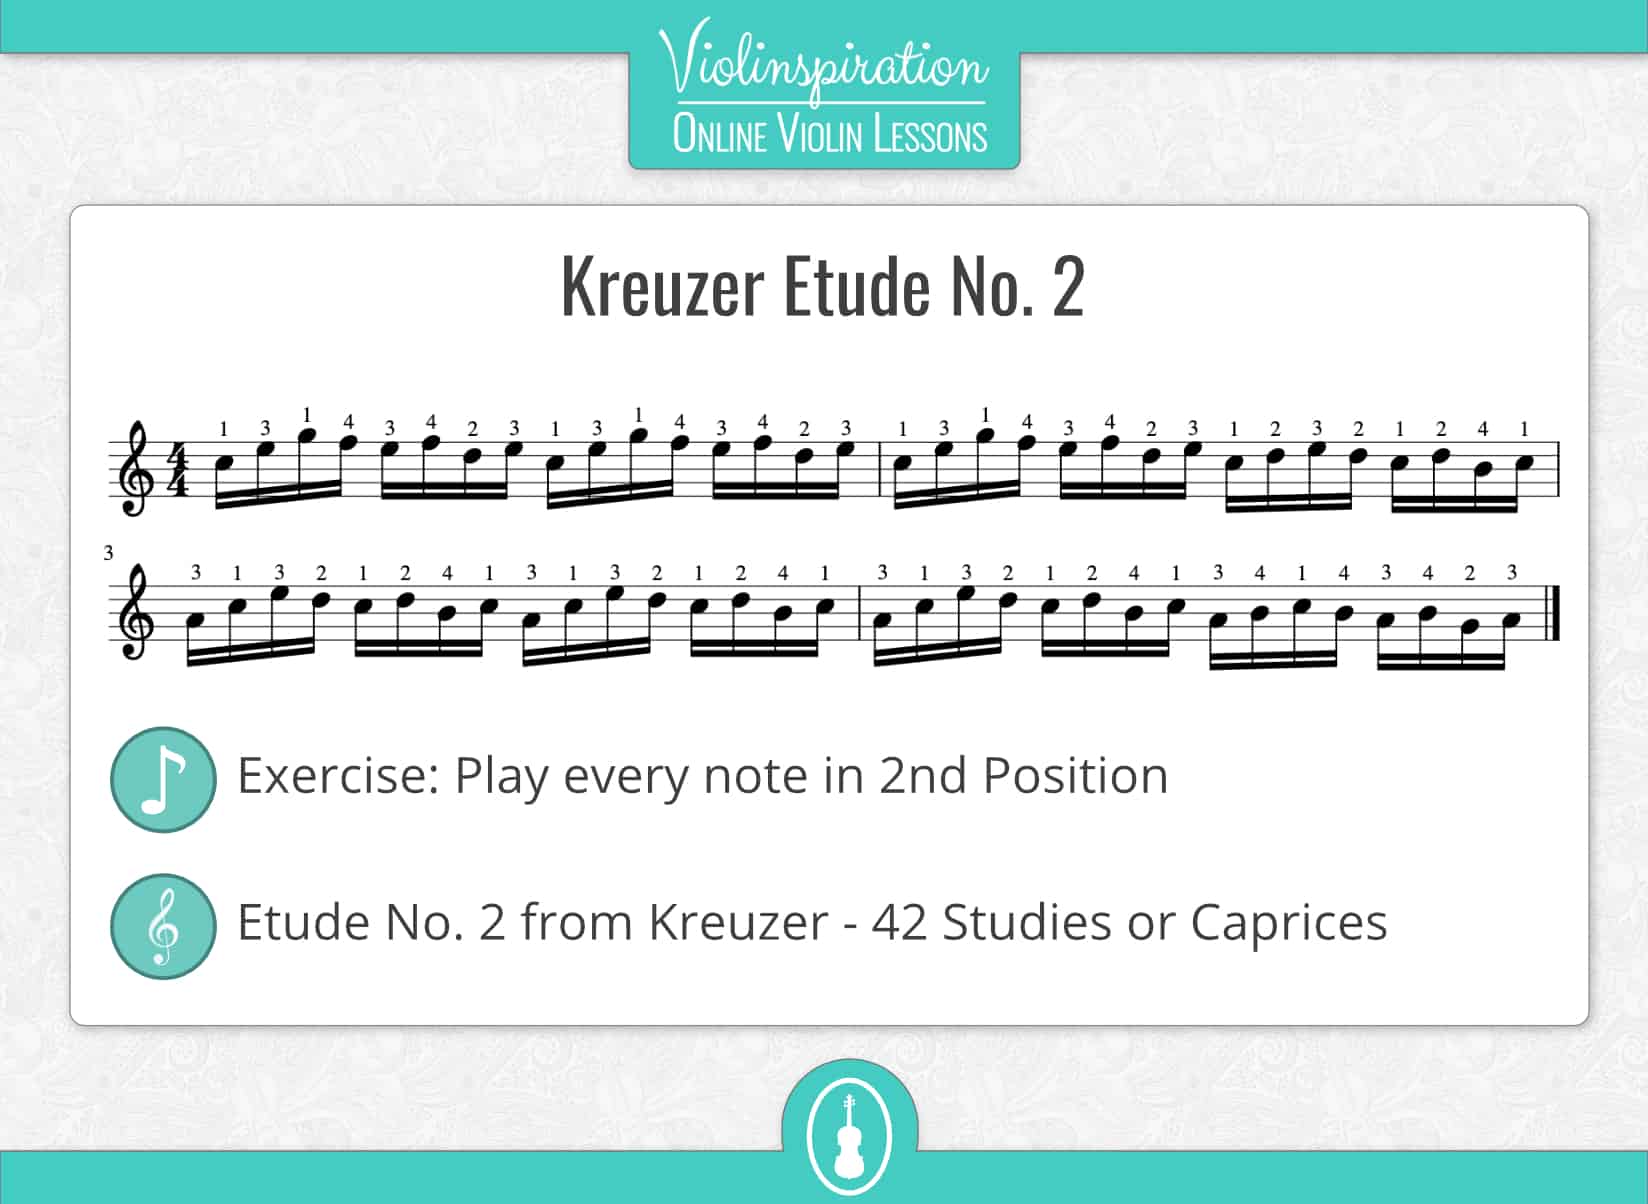
To practice the second position, a great exercise is practicing Etude No. 2 from Kreuzer. Play all the notes in second position. You will feel more confident playing in second position in no time!
The Third Position on the Violin
After learning the first position, I recommend to learn the third position.
Here is the proper left hand hold in the third position:
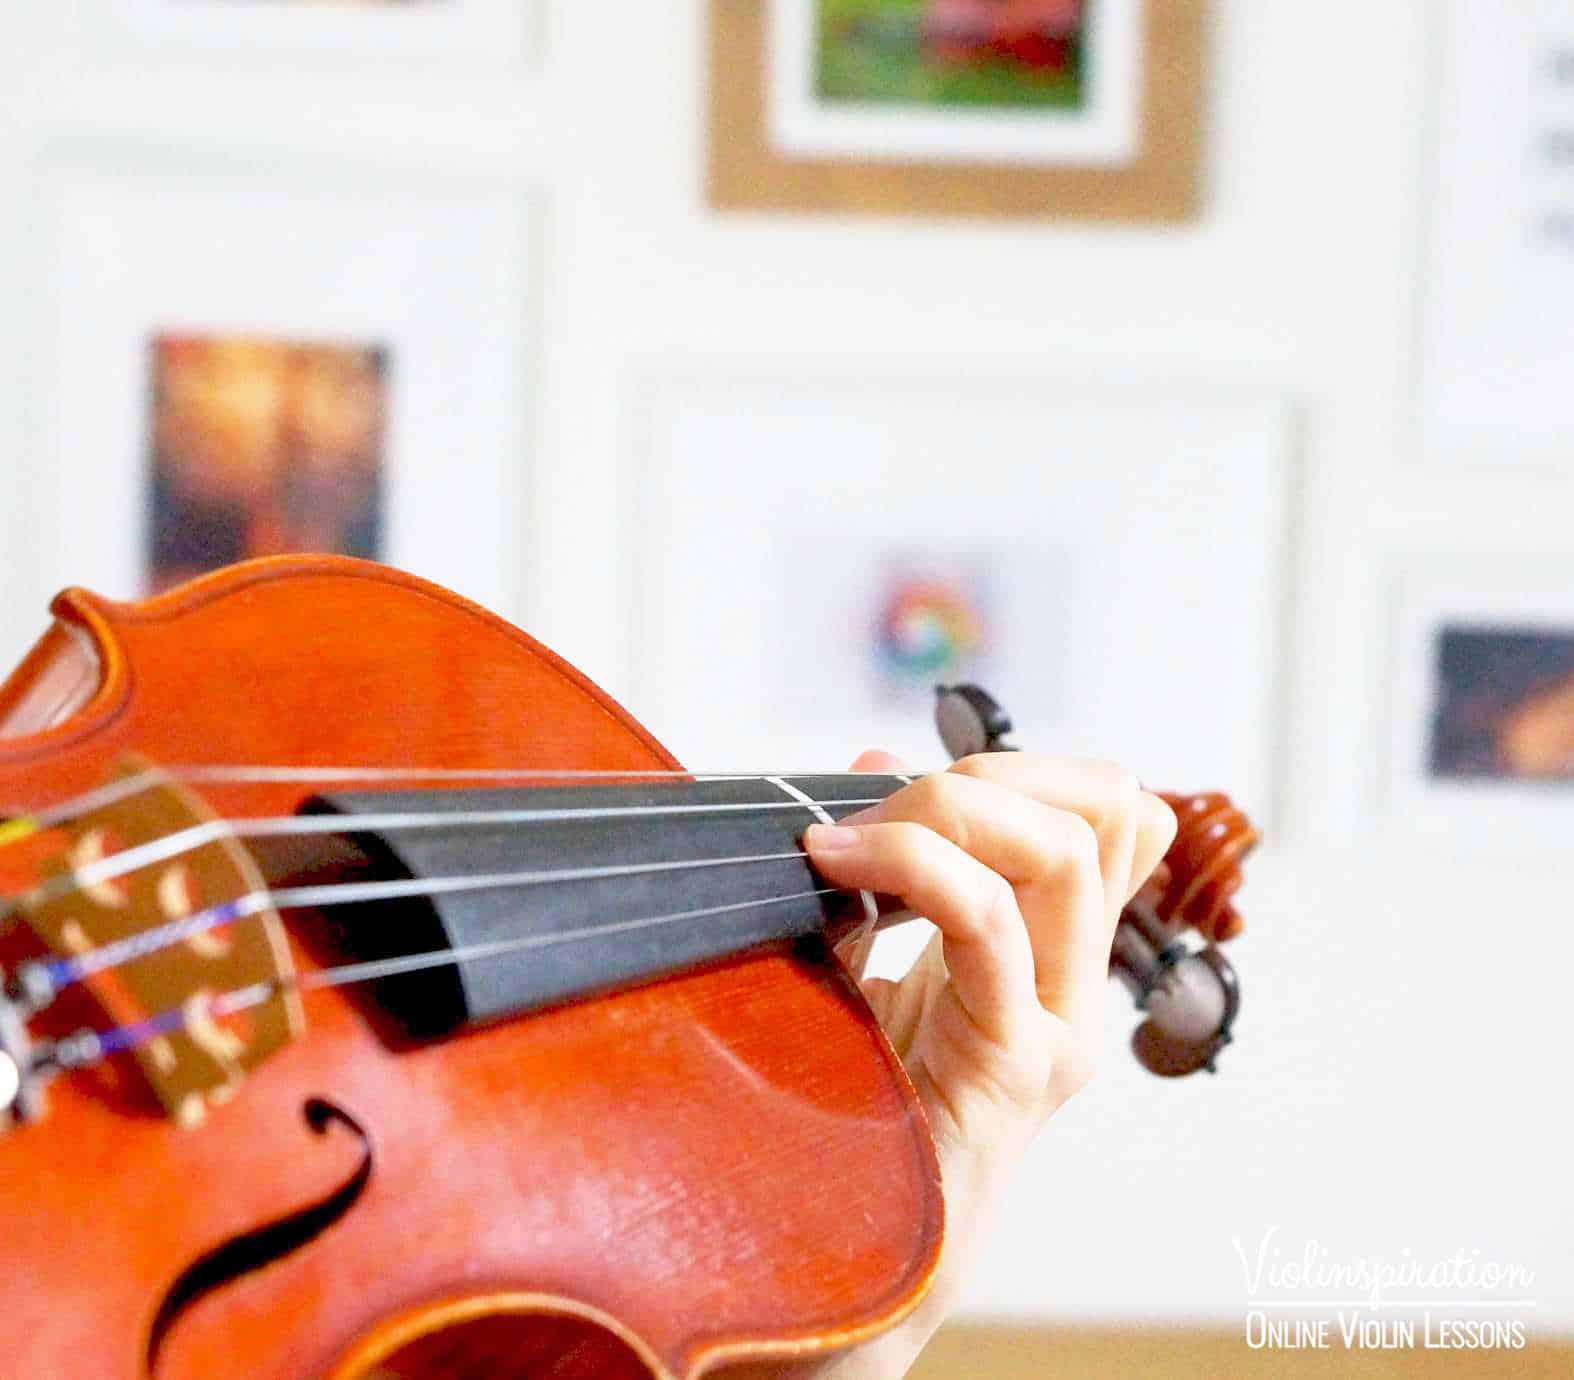
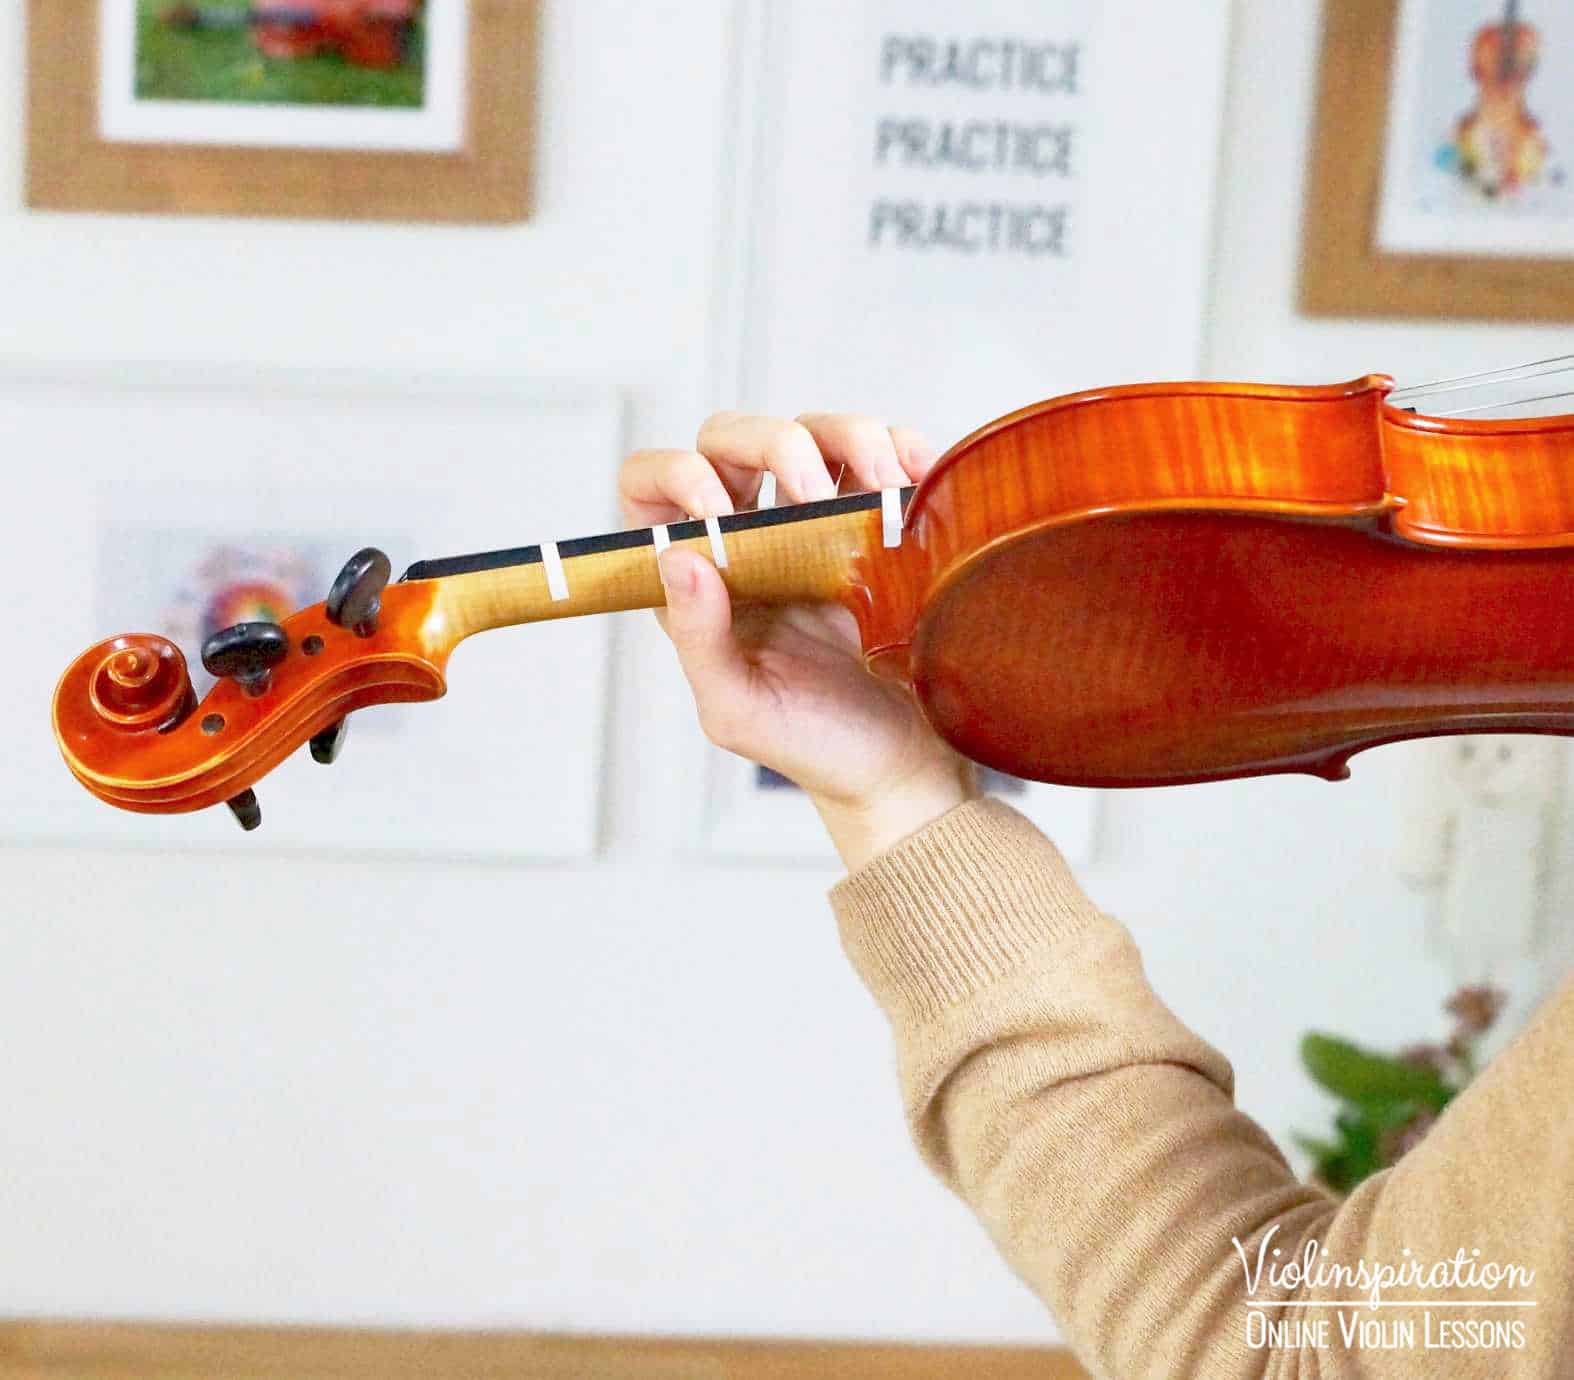
How to Find the Third Position
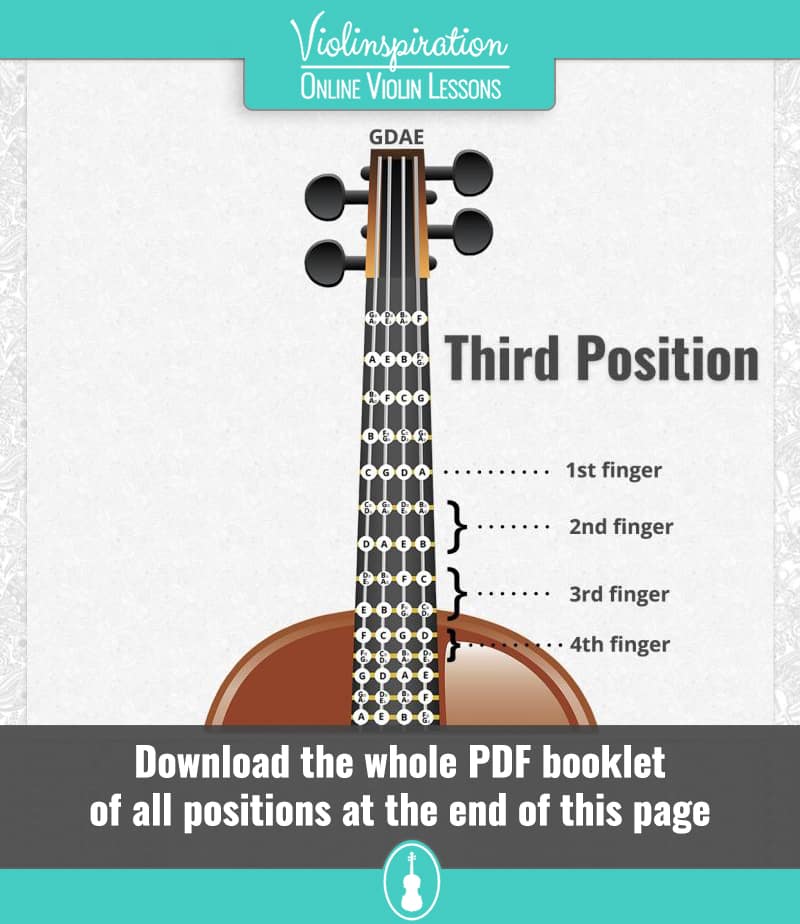
Similar to the second position, is your shift into the third position. Your hand shifts and your first finger is placed at the spot where your third finger was when it was in first position. So, on the A string my first finger is hovering over the note with the pitch of D and for other strings accordingly:
- C on the G string
- G on the D string
- D on the A string
- A on the E string
Easy Intonation Hack for the Third Position
An easy “hack” to play in tune in 3rd position is to touch the body of the violin with the base of your hand. This will help you to feel where the third position is.
Below you can see an example of this “3rd position hack”. Itzhak Perlman uses the base of his hand to touch the body of the fingerboard while playing in 3rd position at 0:22 and beyond. This is one of the ways that he makes sure he will always play in tune in 3rd position.
To be absolutely sure that you are playing in tune, there are several easy way to check your intonation.
Four Easy Ways to Check Your Intonation in Third Position
- Place your first finger in 3rd position on the D, A or E string. Play the first finger and the string below at the same time. If both notes sound the same and beautifully together, you are most probably playing in tune.
- You can do a similar “intonation-check” with your second finger. Place your second finger in third position on the G, D or A string. Play the string above and the finger at the same time. If you placed your hand correctly, the notes should sound exactly the same.
- Another way to check the position of your entire hand in third position, is to place your fourth finger and first finger in 3rd position on the E and A string or A and D string. Play the fourth finger, first finger and the string below the first finger. If all notes sound the same – or, exactly one octave apart from each other – your hand position is correct.
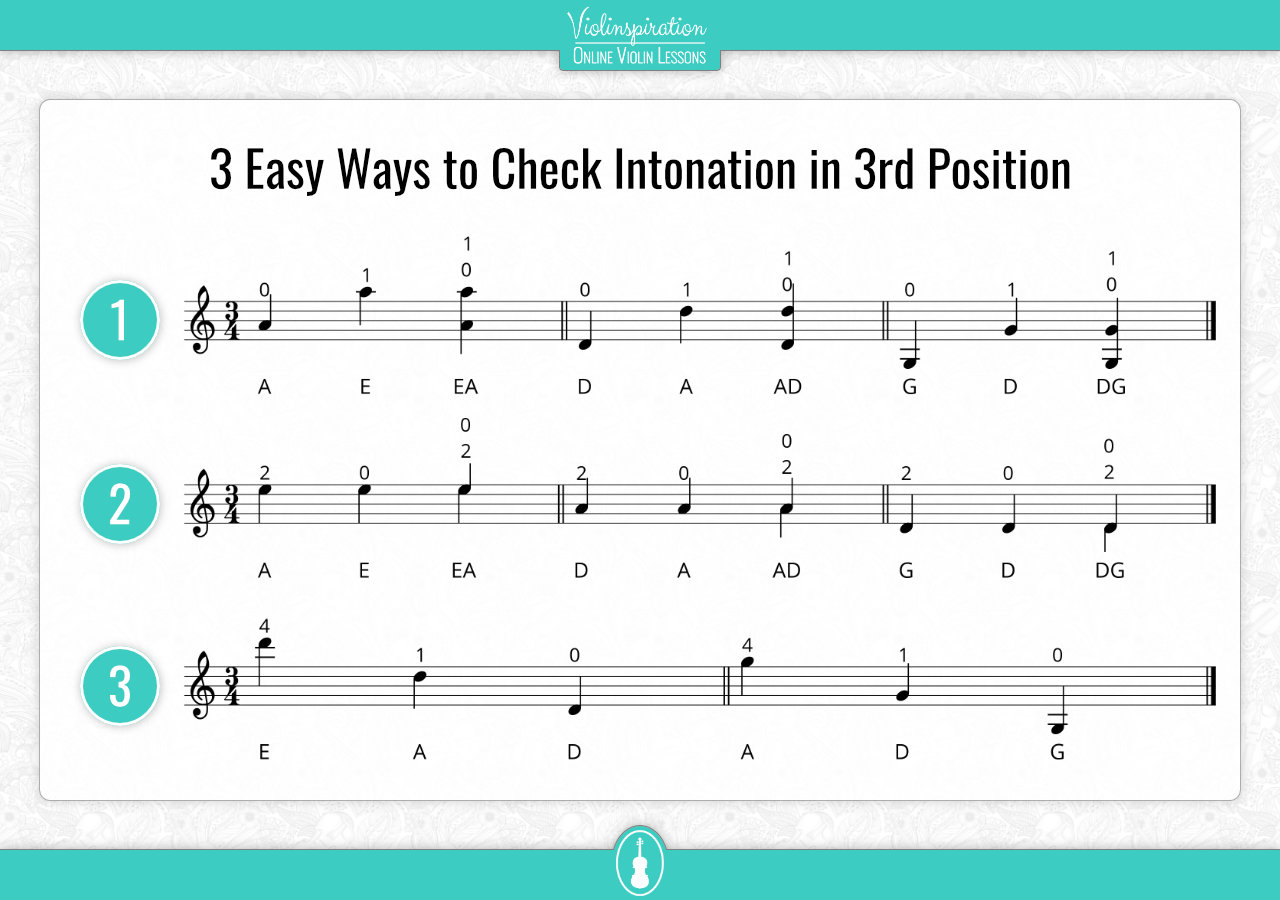
4. The last way to check if you placed your first finger on the correct location is listening to the sympathetic vibrations.
Get a Step-By-Step Plan to Get Confident in Third Position
In my online violin school, Julia’s Violin Academy, you can find a complete course on how to learn to play the third position. I will show you the exact exercises and scales to practice to learn the third position properly and efficiently. We will cover the very basics like first finger shifts, all the way up to shifting in all directions with all possible finger combinations. If you are already a member, you can find the course in the intermediate level.
As a supplement, I can also recommend my course about how to check your intonation with sympathetic vibration. Click here to access that course on JVA. If you know how to recognize sympathetic vibrations, you will quickly hear if you are playing in tune in third position.
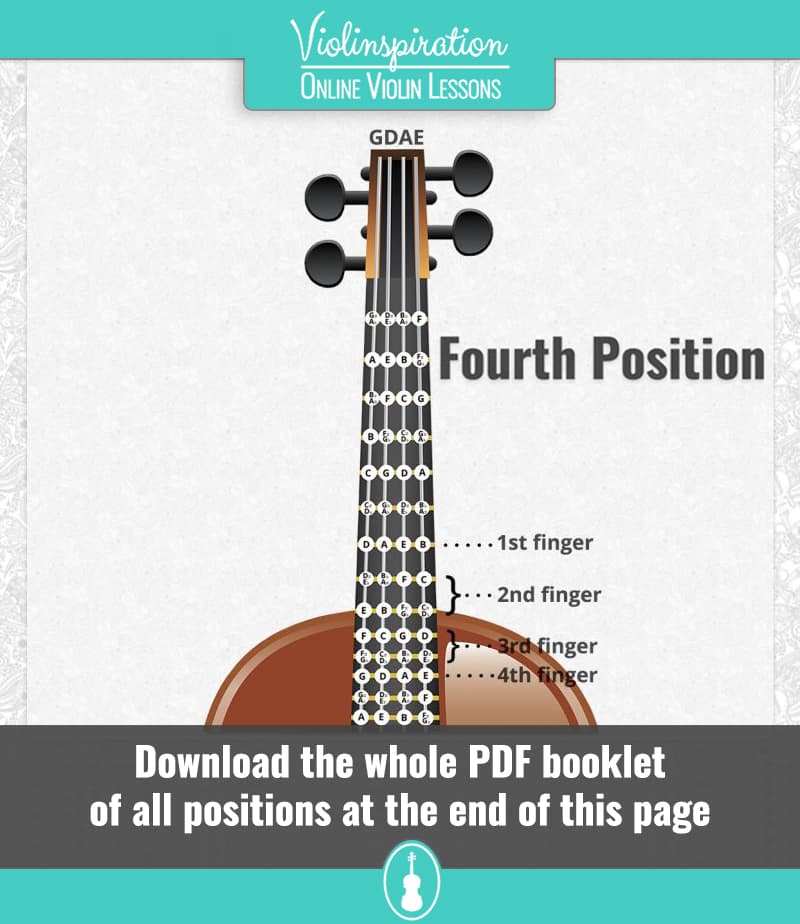
Fingering charts for the third and fourth positions:
The Fourth Position on the Violin
Many violinists find the fourth position a difficult position to play in. Like the second position, it is a lost sheep of the violin positions. Forgotten about during practice, and therefore avoided when playing a piece.
The fourth position can be often avoided by playing in third or fifth position instead. However, the fourth position is still a very useful position to study. Especially if you already know how to play in third and fifth position. The main reason for studying fourth position is getting the exact sound that you want from your violin.
On lower levels, violinists are normally already happy if they are able to play a note in tune. On the higher levels, players get a lot more precise. They don’t only want to play in tune, but also want to achieve a very specific “sound color”. That can often be achieved by playing in the fourth position.
Example of Fourth Position Play
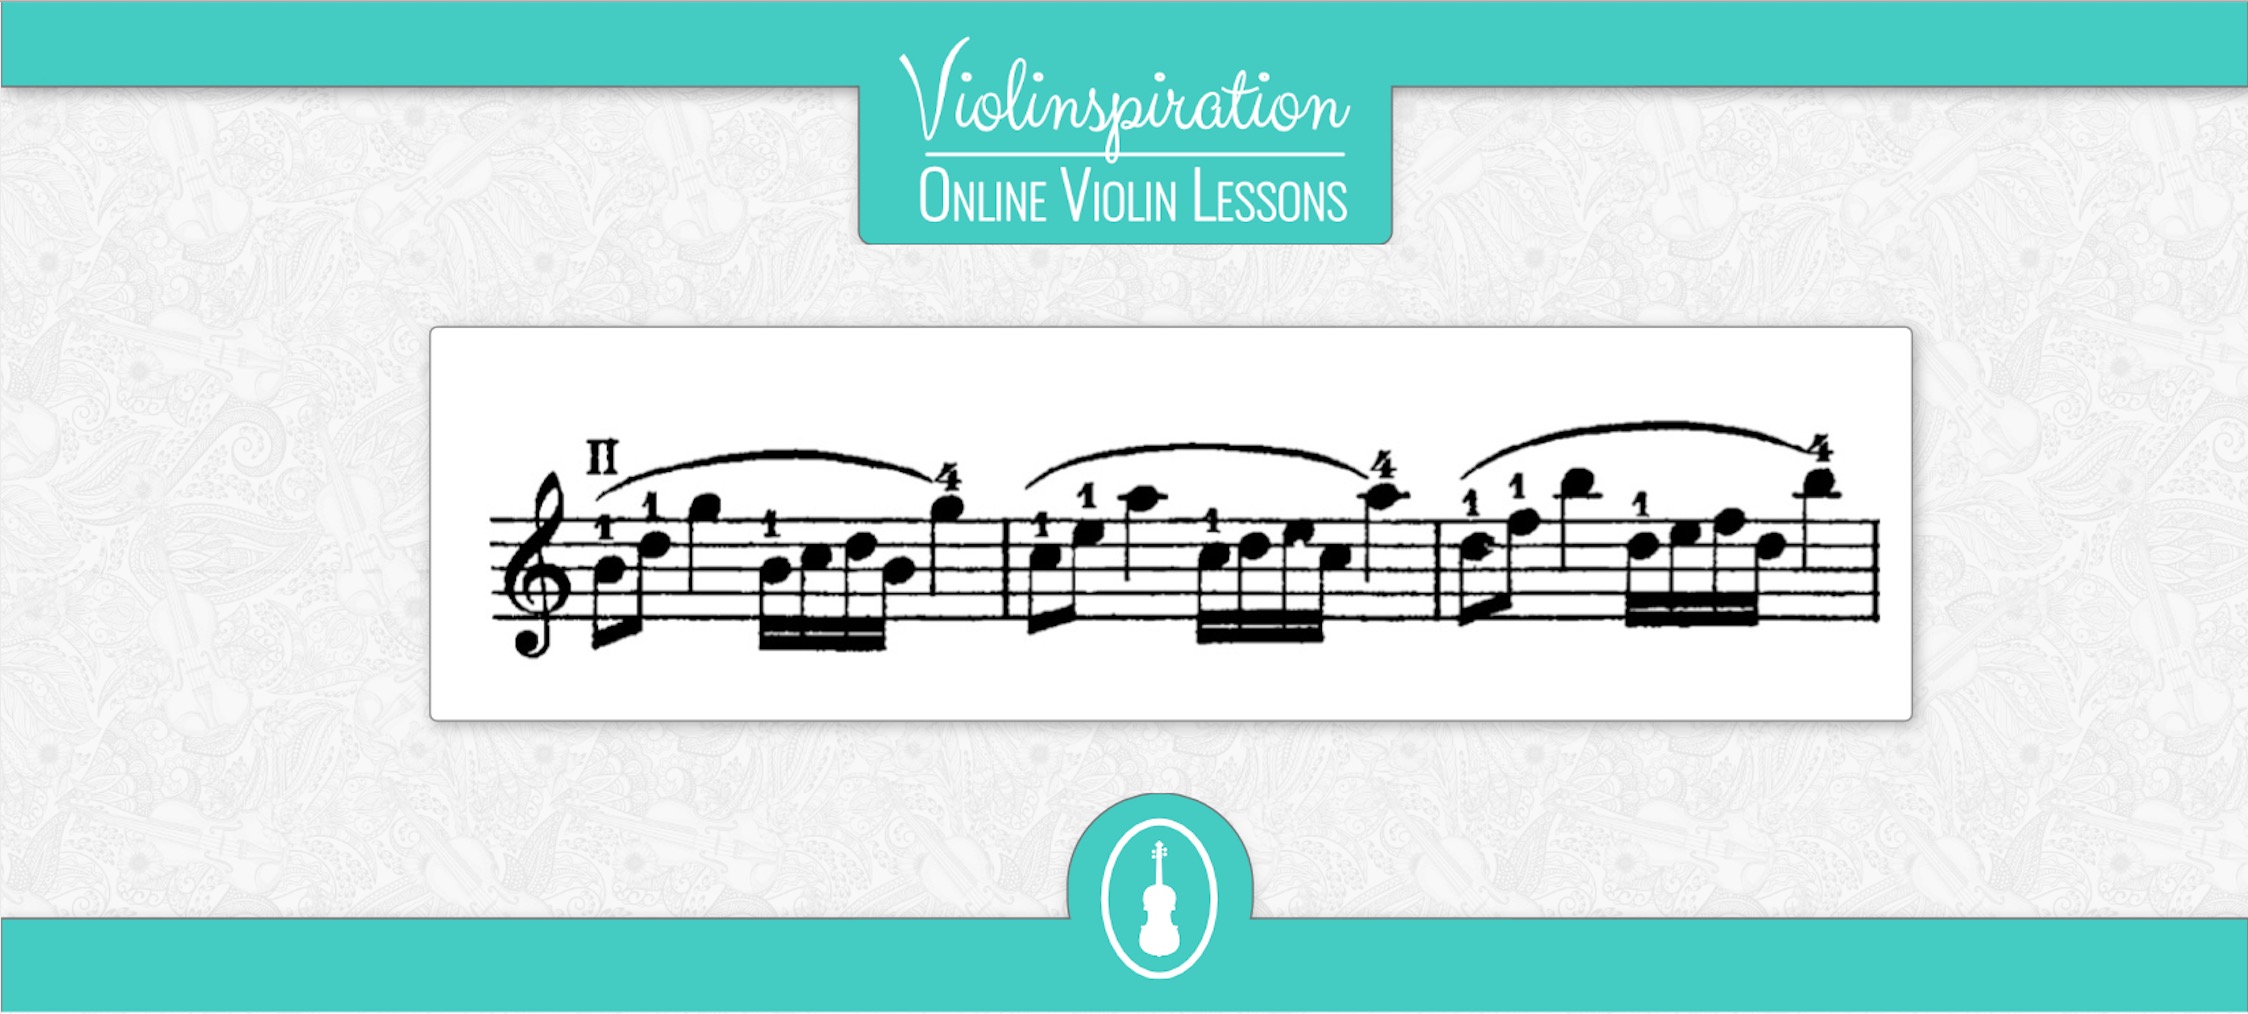
As an example, let’s have a look at this short excerpt from the Mozart Violin Concerto in G Major.
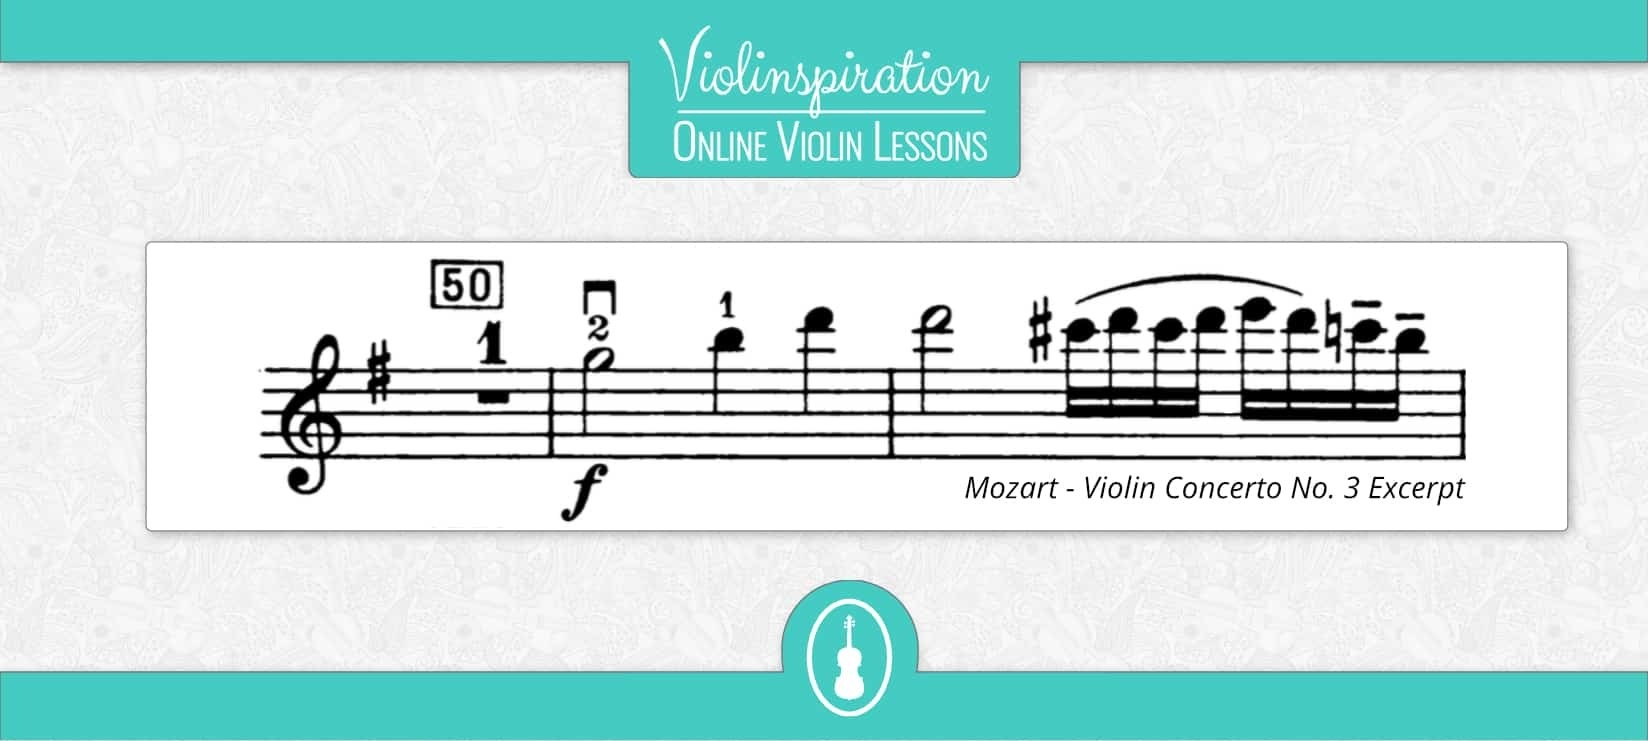
As you see, the first finger is placed in the fourth position on the second note.
If you would play the passage in third and fifth position, you would hear how the violinist changes from fifth to third position. That normally doesn’t sound nice – at the moment the player changes from fifth to third position you might hear a break between the notes, or worse, like a “sliding” sound!
If you play sixteenth passage in fourth position instead, you can keep the hand in the same position during the entire passage. In that way, the whole passage will sound smoother. You can have a look at this exact passage in the the video below.
Notice how playing in the fourth position helps Hilary Hahn to play the quick passage at 1:50 perfectly smooth!
How to Find the Fourth Position on the Fingerboard
- D on the G string.
- A on the D string
- E on the A string
- B on the E string
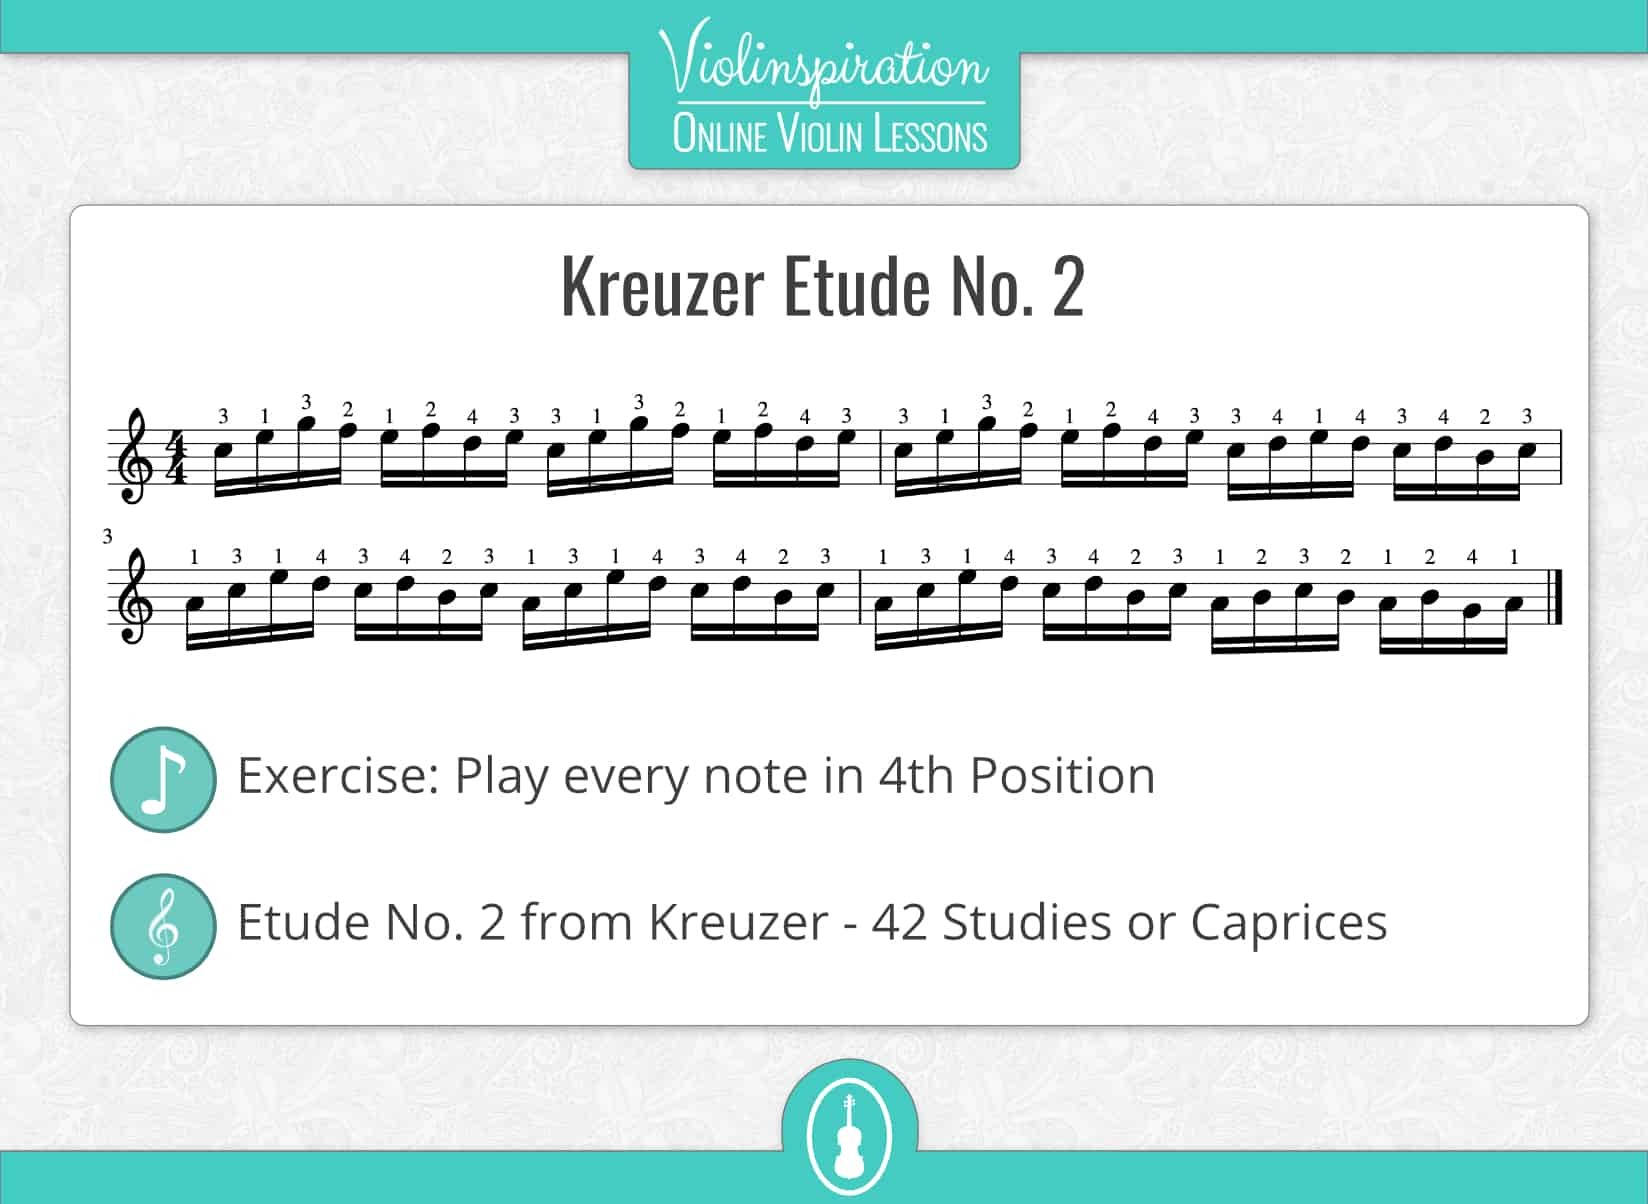
My Recommended Fourth Position Exercise
The Fifth Position on the Violin
The fifth position is a little bit more difficult to find than the first four positions.
When playing in the first position the thumb is on the left side of the neck (fingerboard) and stays there when you shift from the first position up to the fourth position. But, the thumb position changes when you shift into the fifth and higher positions.
In this and all the higher positions the thumb slides under the neck and closer to the body of the violin.
The change in thumb position in this manner makes it easier for your fingers to line up over the higher notes.
Where is the fifth position on the fingerboard?
In fifth position rest the left hand against the body of the violin. Position your hand in a way that you could play both the first finger and fourth finger without changing hand position. Remember that there is only one hand position for each violin position.
How to Find the Fifth Position
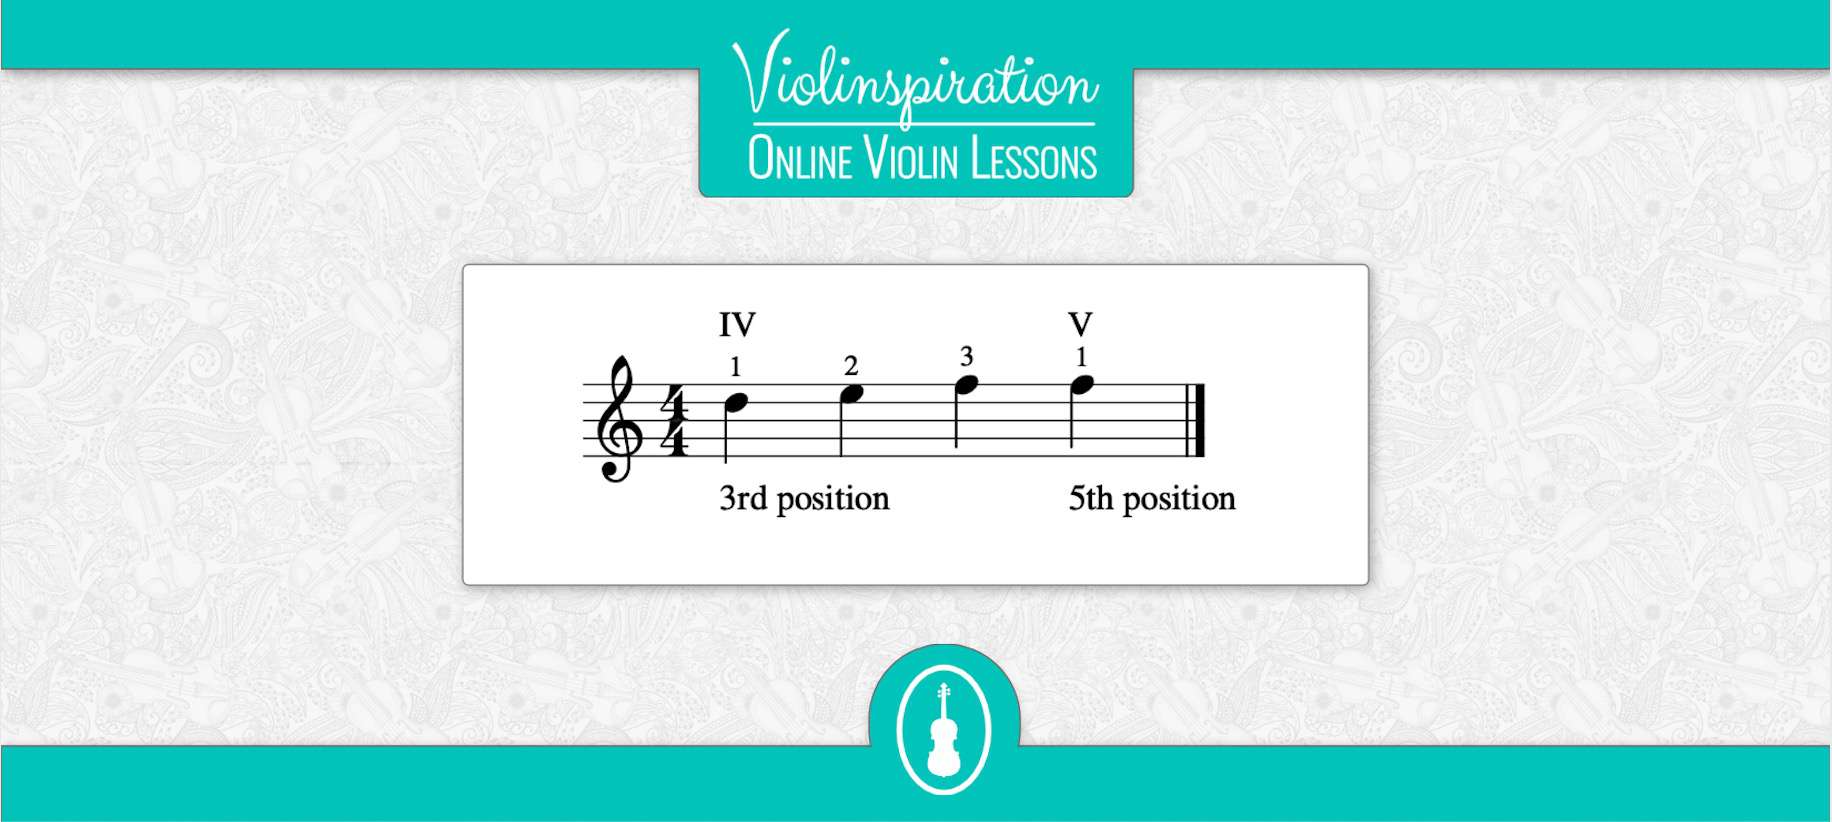
Let’s do a simple exercise together to find the fifth position. Here are the notes of the exercise:
- Place your hand in third position and play the first finger note (on the A string, that would be a D).
- Consecutively place your second and third finger in third position and play the notes.
- Listen to the third finger note and memorize the pitch.
- Play the exact same note you just heard with your index (first) finger. If you heard the same pitch, you are playing in fifth position correctly.
Did the pitch of the first finger in fifth position sound the same as the pitch of the third finger in third position? Congratulations, you officially found the correct location of the fifth position!
Do The Easy “Fifth Position Check”
Now, let’s do a last check-up together.
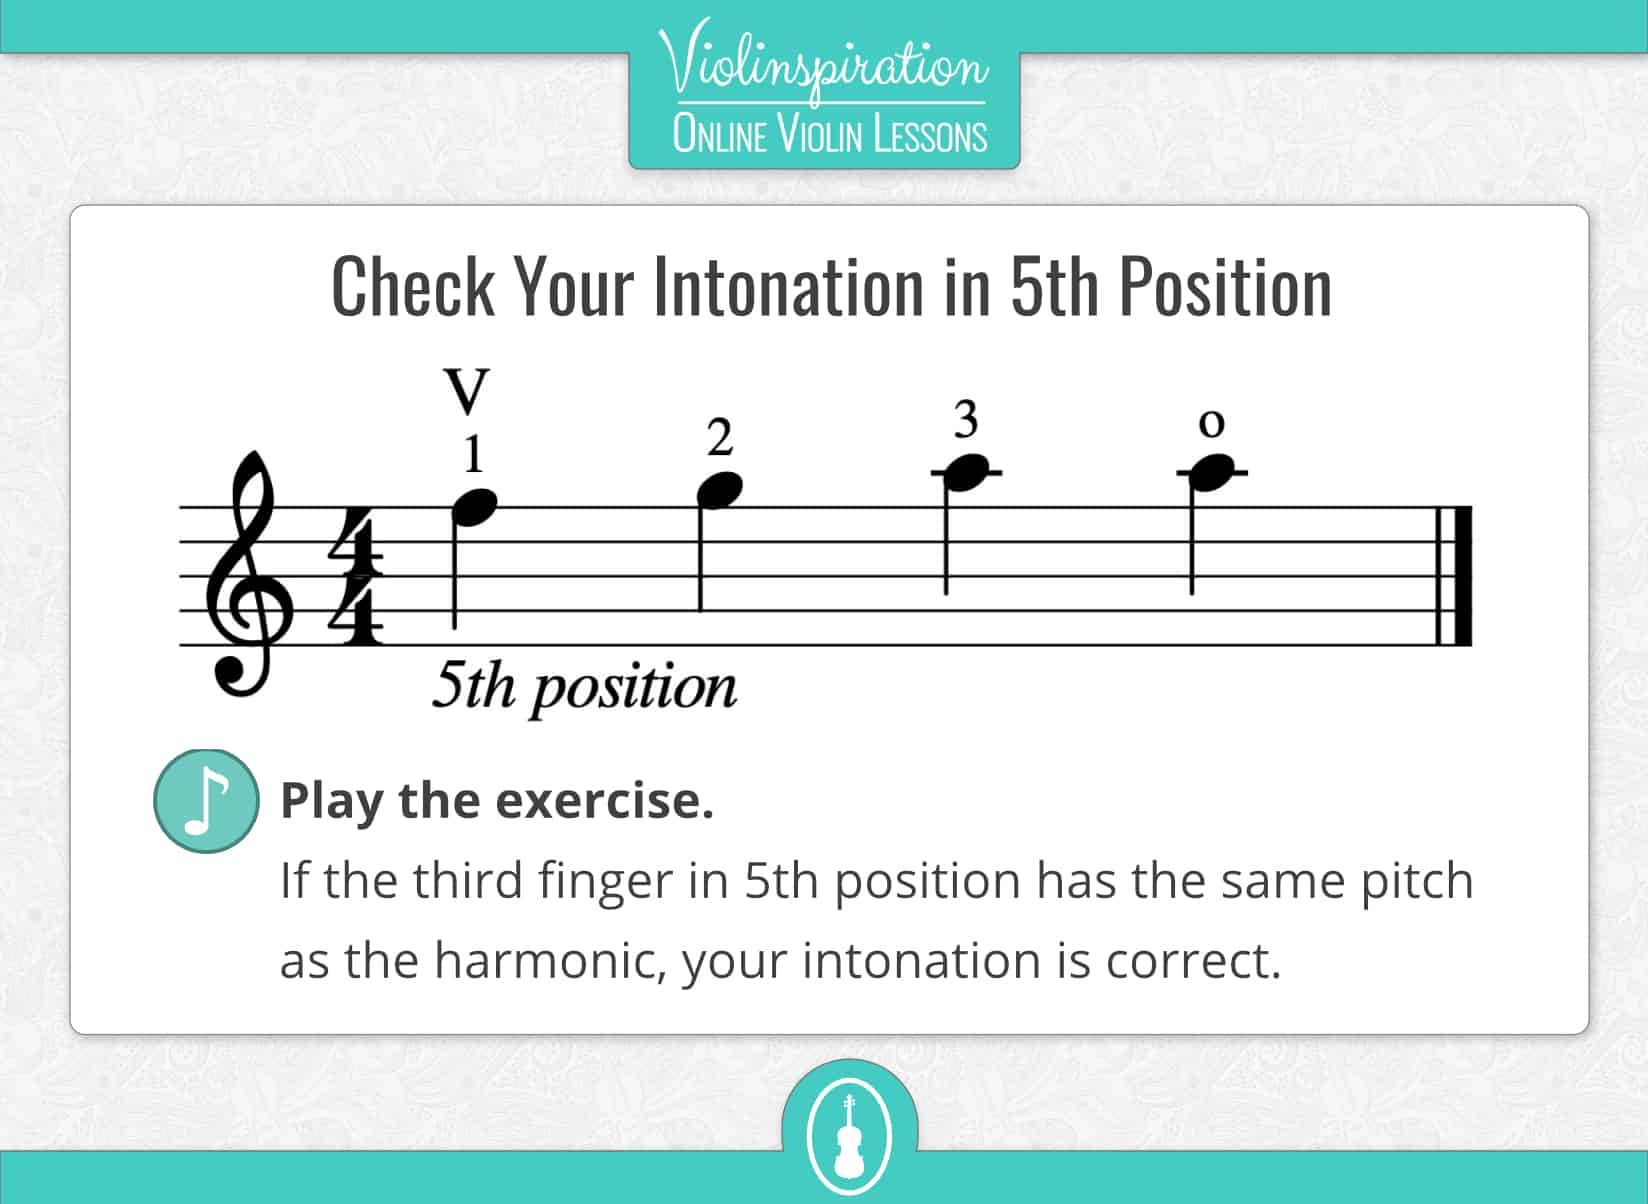
Place the first, second and third finger consecutively in fifth position.
Play the third finger. Now remove all pressure from your third finger, so that the third finger only lightly touches the string. Play the third finger again. If your hand position is correct, you will now hear the natural harmonic in the middle of the string.
If the third finger in fifth position and the harmonic have the same pitch, you have placed your fingers correctly.
To see each note in fifth position with a fingerboard chart and note chart, please download my booklet with all position charts in the bottom of this blog post.
The Sixth and Higher Positions on the Violin
The higher the position is, the closer the notes are together. In the highest positions on the violin, the notes are very close to each other. This means that the space between your fingers becomes smaller in these hand positions.
How to Learn to Play in the Higher Violin Positions
To get more familiar with the highest positions, I can recommend starting by learning the 5 most common 3-octave scales
I will show the exact order in which to learn the 3-octave scales in the blog post linked above.
After that, I recommend the following two books:
If you are a member of Julia’s Violin Academy, you can find downloadable PDFs of these books in the “resources section”.
- Scale System: Scale Exercises in All Major and Minor Keys for Daily Study
If you have learned the 5 most common 3-octave scales, you can have a look at other scale exercises and less common scales. I do recommend getting started with the F Major scale. - After that, you can take a random scale (preferably a scale in which you are also currently practicing one of your pieces) and practice the following Sevcik exercises
- Exercise No. 1 – Make sure to keep your fingers all on one string
- Exercise No. 5 – Learn the 3rd Octave Scale – First 4 bars
- Exercise No. 5 – Bar 5-13 – Learn to Play the 3-Octave Arpeggio’s
- Sevcik Violin Studies – Opus 8: Changes of Position and Preparatory Scale Studies
Practice the exercises in the following order:- Exercise #1
- Exercise #8
- and Exercise #10
If you are working on the exercises, you might notice that it gets harder to get a beautiful tone out of your violin. Sometimes it might sound “squeaky”. This problem can normally get solved by moving the contact point of the bow closer to the bridge of the violin.
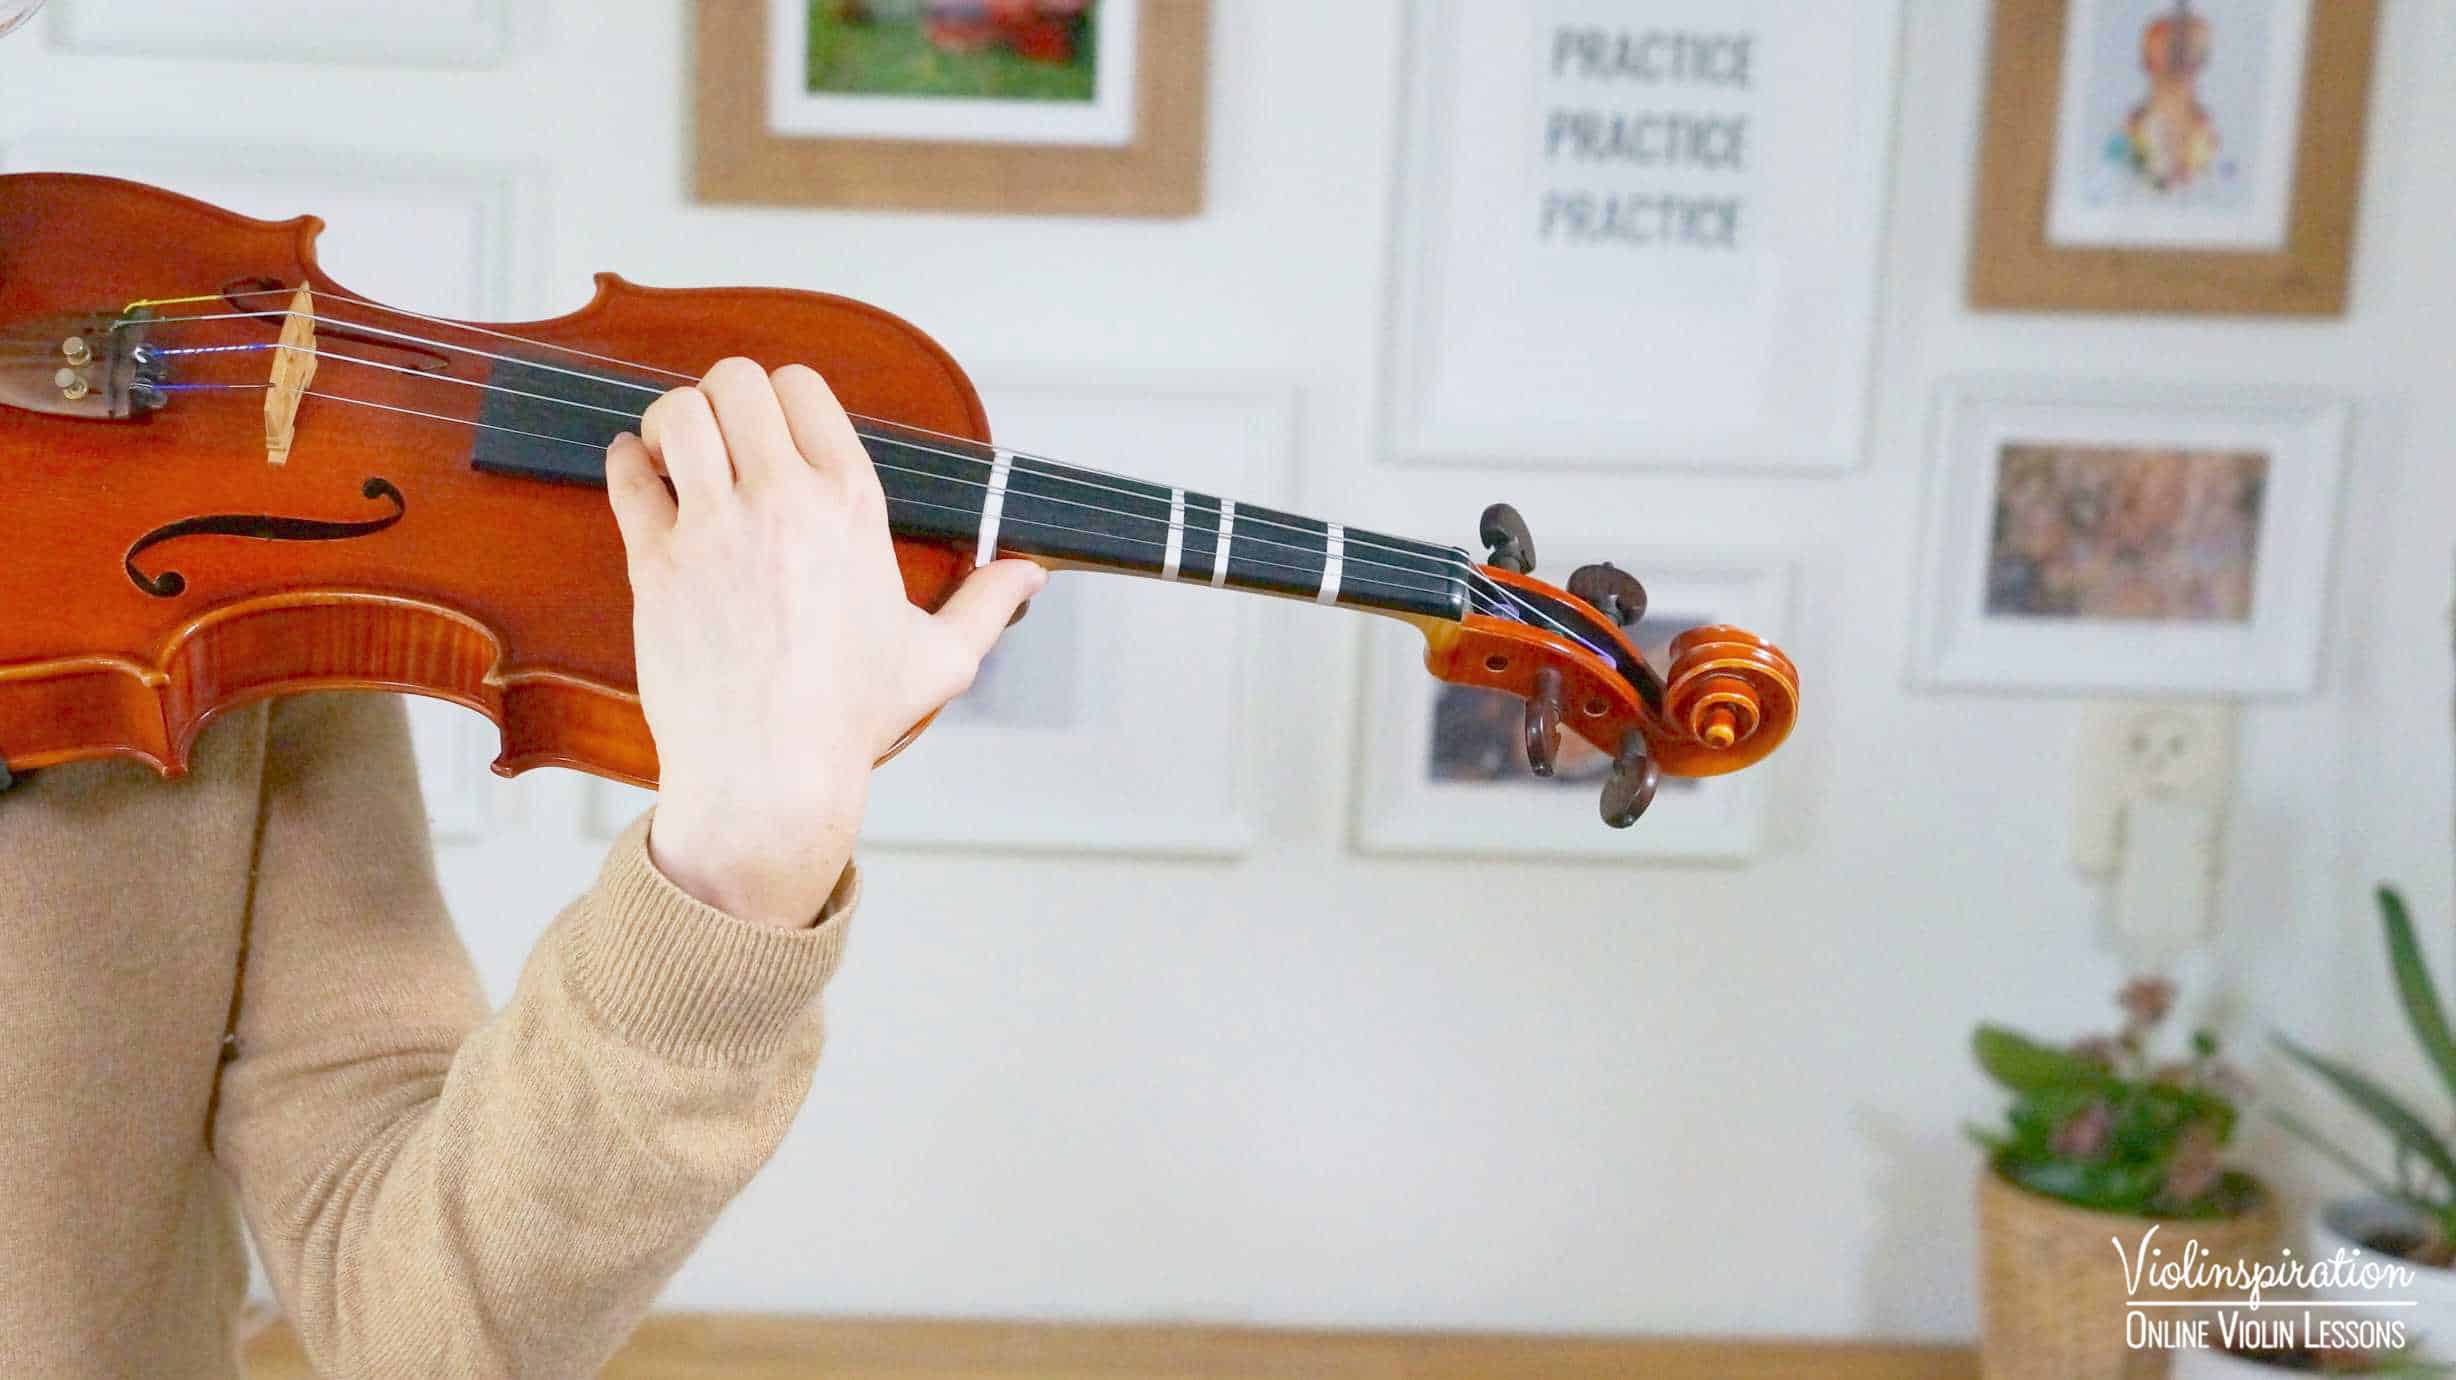
In the pictures below you can see my recommended hand position when playing in the higher positions.
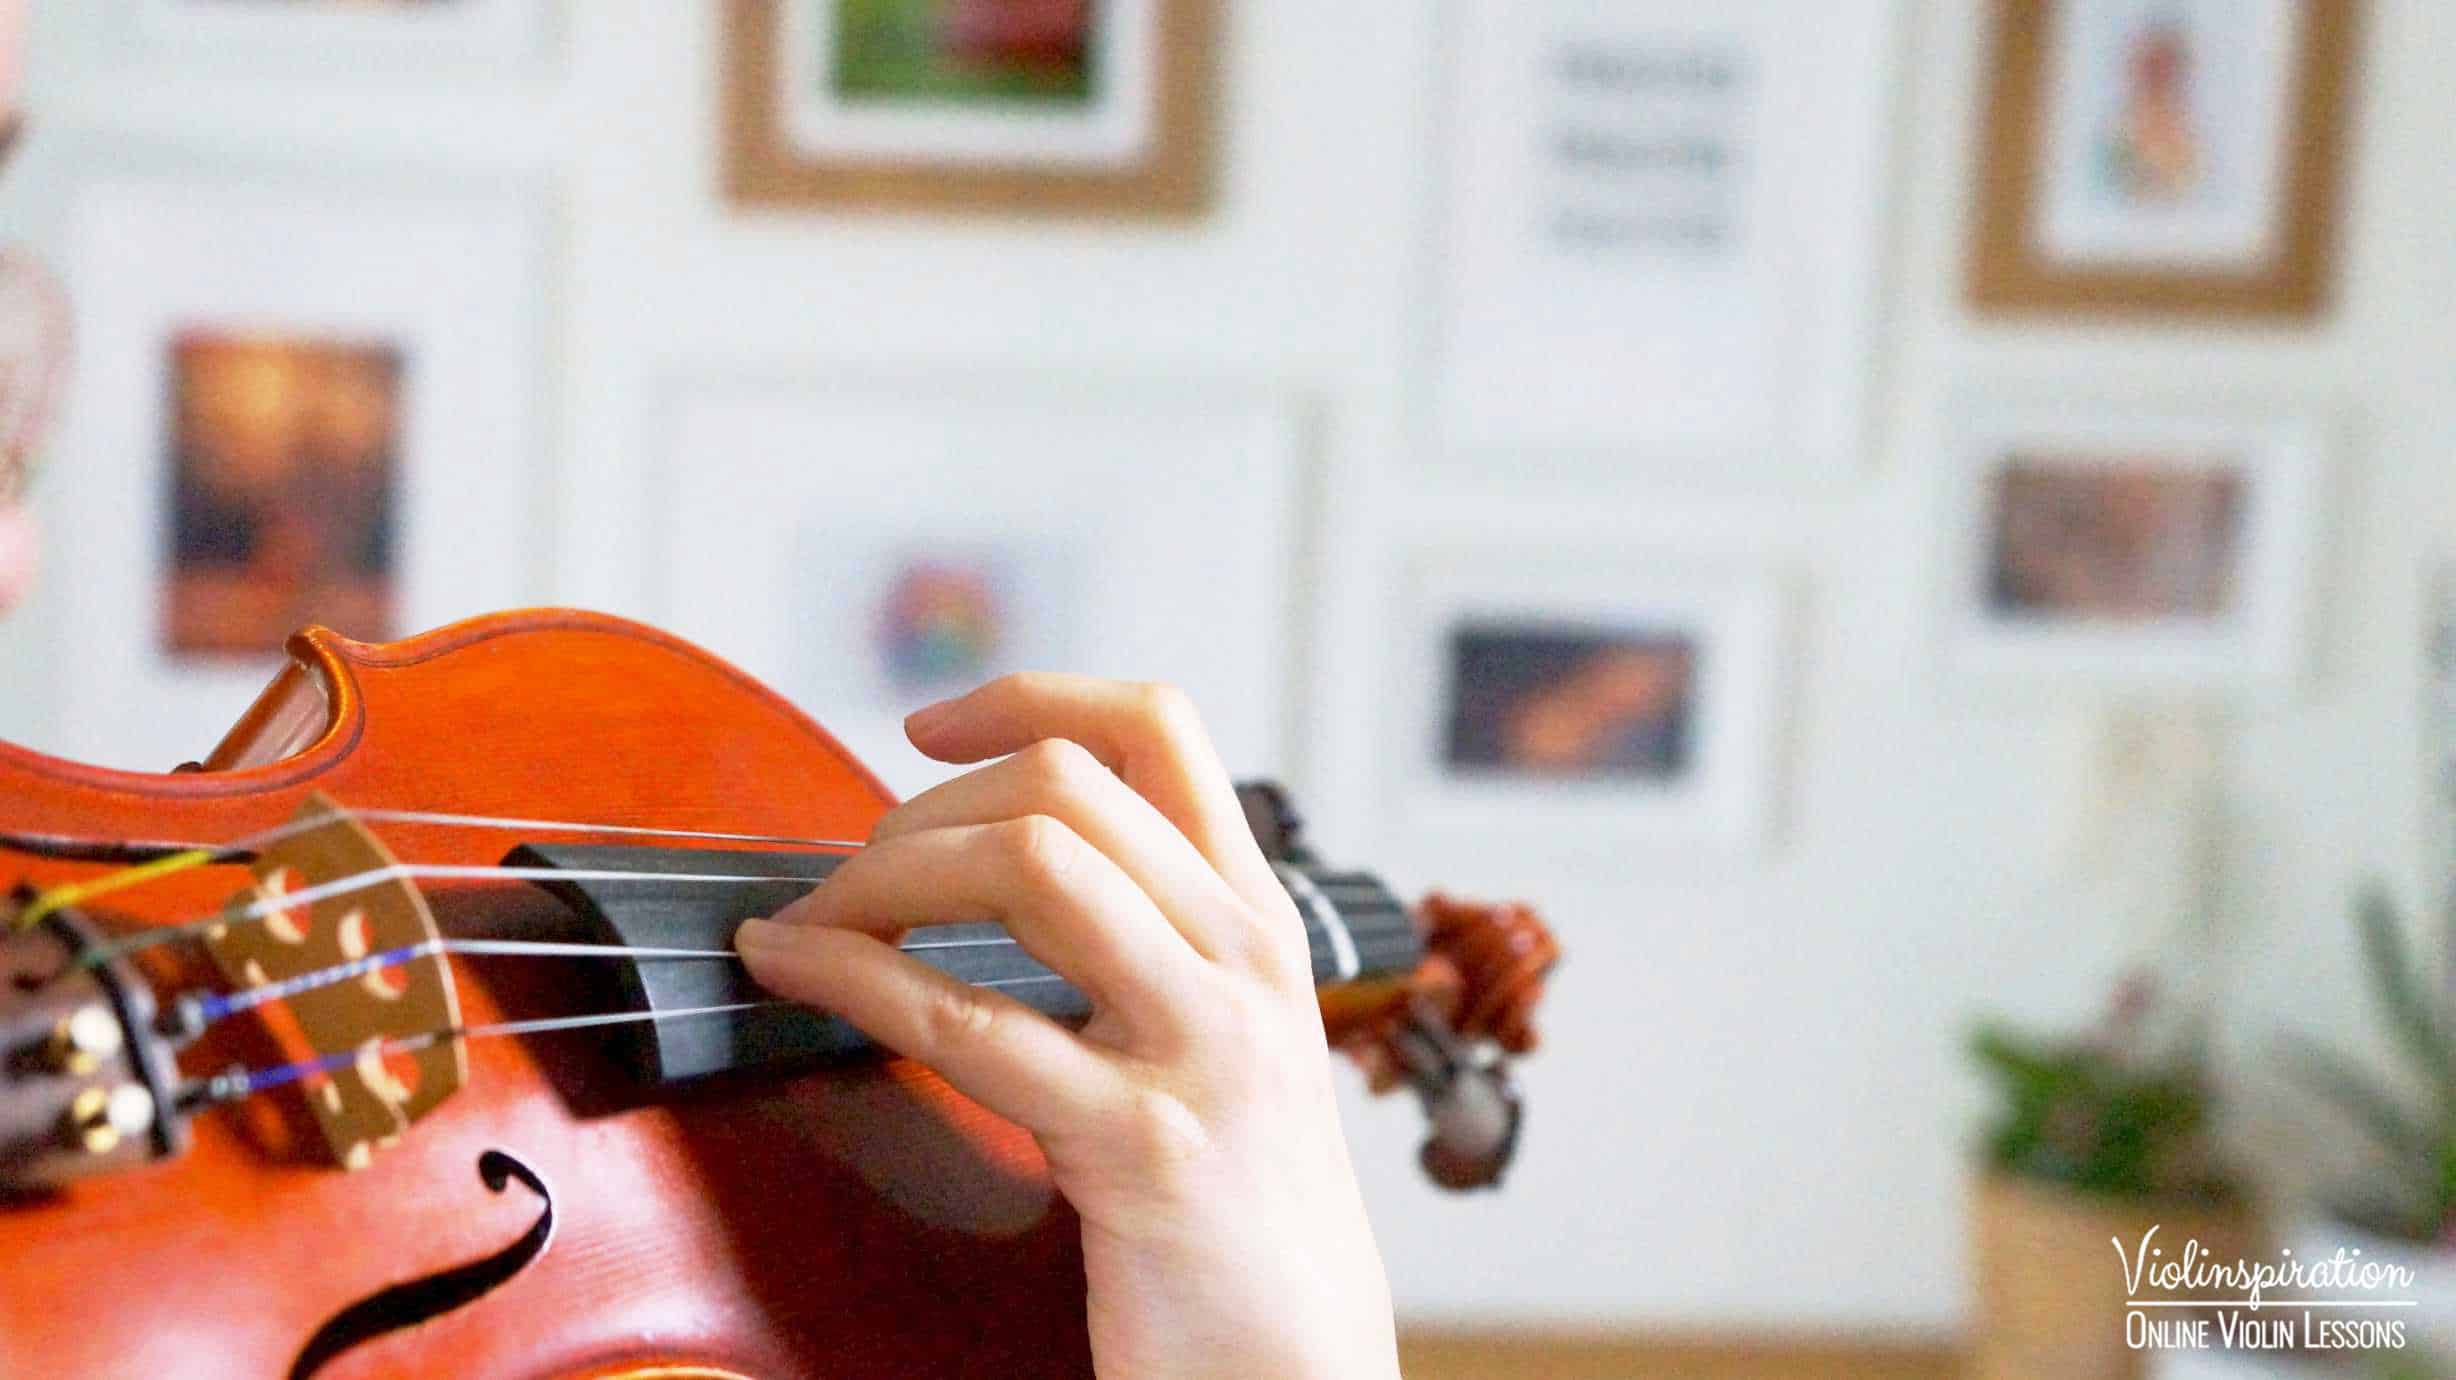
How to Learn Violin Positions
A great way to get familiar with a new position is to play a simple scale in the position you’d like to learn. Thanks to that:
- your ear will get used to the pitch of the note
- your muscle memory will begin to develop
- you will know where your hand needs to be when you are playing in tune.
After practicing simple scales, go on and practice etudes and exercises that focus both on finger placement in the new position, as shifting between your target position and other positions.
You can also play simple pieces you already know by heart (like Twinkle Twinkle Little Star) in the new position.
As soon as you feel more confident in playing the new position, start to play and practice as many violin pieces in which the position that you’d like to learn is incorporated.
Order in which to learn the positions
All beginner violinists learn first position firstly.
After first position, the general rule is to teach third position. This is because you gain two extra notes by shifting into third position and you only gain one note shifting into second position.
There are some teachers who teach both second and third positions at the same time. Some teachers will make sure you can play the fourth and the fifth positions. When they are sure of this, they will then teach you to play the second position.
This is the order in which I currently teach the violin positions to my students:
- First Position
- Half Position
- Third Position
- Fifth Position
- Second Position
- Fourth Position
- Higher Positions
How to Shift Between Positions
At the moment you move your hand upward or downward from one position to another you have a shift.
There are many types of shifts – and sharing about each type would be enough material to cover yet another full-length post. If you are interested in that, please let me know in the comments below.
Also, if you want to learn all types of shifts in the order I recommend, I also recommend enrolling in my online violin school Julia’s Violin Academy. If you follow my step-by-step curriculum it will automatically take you through each shift you need to learn in order to master violin playing.
In general, you need to keep several things in mind when shifting positions:
- your thumb needs to be very loose, because you want it to move upward smoothly with the whole hand
- you can think of your hand as one object that moves as a unit as you want to move your fingers, hand and thumb together up and down the fingerboard
- try to keep the whole unit relaxed while shifting
- shifting is a very soft and subtle motion – think of the motion you make on the strings as the motion you would make when stroking a kitten or a puppy
- use double contacts: use the contact points of your thumb and the base of your index finger – this guide will help you find your notes when shifting
- when we shift, we usually shift at the end of the old bow stroke or note, because shifting at the beginning of the new note or bow stroke doesn’t sound as smooth
- use a new bow stroke while playing the new note in the higher position.
How do I know when to shift? Or, how do I know which position to shift into?
In most classical sheet music you will find violin fingerings. Violin fingerings are numbers above or below notes that indicate which finger to use on a specific note.
Read the Violin Fingerings Instructions
Here is an example of such fingering instructions:
There is only one violin fingering and pitch combination for a note on each string.
For instance, if a D (“third finger”) is played on the A string with your first finger, you will always have to play in third position.
I created downloadable PDF charts that go along with this blog post that will show you exactly in which position to play each note / string combination.
Here is an example of one of these charts:
With the help of the charts you can figure out in which position to play any note. The more often you practice correlating finger number and strings with positions, the more natural it gets.
At some point it becomes second nature to recognize in which position you have to play a note by seeing only a finger number and pitch.
However, even if you would know all combinations by heart, you might still encounter another problem.
There are many pieces of sheet music that do not have fingering instructions. In that case it is up to you to decide in which position to play.
How to decide on positions when there are no fingerings
Normally you start playing a piece in first position by default, as it is the easiest and most practical position to play in for most violin players.
To choose whether you should shift to (or even start to play the piece into) another position, there are three basic questions to ask yourself:
- Is it necessary?
Usually if a shift is to take place on the E string, you will see it in the sheet music. The notes are above the staff using ledger lines. - Is it easier?
Sometimes shifting to a higher position is easier than crossing strings. - Will it sound better?
Is the sound you’re looking for a deep and rich sound? You may want to shift to a higher position. Is the sound you’re looking for light and vibrant? You may want to cross to a higher string.
A shift will also stand out more if it takes place in the middle of a slur or musical phrase. It will sound smoother if you shift between them.
Making the decision ultimately depends on these three main factors.
If you would like to see some practical examples of deciding in which position to play, please have a look at the following video:
Final Note
Starting to learn to play in new violin positions can be daunting at first, but with the right practice techniques and patience everyone can learn to play in all positions!
Download the PDF charts under this blog post and start playing all notes of the chart in your target position. Continue to practice with the etudes, exercises and suggestions within this article. You will already see a noticeable improvements in any position even after only one week of practice.
Even if you don’t feel comfortable playing in a new position after a few months, it may not be time to throw in the towel just yet. Remember that consistent practice always pays of in the long run and give it a little more time.
At some day you’ll casually wake up and play a concerto in 5 different positions – and you’ll actually be enjoying it!


