Learn how to hold the violin correctly with this visual guide to the violin left-hand position – including the 4 most common mistakes to avoid!
So, you’ve found yourself inspired to begin playing the violin. You’ve bought an instrument, found the music for songs you want to learn, and now you’re off to the races!
You begin playing and soon enough, you think to yourself “hmm, this is a little challenging. Why does it look so easy in the videos I’ve seen?” and the answer to that question — excuse the cliché — is practice! And practice can be really fun, especially when you know what you’re doing and what you should be working on.
Learning to play the violin is almost like putting together a puzzle. You work slowly and carefully, trying out each piece in each position until eventually, the image of the puzzle begins to appear, and you can finally begin to see the fruits of your labor. One such puzzle is the left-hand position and left-hand hold. Let’s dive into it!

Approaching the Left Hand on the Violin
When I am practicing my violin, I think of my work much like I would when I am putting together a puzzle. The violin left-hand position is perhaps the most important part of playing the fiddle. Of course, the sound of the violin is created by pulling the bow across the string, but the fingers are what create the notes, and the notes are the roadmap to the music.
But what is the correct way to use your left hand? How do you place your fingers onto the string? How do you hold the violin? And what should we do about the annoying wrist and elbow?
Fear not — I will answer any questions that you may have while starting on your musical journey.
If you are still not sure about your left-hand hold after reading this article and you are a member of Julia’s Violin Academy, make sure to upload your video to get personal feedback!
What is the Correct Way to Hold the Violin?
The correct way to hold the violin is the one that is most comfortable for you. There are only a few parts of the puzzle that you should pay attention to the thumb, the index finger, the wrist, the left hand, and the left arm and elbow.
Are you curious about the difference between the classical violin hold and the fiddle hold? Check out this quick guide by Kennedy Violins on holding a fiddle vs. a violin—and choose what feels best for you.
The Main Elements of the Left Hand
These main elements are the foundation of fingerboard mastery. The thumb and index finger are the co-captains of the left hand. The wrist, arm, and elbow are the supports that mobilize the entire left-hand unit.

The thumb and the index finger (or the first finger) are the guides your body uses when moving around the fingerboard. They guide the left hand, the left arm, the elbow, and the fingers. They are the captains of the violin left-hand position.
The wrist is another essential component. It is the joint which connects the left hand to the arm and should never be tense and should always be relaxed. Also, the posture of the wrist will vary depending on the position in which you are playing.
Of course, we cannot talk about the technique of the violin left-hand position without mentioning the left hand itself! The palm and the left hand support the movement of the left arm and fingers, in general.
Finally, the left arm and the elbow are what make the hand and fingers mobilize up and down the fingerboard. The positioning of the left arm and elbow will vary depending on the string you are playing.
Now let’s get into the specifics of these components to help you look and sound like a pro!
The Thumb
The thumb and the index finger work together as a unit to guide your arm up, down, and sideways across the fingerboard. Place your thumb to the left side of the violin neck, keep it relaxed, and place your index finger right across on the right side.

Be aware that your thumb should not stick up above the fingerboard too much, it shouldn’t be too curved nor straight. You also should take care not to press too much with the thumb or the first finger; doing so will cause tension and could lead to injury.
The Role of the Index Finger
The base knuckle of the index finger contacts the right side of the violin neck. This will allow the left-hand position to serve as a basis for each position. It also measures distances between shifts and guides the hand across the strings.
The first finger stays in this position until you shift above the third position, in which case, you should take your first finger away from the neck so it can become free.

Other important roles of the index finger:
- Positions – The first finger is the foundation of all positions on the violin. The hand position, or the hand frame, is a set of fingers in one position and which relies on the first finger. Whether you are in the first or third position, this is always true.
- Shifting – The most stable and reliable finger when shifting is the first. You should always use your first finger as a guide for shifting, even if you are shifting with another finger.
- Intervals – The first finger also measures distances between intervals. For example, if you are in the first position and you play a four-note A Major chord, your first finger helps the other fingers to find their position on the strings. This is also true when shifting.
Position of the Fingers
The position of the fingers should be slightly above the string you are about to play on. They are curved, relaxed, and have two basic movements: to lift and to drop.
The fingers should drop from above and onto the string and when you lift them from the string, you want to use the muscle of the first joint. You could also think of this as pulling back.
When you drop, you don’t want to use too much pressure so that your hand becomes tight, and when you lift, you want to avoid lifting the fingers too high.

To imagine the feeling of the natural position of the fingers, imagine you are typing on a keyboard. That is the same feeling you want to have when you are playing the violin: relaxed and curved.
The Wrist and the Shape of the Left Hand
The violin left-hand position is maintained with your wrist. It helps the first finger and the thumb guide the arm on the violin. To maintain the proper shape of the violin left-hand position, your wrist should be parallel to the forearm except when above the third position.

In the lower positions (below the third position), the wrist is parallel to the left arm. If you had a ruler or flat surface, you could run it along the back of the left arm and wrist, and it would be completely straight.
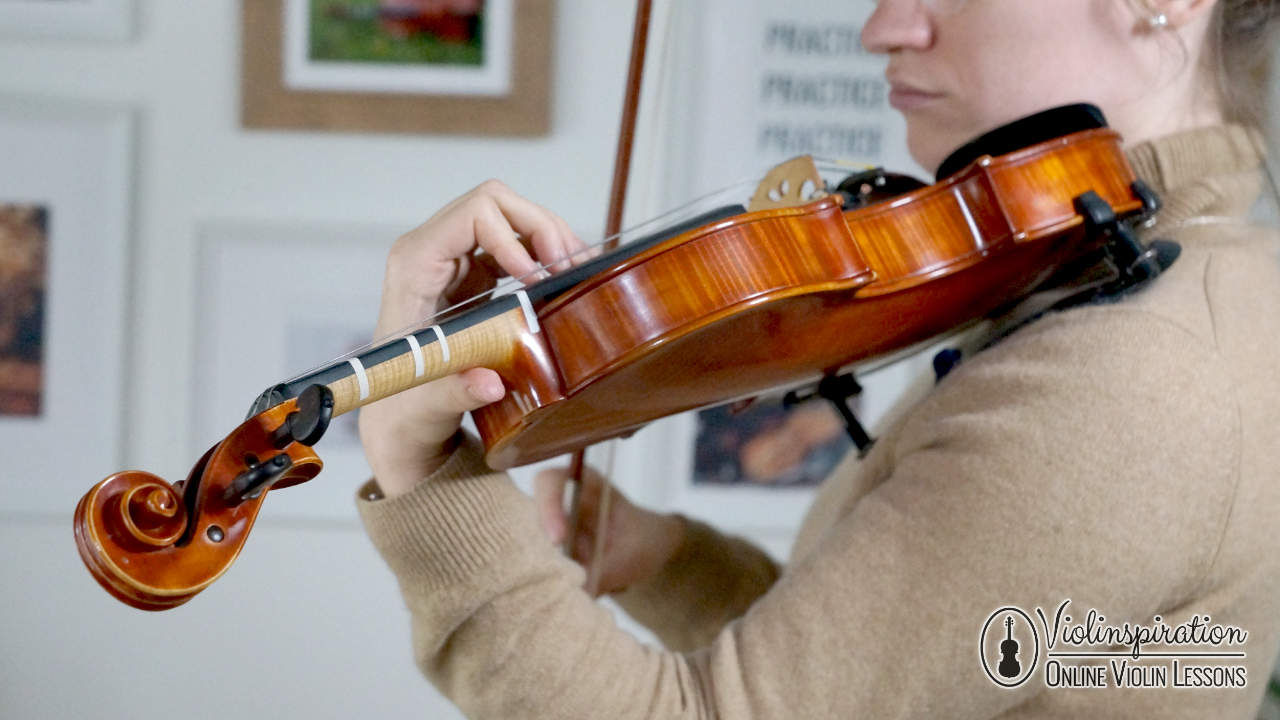
In higher positions, the wrist is slightly bent outwards away from your body but still relaxed. Your knuckles should come towards the ceiling.
You can try this for yourself: try scratching either shoulder with the same side hand. Notice how the fingers become “longer” and the wrist becomes slightly more bent. This is the same feeling as if you are above the third position.
Arm and Elbow Position
The elbow and arm position depends on the string you are playing with your violin. If you play a lower string, the elbow and arm move to the right. When you are playing a higher string, they are pivoted more towards the left.
The arm and the elbow should move together as a single unit. When you shift up, the elbow will come towards your body and when you shift down, the elbow will go away from your body and towards the scroll. (Oh, and they are relaxed and not tight!)
You can think of the arm and elbow as a “claw machine.” Your fingers are the “claw” and are transported by a pulley system made up of your arm and elbow. The left arm and elbow give flexibility to the body, and help to move the hand and fingers forward, backward, and sideways on the fingerboard.
Four Common Left Hand Mistakes
Now let’s have a look at a few common mistakes that you should look out for in your own performance and practice, and how to fix them:
Mistake #1: Arm and Fingers Are Too Tight
When you play the violin, your goal should be to move as efficiently and easily as possible. Tight fingers and muscles can impede your progress. Minimize tightness every time you play.
This was a hidden theme in the article but one that is very important. Musicians often revert to becoming tense when the notes become difficult. It is detrimental to your progress and the muscles in your arm.
When your hand and arms become tight my advice is is to put your violin down and focus on something else for a few seconds. When you return to the instrument, begin playing slowly and become mentally aware of the muscles you are using.
Make sure to feel every move as you make it, and make sure each movement is a relaxed one. The slower you practice, the less tense you will become and the more you become aware of this tightness, the sooner the habit will go away. You should constantly work towards relieving yourself of this tension.
Mistake #2: Clutching the Side of the Neck
Clutching the side of the violin neck is something that can cause your hand to become “frozen”. This is caused by using the wrong muscles to control the fingers.
This age-old problem actually stems from squeezing with the palm which can lead to injury and pain while playing. You want to be sure that you are always relaxed when you are playing. If you are squeezing the neck with your index and thumb, this can create a strain on your muscles.
To release the tension, simply open and close the palm to relax the muscles. Do not squeeze, just open and close.
Mistake #3: Touching the Palm to the Violin When Shifting Up
When shifting above the third position, some string players will touch their palms to the side of the violin. This causes your arm and hand difficulty when trying to reach higher positions and can lead to tension in the arm and hands.
This is a common mistake that even professional violinists make. When you are shifting to the third position or above, you want to avoid hitting the side of the violin with your palm. When you hit the side of the violin with your thumb, you lose the shape of your left hand.
My advice for this sort of mistake is to be very conscious of how you shift and avoid hitting the palm to the neck. It is surprisingly common and can sneak up on you when you least expect it.
Mistake #4: Not Measuring Shifts with the First Finger
When shifting from a lower position to a higher position, you should always measure the distance between the shifts with the first finger. It is the most reliable way for accuracy in shifting and intonation in general.
Simon Fischer wrote an excellent series on violin playing titled “Basics” and speaks to great lengths about what he coined as “ghost” shifts. A “ghost” shift is when a player shifts from one position to another using two different fingers.
Try this on the E string with your first finger on the note F#, then shift up to third position to the note C# (played by your third finger.) You begin playing the F# with your first finger but now are playing with the third finger on C#. The ghost shift already occurred with the first finger: lift your third finger up from C# and check what note your first finger is on – it’s an A.
So, you started on F# in first position on the E string, and ended up in third position playing C#. Even though you never audibly played the A, your first finger still moved to this position. That is a ghost shift.
This is why measuring any shift or distance on the violin with the index finger is so important; it guides the arm and the ear to the right position and greatly improves your chances of intonation accuracy.
Final note
As you can see, each part of the hand and arm is involved in playing the violin. It may seem a lot of work to do at first sight, but soon you will observe how avoiding tension and keeping the correct left-hand hold help you play more beautifully.
Now you may want to practice the correct left hand position in different violin positions. This set of fingering charts will help you out:

Get your free violin charts
for all the positions!
Also, have a look at my Video Lessons library where you can find video about optimal elbow position and even more left-hand mistakes plus troubleshooting.
It has been fun to explore the violin left-hand position with you, and I hope that you will find this knowledge useful in your daily practice.


