Improve your playing by doing violin bowing exercises!
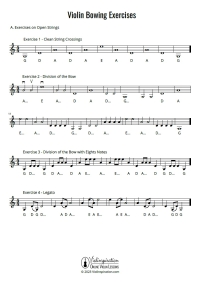
FREE Violin Bowing Exercises
Improve Your Bowing Technique
Holding the bow, as well as having control of it, is one of the most fundamental principles of the violin technique. The way we use the bow determines the quality of the sound, and a well-prepared bow hand enables us to apply the different bow techniques to create different timbres.
Saying that a violinist needs to have perfect control of the bow is one thing though. How to do that is another, and it’s not so simple.
On other instruments, it’s much easier to have a good sound from the beginning. For example, when you hit a note on the piano, the tone is just as it should be. On the violin though, a good tone is something that you will work on and on to find a way to get the desired sound. Thus, if you’re working hard on your technique, you will achieve a good quality professional sound.
For that reason, I created this post. Whether you’re a beginner, or you’ve played for a while, the following bow exercises will help you improve your tone, get better control of your bow hold and bow arm, as well as teach you some of the basic bowing techniques. I will also provide information about the variations you can try.
Let’s get started!
1. Warm-Up Bowing Exercises: Bow Lifts
The three following exercises do not require playing on the violin. Usually, they are the first exercises a violin student does, but they can be helpful for you even if you’re playing for a while.
Hold the bow stick with both your right and left hand. The forearms should be parallel to the floor, and your arms in a vertical position. We’ll call that “position A”.
Extend your arms, then go back to position A.
Next, move your arms back so that the bow touches your chest, and then return to the A position.
Then, move your arms all the way up and all the way down, always returning to A.
2. Warm-Up Bowing Exercises: Windshield Wipers
Hold the bow with only your right hand. Be careful to have a proper bow hold. Your arm and forearm should be like in the A position.
Turn your forearm in a way the bow turns to a vertical position and stops. Then turn your forearm again so the bow stick is parallel to the floor.
Put your bow in the vertical position and then move back to A a few times.
3. Warm-Up Bowing Exercises: Crawling the Bow
Turn your bow vertically to the floor.
Now, try to “climb” the bow with your fingers, much like a spider would do. When you reach the tip of the bow, go back the same way.
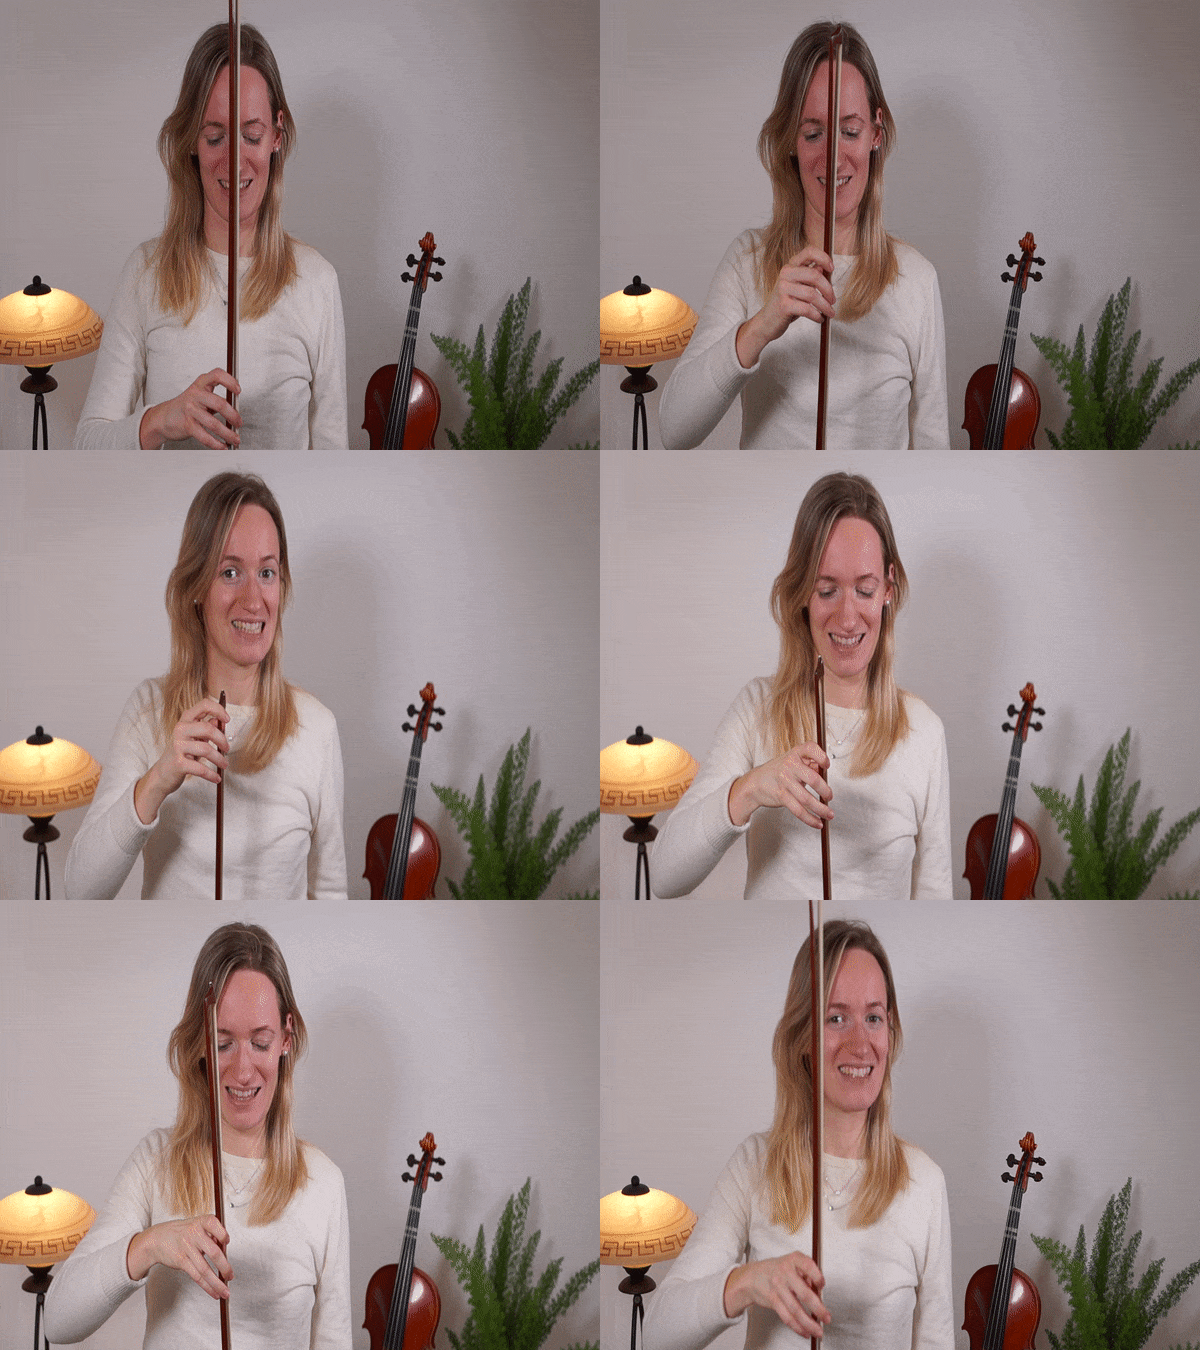
For an extra challenge, you can turn the bow around after reaching the tip!
4. Clean String Crossings
It’s very important to keep the bow on one string (well, unless you play double stops). It’s equally important to play the correct string, and not create unnecessary sounds during string crossings. The following exercise by violinist William Henley (1874–1957) will help with that.
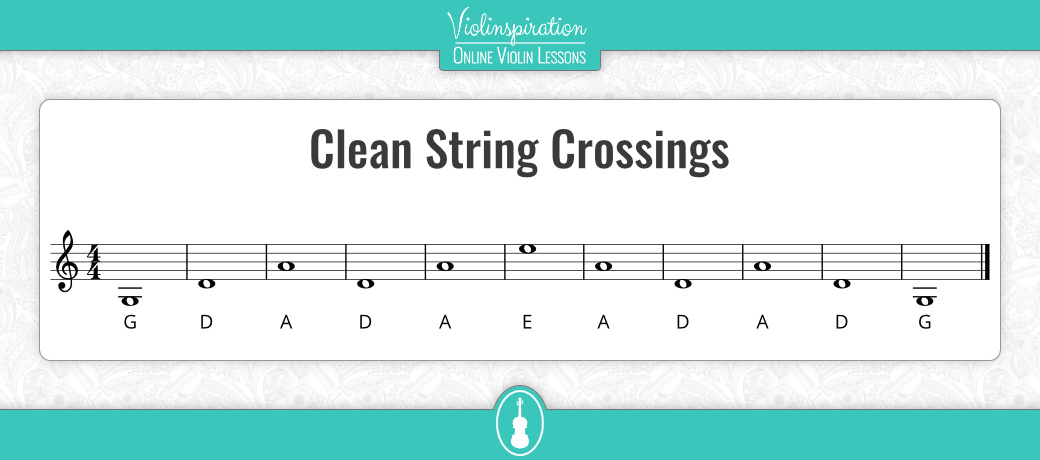
When practicing this exercise, make sure to play long bows. Use the full length of your bow and set a metronome at a comfortable speed to make sure the notes are of equal length.
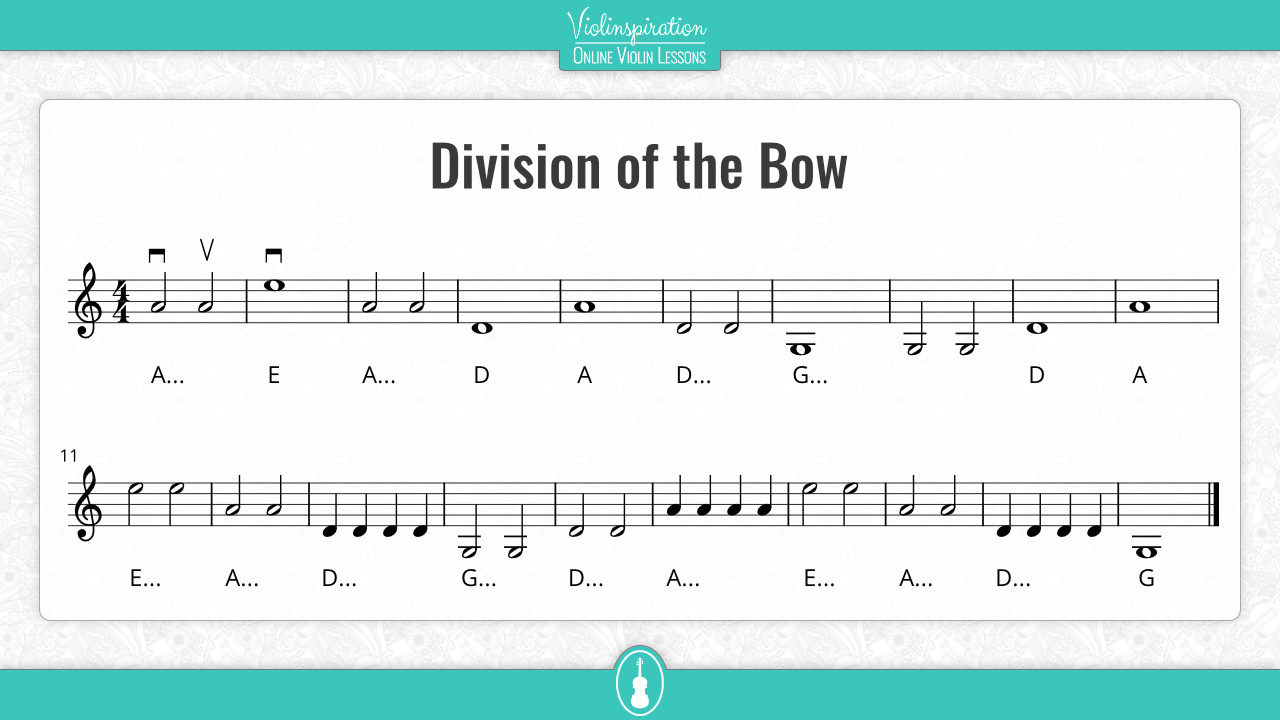
5. Division of the Bow
How much bow hair should you use on each note? Well, it depends on what you are currently playing, as well as what comes next. Learning to divide the bow in half and in three will help you distribute the length properly.
Usually, we use the entire length of the bow for whole notes and half notes, and half the bow for quarter notes and eighth notes. Although, that can change, as you might find yourself cornered on the tip or frog.
For this exercise, apply the rule about the whole bow and half bow. It might be easier if you put a tape in the middle of the bow. But remember, you’ll also have to learn where the middle of the bow is without it!
6. Division of the Bow with Eighth Notes
Learn how to play the eighth notes, while you’re using half of the bow. It might be even less if you’re playing fast!
The following exercise will help you divide the bow while playing eighth notes on open strings.
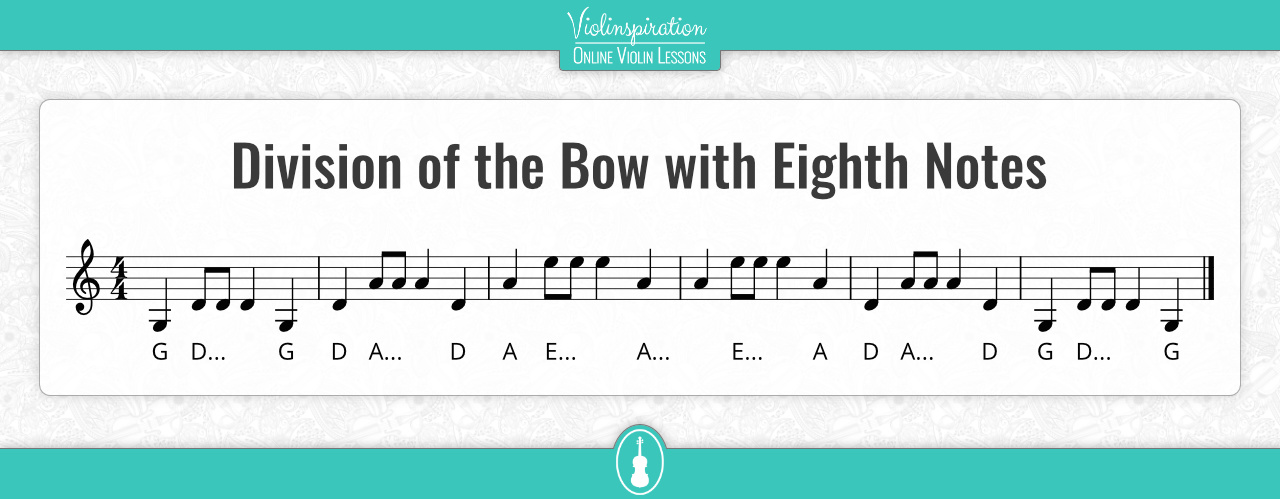
You can change the notes and use various finger combinations with your left hand if you want.
7. Bow techniques: Legato
Legato is one of the most common bowing techniques, along with staccato. It’s good to get familiar with it, as you’re going to use often.
A legato bow stroke is when we play more than one note in the same direction and make them sound connected, e.g. two notes on a down bow.
The way you divide the bow is paramount, as you’ll have to think about how to equally distribute it for the notes under the legato line. You might need to have subdivision markers on your bow, for example, divide the lower half in two.
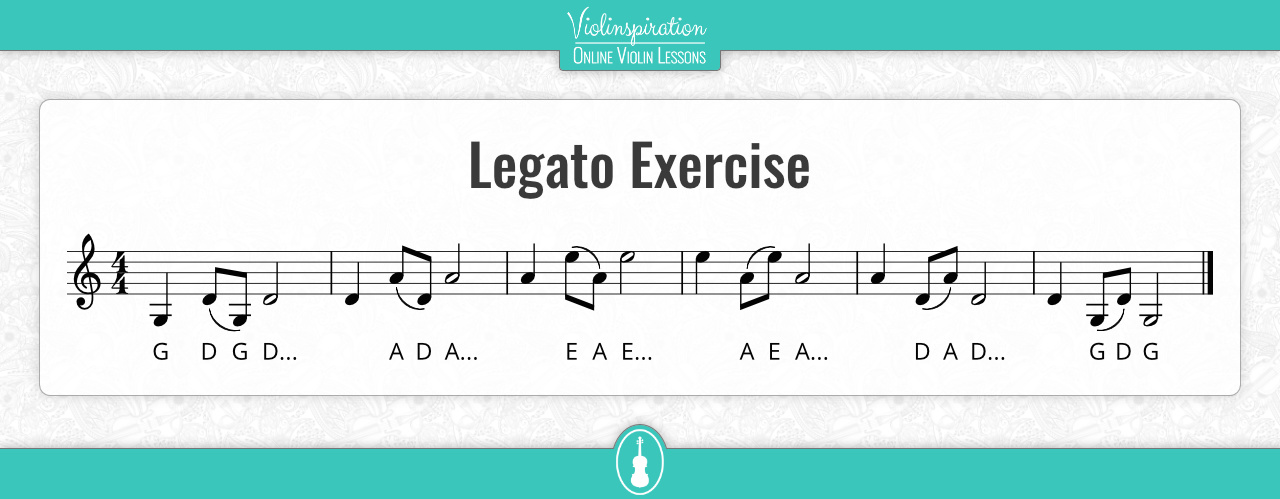
In this exercise, you have to use the lower half of the bow for the quarter note and for the eighth notes in the first measure. Then, use your entire bow for the half note. In the next measure, you’ll have to do the opposite: the first two beats of the measure are going to be played on the upper half.
8. Bow techniques: Legato and Staccato
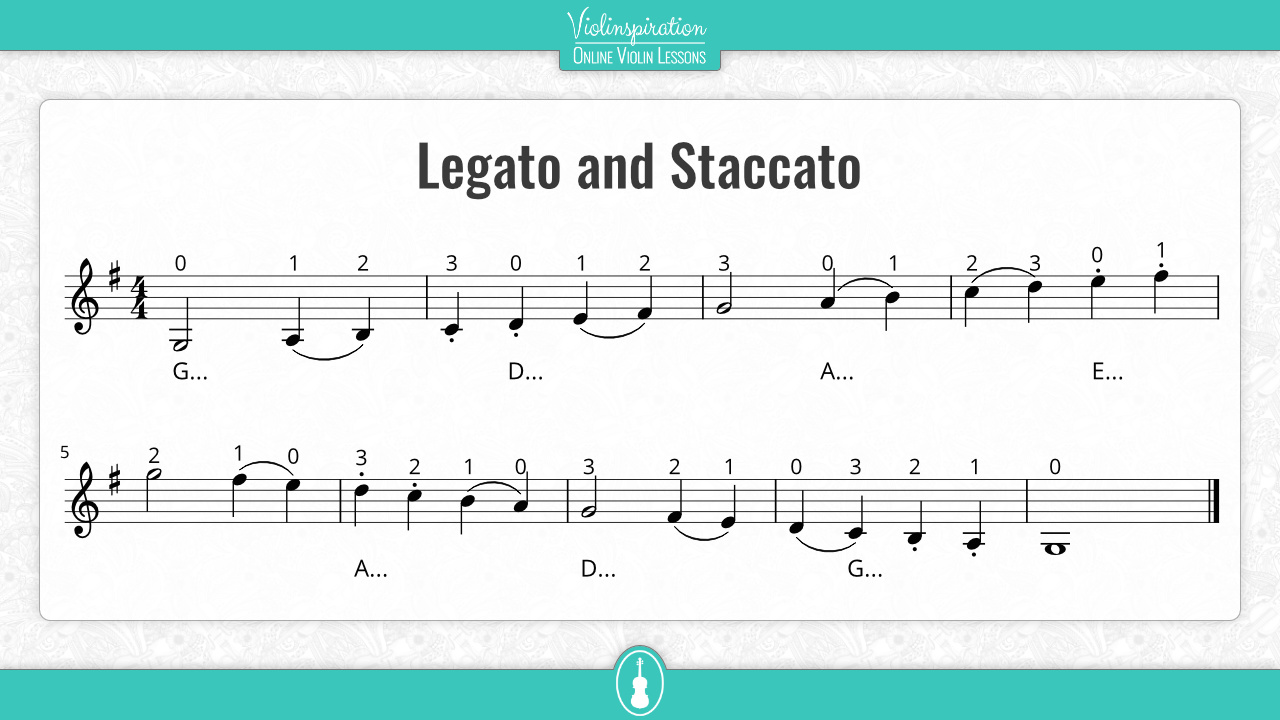
When playing staccato, we make a short and sharp bow stroke cutting the note length in half. We don’t lift the bow between playing the staccato notes. We recognize staccato bowing by a dot above (or below) the note.
The best way to practice various bowing techniques is by doing scales. So, try an exercise on the G major scale with both staccato and legato. A good understanding of these techniques will help you improve your playing!
9. Dynamics
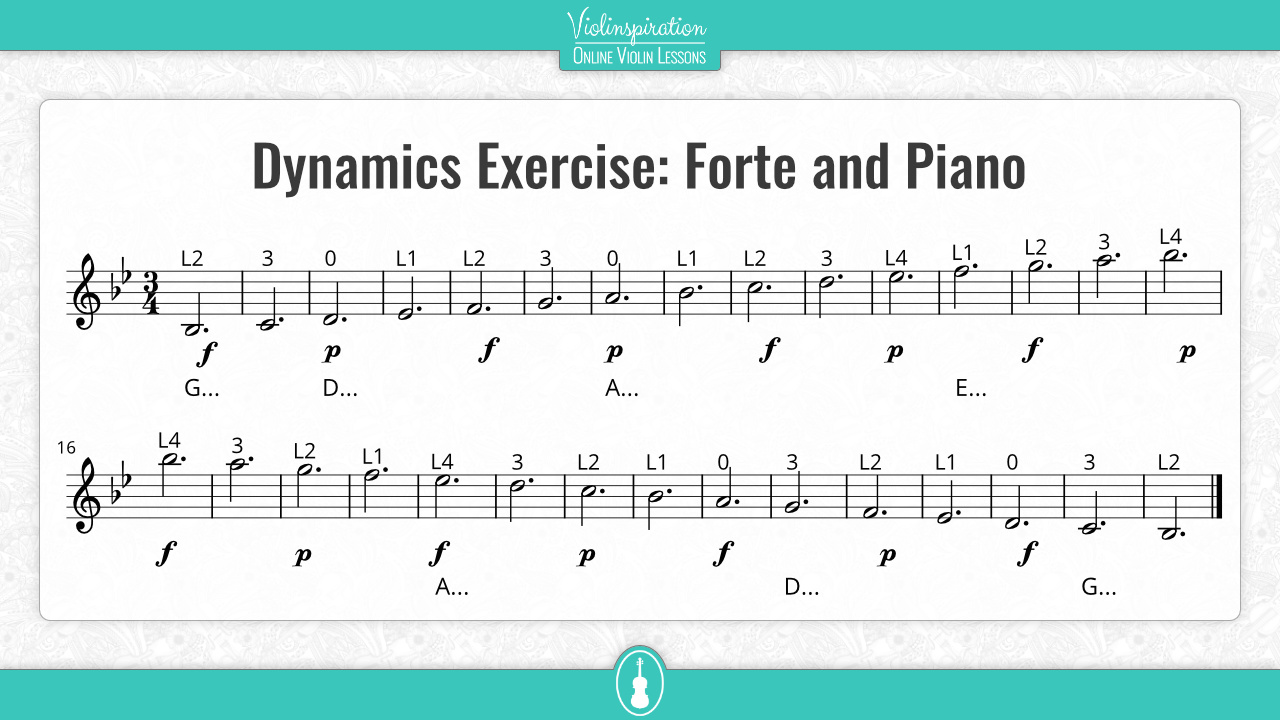
Dynamics make music sound interesting and generally provide a richer tone. Dynamics range from pianississimo (ppp) to fortississimo (fff). It is important to gradually expand the range of the basic dynamics (forte and piano), so you’ll be able to go through all the middle levels of loudness, as well as the extreme ones.
To play with dynamics, you have to either apply more or less bow pressure, as well as adjust the bow speed. Keep in mind that it’s easier to play piano on the tip and forte on the frog. Also remember that the pressure from the fingers should not be too much so that it hurts or it makes difficult to play.
Here’s a scale where you can try to use dynamics. Play as loud as possible for forte and as softly as possible for piano.
10. Uneven Bow Strokes
When you run into uneven bow strokes, when the first note is long and the next is short, you’ll have to be really careful to adjust your bow speed in such a way that the sound of both notes is “similar”, meaning that the shorter one should not be accented.
Practicing dividing the bow will help you greatly here. Do the following exercise on all parts of the bow and always try to keep the sound the same in all of them. After you master it, you can think of how to divide the bow in a way that helps you play what is required in the piece you’re studying.
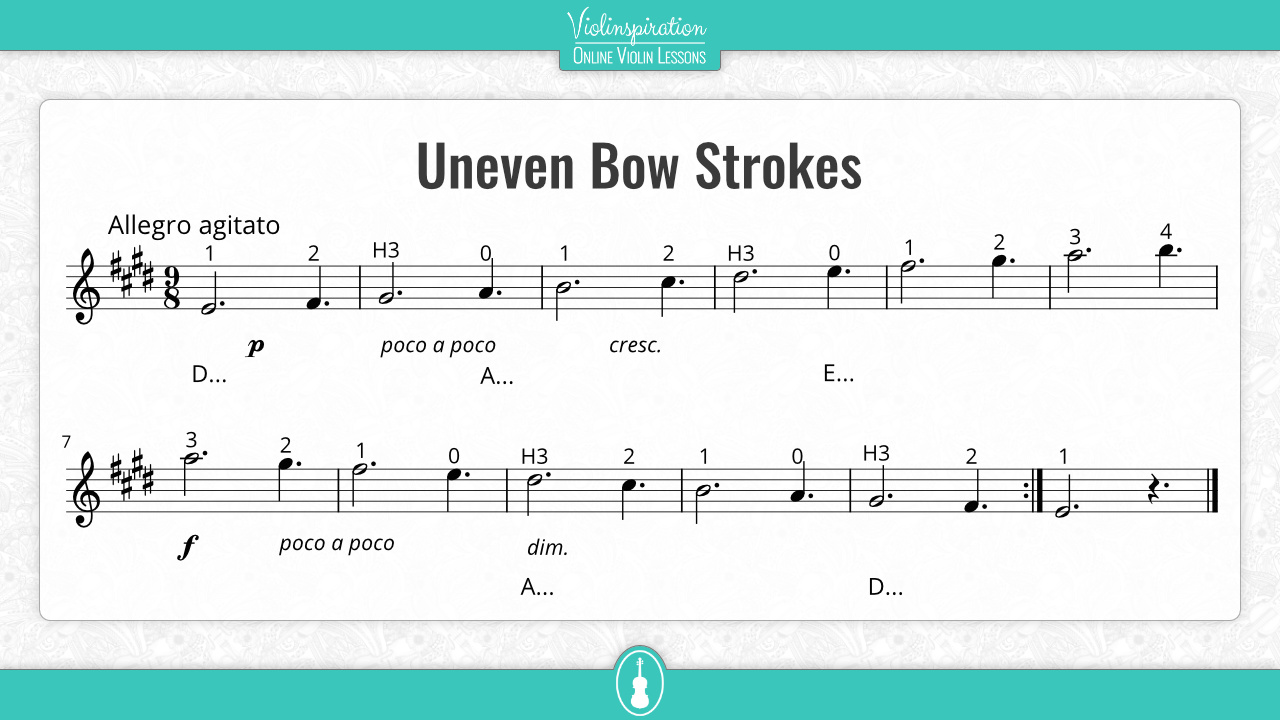
In the above exercise, you have to be very careful when playing the dotted quarter note. You have to give it enough bow, so when you have to play the next note, you won’t find yourself cornered. First, try it without the dynamics, then add them for an extra challenge.
Bonus: The Thibaud Bowing Exercise
The Thibaud bowing exercise is for a bit more advanced players but it really helps with taking control over the bow. If your bow is shaky or tilted, this is the exercise for you!
The first step in the Thibauld exercise is to execute an up bow very near the frog for a single note. Then lift your bow, go to the tip, and execute a down bow there.
When the bow is lifted, it should move to the next point as smoothly as possible, without any unwanted sounds, and you should keep it in a straight line. Your bow hold should be “glued” to the string (what we call collé). You can increase the tempo for extra difficulty.
Tips for Executing Violin Bowing Exercises
Whether you do exercises from this post or you do any other bowing exercises, always remember the following rules:
- First, examine what you have to play
Have a good understanding of what kind of movement you need to make. - Break the movement down to its fundamental elements
Start with simple exercises to get into the required movement. Those exercises could be as simple as holding the bow and doing a specific movement in slow motion. - Don’t rush
Start slowly and speed up only when you’re comfortable with playing a slower version. - Don’t apply unwanted bow pressure and make sure your bow grip is correct
If your hand feels weird, starts hurting, or you realize you have too much tension, you are probably doing something wrong. Stop, reset, find out what is not working, and introduce an improvement. - Keep the bow straight
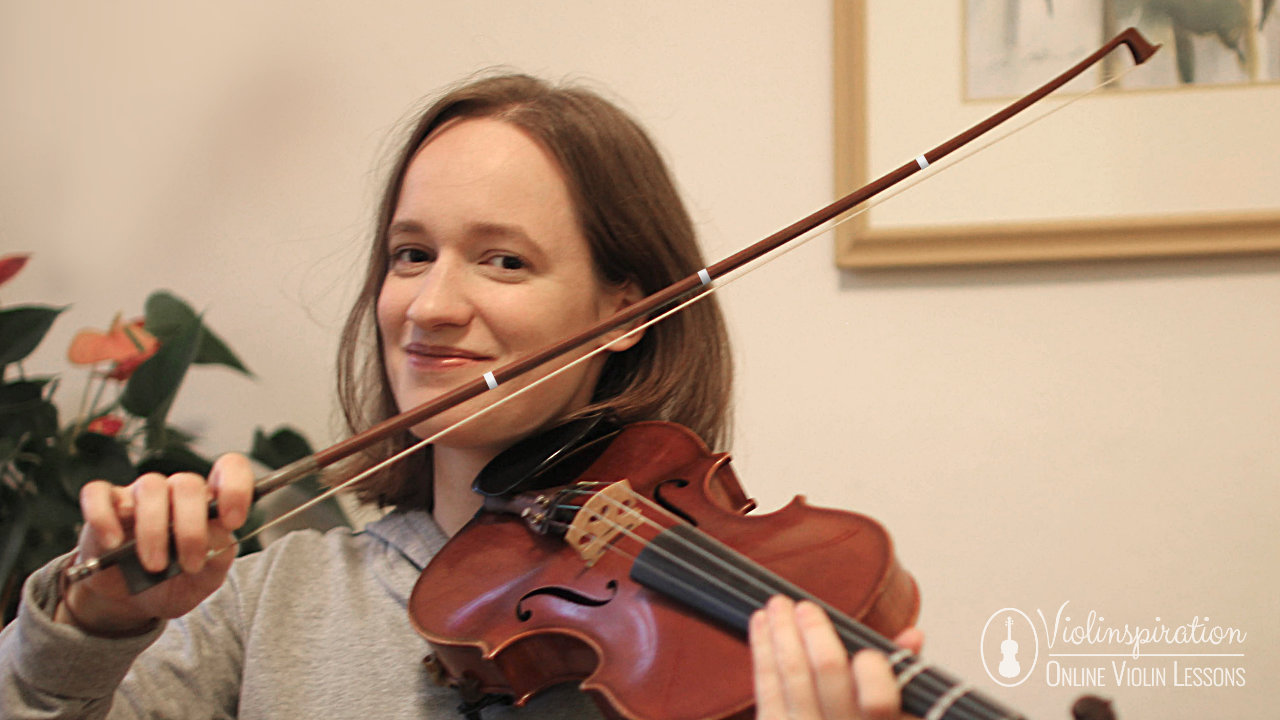
The bow should move parallel to the bridge, around the middle between the bridge and the fingerboard (a bit closer to the bridge though). But how to keep the bow from moving a bit to the side?This is very important, as it affects your tone and your bow flexibility. There’s nothing better to do than practice just open strings and long bow strokes. You can do it with a simple melody as well, however, playing something as simple will let you focus on the straight bow stroke.When the bow is parallel to the bridge, it should look from your point of view a bit leaning away from you. So play in front of a mirror and check if your movement is correct. This can help you memorize how it looks when the bow is straight.
- Keep your fingers flexible
It is very important to have a good bow hold, as you change bow pressure during the various techniques you use but finger flexibility is noteworthy as well.You can practice it by keeping your bow in the playing position and extending your fingers as much as possible. You’ll have to do that with all your fingers and at the same time not lose the balance of the bow.Go with your fingers up and down as if you’re doing push-ups.A variation of that would be to enhance this movement slightly with your wrist. Move the bow like an up bow and a down bow, each time returning to the playing position.When you extend your fingers, they should be “glued” to the bow. Imagine that your fingers are nailed in the bow, so they can’t leave their place but they can do slight side moves.
FAQ
How can I improve my violin bowing?
You can improve your bowing by correcting your bow hold and practicing dedicated bowing exercises, such as long notes with attention to keeping the bow straight, playing in front of a mirror to double-check whether the bow is straight, playing with various dynamics, and practicing uneven bow strokes.
You can practice these exercises on a daily basis, as a warm-up before your regular routine. Some of them you can do even when you’re not practicing, for example, while holding a pen or a pencil.
How do you practice straight bowing on a violin?
You can practice straight bowing on w violin by checking very often in a mirror whether your bow is straight (or by recording a video). You can play long notes or simple tunes that you know well. Meanwhile, keep your hand and arm relaxed, without tension.
From your point of view, the bow might look a bit tilted away from you, so be sure to check with a mirror when it is actually moving in a straight line. If you’re already confident with using the bow, try out the Thibaud exercise.
Summary
One could argue that having a good sound is the most important aspect of playing the violin. To do that you have to master your bowing technique, control any small movement your hand does and what the effects on your sound could be.
Even small exercises help, even for advanced players, to get your mind focused on the control of the bow, and it’s a huge advantage that you can do some of the bowing exercises when you’re doing other things.
I hope that this post has helped you learn a few bowing exercises and I’m looking forward to seeing your improvements in our Facebook group (Julia’s Violin Academy members only).

FREE Violin Bowing Exercises
Improve Your Bowing Technique


